IO Admin Manual
Managing Backops With 3 Levels of Hierarchical Roles
IT Admin
An IT admin takes care of all the tasks for the company like managing the Backops Managers/Users. He can manage to Enable/Disable the grants provided on the Backops and various other tasks.
His actions include
- Create new user
- Create backops users/managers
- Manage backops users/managers
- Download MIS reports
- Edit product settings and manage grants
- Manage distributor settings
- Create flows
- Edit flows
- Assign flows to distributors
- View applications assigned to him
- Accept, reject, move the application to drafts
- Add internal notes
- Check the integration status of the application
- Re push application to KRA
Backops Manager
A backops manager manages all the backops users under him and also can go through the applications to make decisions on accepting, rejecting or moving the application to drafts.
His actions include
- View applications assigned to his backops users
- Accept, reject, move the application to drafts
- Add internal notes
- Check the integration status of the application
- Re push application to KRA
- Create Investor credentials
Bakops User
A backops user goes through all the applications and documents provided and decide on accepting, rejecting or moving the application to drafts.
His actions include
- View applications assigned to him
- Accept, reject, move the application to drafts
- Add internal notes
- Check the integration status of the application
- Re push application to KRA
The Backops Admin Portal allows Customers to manage and view the applications which are submitted, the status of the applications, what is the progress, how many applications are being submitted and other important reports. In order to Securely login on the Backops Portal use the Customer Login Credentials.
Feature Description
The creation of different roles in investor onboarding allows investors to simplify user management in organization with delegated administrators to manage users in specified roles and all subordinate roles.When one level of the hierarchy makes a decision and instructs the next level, objectives are clear and things tend to get done efficiently. The defined structure also helps the decision makers be clear and responsibility gets delegated effectively.
Backops Admin plays a major role here.
Backops Admin
An admin is responsible for managing the Backops Managers/Users, settings for distributor grants, other integrations and configurations
His responsibilities include

Settings
The settings feature will allow you to access various other functionalities like Create Investor, Create Backops Admin, Manage Backops user, Distributor Settings, MIS Report, Edit, Integration.

Create New User
- This functionality will allow admin to create a new user to perform the Onboarding journey on Signzy’s frontend platform.
- The parameters required to Create Investor are Name of the investor, Username(create a unique and lowercase string), Email of the investor, Mobile Number of the investor etc.,
- The username and password to login to the onboarding application will be created along with the four Login URLs : Web Login URL, WebAuto Login URL, Mobile Login URL, MobileAuto Login URL.

Create and Manage Bakops Users
- This Section will display the list of all the Backops Users created along with their details like Name, Username, Email, Employee Code, Current Pending applications(numbers).

Round Robin Distribution of Applications
A round robin assignment rule allows us to randomly distribute new applications without having to manually assign them using a rotation
The functionality of assigning applications in backops to each Backops user works on Round Robin Distribution. Whenever new applications are submitted based on their status currently active, then those will be distributed accordingly.
Feature Description
- To assign the application fairly, a round robin scheduler generally employs time sharing, giving each backops user a time slot or quantum to go through the applications.
- Backops Users should be assigned with time slices to process the application in equal portions and in a circular order.
- They should handle all the applications without priority from their side.
- Backops Users need to take an equal share of each and every cycle of distribution in turn.
- If the user terminates or changes the application process state to waiting during its attributed time, the scheduler selects the first process in the ready queue to execute.
- Without any logic any backops user can be assigned to any application.
- Backops users cannot expect the application scheduling in the overall process.
- At the application submission time, users can be randomly assigned with a number of applications according to the Received submitted applications.
- There are no such rules and schedulers need to be followed for such kind of distribution.
- Availability of users needs to be checked before assigning the application.
Rule Based Assignment of Application
This can be based on any variable being assigned to one user.
Reassignment of Applications
- Option to Reassign applications is available under Manage Backops users for the Backops manager or IT admin where they can view the list of pending applications under each Backops User.
- Reassign option under each Backops user will allow the Admin to view all the applications pending under the Backops user along with the details like name, merchant id, Onboarding date and time.

- Admin can select the applications and reassign them to another Backops user from the list of Current Active Backops users. They can also Reassign all the applications using the option Reassign All Applications.

Reassignment Scenarios
- Unavailability of the backops user / user status is Currently Inactive / user is on leave.
- Automated assignment frequency.
- Equal distribution of applications.
- Admin can take the decision on the number of applications that need to be reassigned.
Create and Manage Backops Manager
- This Section will display the list of all the Backops Users created along with their details like Name, Username, Email, Employee Code, Current Pending applications(numbers).


Download MIS Report
- These Reports will give overall information for each KYC application like Date of Creation and Submission, Merchant id, PAN, Address, Name, Email, Status, Auto Login URL, Draft and Rejection Reason and Distributor’s name under which the applicant was Onboarded.
- The MIS Report can be downloaded with either All variables or Custom Variables by choosing from the list available.

- The MIS Reports can also be downloaded in Date Range by selecting any one the available options - Daily Report, Weekly Report, Monthly Report, Custom From and To Date.

Manage Distributor Settings
- This section allows the Admin to Create a KYC Flow for each Distributor. The Create New Flow option allows the Admin to Name the flow and choose the Grants.
- The Admin can choose the Sections required for the KYC flow, Documents for POI, Documents for POA, Documents for CPOA,Signature Creation Methods, Skip functionality, Enable/Disable Captcha, Aadhar Field, Bank Address, Annual Income, Place of Birth and Save this setting.
- The list of all Distributors, Total no of applications, Date of Enrollment and their respective flow for KYC that can be chosen will be displayed.
- The Search field helps to find a particular Distributor.


Edit Product Settings and Manage Grants
- The Edit feature enables the Admin to Edit/Configure the grants provided to the Customer.

Classification Criteria
- For Safe, Uncertain,Risky will be categorized based on the selection of classification criteria (Pending/Accepted/Rejected) the applications will be moved to the appropriate buckets in backops portal.(Eg. Safe as Accepted- Then all safe applications will be shown in the "Accepted" tab).


Change Call Back URL
- Change Call Back URL to be used once the process is completed by the applicant or whenever the status of the application changes for which data can be posted on the callback url.

Page Call Back URL
- It allows to set CallBack URLs for each step like POI, POA, CPOA, Fatca, Signature, Photo and video capture, contract and OTP Verification.

Proof of Entity
- The Proof of Identity, Proof of Address, Proof of Correspondence Address settings enables you to Choose the Documents proofs(PAN, Voter Id, Passport, Aadhar Card etc) which the investor can upload for each of these steps.


Whenever a user doesn’t have the physical copies of their Documents so the Aadhar Digilocker, PAN Digilocker and DL Digilocker are available for users to Login on Digilocker and fetch their Documents.
Institution Name and Code
Institution Name and Code information to be provided for the KRA service/system. Employee IPV Details of one of the employees from the Customer.


Password Customizations
This feature allows the Backops users, IT Admin, Creator user agents to timely update their passwords ensuring authorized access at all times and this feature would also help incase their passwords are compromised.
- On creation of Backops users and Creator Users an auto generated Password will be sent over email to them for first time Login.

Reset Password on First Login
Automatic alert to change the password on First Sign-in of the Backops Admin and Creator User allowing them to have a password of their Choice.

Disable Multiple Sessions for Backops Users, Merchant, Backops Admin, Creator Users, Distributor Backops and Distributor Admin to restrict them from logging on multiple devices simultaneously.

Auto Reassign on Inactive Backop User
To enable auto reassignment of all pending applications on first enable button and auto reassignment of applications assigned to Inactive status of backops status for enable on Inactive application button.

Password Management
To manage and lockout the account after n number of failed login attempts and set time for how long the account must be locked.

Closing Message on Submission
- Closing message on application submit to configure the closing message and header on the final page after the applicant has submitted the application.
Configurable Automated Merchant Submission
- Customers can now opt for Automated Merchant Submission as soon as the users finishes the final stage of KYC journey to reduce the dropout percentage.

KRA Integration Configuration information like username and password for KRA integration.

- Auto-push to KRA on Accept Enable this setting in order to push the application to KRA upon being accepted by Backops Admin/User.
- MIS Bi-Hourly Report enables the Admin to set up an email id to which the MIS Reports will be sent every hour.
- Video Iframe customization - Allows to enable/disable Video OTP, show ID card, custom Text

- AMC Details - Can use AMC code if we have
- Related Person Details(Declaration Step) to enable/disable this section from Fatca/Declaration step. Session Time out feature to configure session timeout due to inactivity on URL, time out in seconds and countdown in seconds has to be configured if enabled.

- Contract Page Delay can be enabled to allow a preview time once the generated Contract has been Signed in order to allow the applicant to Download/Preview the Signed contract.
Rich Text Editor
Added for Main Page Consent Text for enabling hyperlinks and customized text for giving TNC


Consent Content
- Signzy Signature Consent to display Signzy’s signature Consent checkbox on the Signed Contract PDF.
- Aadhaar Consent Allows to edit the text in the aadhaar consent page
- Offline Aadhaar Consent for customisable consent text box for Offline Aadhar.

- Save for Later Enable/Disable option for saving the data to allow the users with a capability of drop off in case they wish to discontinue or submit the application later where they can click on save for later button.
- Captcha Enable/Disable for captcha verification before the KYC journey starts.

Offline Aadhar Day Validation can be set from our Backops
When set to true the user will not be able to proceed to the next step if the uploaded Aadhar XML is older than 3 days for POI, POA, CPOA.

In offline Aadhar, the error message to be displayed to Investors exceeding the validity period can be customized in Backops.
Aadhar XML
In Aadhaar XML UID field to be displayed or not is now Configurable

- Signature Creation Methods will allow the applicant to Draw Signature, Upload signature, use a Font Based Signature for Signed Contract PDF.
- SKIP/BACK Button Required to be used to allow an investor to skip everything, no skip, skip with restrictions throughout the KYC journey.

- AADHAAR FIELD MANDATORY, MOTHER’S NAME (PERSONAL INFORMATION), BANK ADDRESS, PLACE OF BIRTH, Annual Income (FORM SECTION) to show/hide these fields in the forms section and can be made mandatory/non-mandatory.

- Related Person Details(Declaration Step) to enable/disable this section from Fatca/Declaration step. Session Time out feature to configure session timeout due to inactivity on URL, timeout in seconds and countdown in seconds has to be configured if enabled.

- Investor Dropout Settings to enable a dropout mail trigger to the investor by specifying the dropout time in minutes.
- Once the application has been submitted by the applicant you can redirect them to your website by specifying the Redirect URL on CHANGE REDIRECT URL.
- Enable/Disable Backops session Timeout

Enable/Disable the Move to Pending Button
- Whether backops admin should be allowed to move an accepted/rejected application to pending is now configurable.

Configurable SMS and Email
- Customers can enable Automated SMS and Email notifications to Investors which contain the link and credentials to securely start their KYC journey.

Enable/Disable Keycode Events
- Configurable Disabling Right-click all such keycode events(shortcuts like F12, ctrl+u, etc..) to block inspect, console, and all other context menu options of the browser for blocking the download/save options.
Auto Login URL Settings and Aadhar E-sign Context
- Expire Auto login URL feature allows Backops user to configure when, at a maximum seconds of time limit the Auto login link must be expired.
- Aadhaar Esign consent allows to edit the context
- Added linguistic feature for Aadhaar e-sign consent

Geo Location Information in Backops
- Enhanced Logic for geoLocation recording for higher accuracy and handling error scenarios.
- The priority is shown below:-
- Geolocation from latitude and longitude collected from browser
- If Geolocation is disabled then collect IP from the end user frontend
- Then based on above data get city,state and other geolocation parameters
- On Backops the Longitude & Latitude, Complete Address will be visible under the GeoLocation section of VCIP
- Longitude and latitude details will be visible under the Due Diligence section for IO applications.
- User OTP Verification is a grant based feature when enabled the customers can configure the Email and Mobile OTP verification. The enable Prefill Data for mobile or enable Prefill Data for Email will fetch the prefill Mobile number or email address used in Create User/Investor. User OTP Verification Attempts to be set up to configure the number of attempts to verify OTP can be allowed for a user. The default count is set to 3.
- Conditional field for maiden name - Hide/show options
Merchant Session timeout to configure session timeout for each applicant whenever there are ideal on the Video KYC journey
- Timeout Time (In seconds) - User will be logged out after the configured interval
- Timeout Countdown (In seconds) - Countdown time shown as estimated time before logout
- Continue Session Dialog (Grant based)
- If Required - Continue Session Dialog Timeout (In seconds)
- Not required
- Session Timeout Redirect URL - Redirect the user to the redirect URL after the session timeout
- Session End Message

Digital KYC in Regional Languages
Now you can use our Linguistic feature for Onboarding journeys on Web and Mobile and build a personalized experience for your users by choosing the language of your choice from English, Hindi, Bengali, Kannada, Marathi.

How to Configure More Languages
- All these language options can be configured from the Backops Edit Section.
- A default language can also be configured from the Backops Edit Section.
- Linguistic Configuration for Distributor custom flow settings
- You can dynamically pass a default language in the Create Investor API.

- You can dynamically pass a default language in the Create Investor API
- Action Button allows to show accept button on summary page when verification is true for IDs and video and Warning on browser
- Warn on Browser Action to enable a warning whenever user clicks back or close button during the KYC.

Make Our Platform Look Like Yours
Use Our Enhanced Color and Branding Customizations
This feature allows the Customers to customize Signzy Web Platform based on background color, font color etc as per their Choice based on their Organization/Brand theme.
To enable/disable Custom UI options as below from HEX color Code
- Main Heading Color
- Sub Heading Color
- Instructions Color
- Input Label Color
- Input Text Color
- Input Outline Color
- Input Outline Focus Color
- Input Background Color
- Radio Button Color
- Checkbox Color
- Button Background Color
- Button Hover Color
- Button Text Color
- Card Color
- Card Focus Outline
- Skip Button
- Stepper Button Color
- Stepper Pending Color
- Stepper Done color
- Arrow color
- Placeholder color
- Button disable color


The Logo of your Brand can be uploaded to be displayed on the application during the KYC journey.

Customers Can Now Use Their Own SMTP Server
When Interacting With End Users by Sharing Their SMTP Credentials
The feature is to Configure the client’s own SMTP Server to send email notifications and alerts whatever were triggered from SIgnzy’s SMTP server for all emails sent to customers and end-users during the whole onboarding process.

Integration Dashboard
- In the Integration tab you can view all the applications which are pushed to KRA after being accepted by Backops Admin/User.
- For each application the merchant id, date it was pushed to KRA, Response, username, and the status(success/failure) will be displayed.
- The provided filters are Date and status(Success/Failed/All), KRA Name, Application Status(Accepted/Rejected/Pending/Redo).
- If an application gets a failure response and you wish to Re-push the application to KRA, then select the application(s) and click on Re-run.
- The Search field is available to search an application by Merchant Id.

Reset Password
The Forgot and Reset password option has been added for Backops IT admin,Backops Admin, Creator Users, Distributor Dashboard and Distributor backops Users allowing them to reset their passwords without any hassle.

Summarized View of the Submitted Application
View Applications
- You can view applications based on the current status of them after submission by the applicant.
- The application status has been categorized in 4 statuses: Pending, Accepted, Rejected, Redo(Draft). The application under “Pending” status reflects that it has been submitted by the applicant and is pending to be reviewed by the Backops user.
- The applications under “Accepted” status reflects that it has been reviewed by the Backops User and has been accepted to be pushed/inserted to KRA for KYC registration.
- The applications under “”Rejected” status reflects that it has been reviewed by the Backops User and has been rejected due to incomplete/incorrect data filled by the applicant.
- The applications in “Redo” status indicates that the Backops user will allow the applicant to Resubmit the application if there is scope of correction in the application submitted by the applicant.
- All the applications combined of the various status can be Viewed under “All”. The numbers mentioned across these Status are the number of applications for each status.

Filter By
- This Filter by feature will allow the Admin to filter the applications submitted based on the Distributors and AMC.
- The Admin chooses any Distributor’s name(s) and the applications submitted under those Distributors will be displayed.
- If the Admin chooses AMC then applications submitted under the AMC will be Displayed.
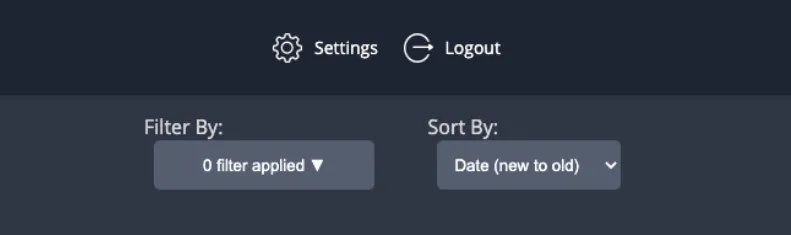
Sort By
The Sort by Feature allows the Admin to sort the applications by date(new to old) i.e., newest applications will be displayed on the top and similarly sort applications by date(old to new) i.e., oldest applications will be displayed on the top.
Search
The search functionality will allow you to search an application by Name, Email, and UIDs like PAN, Merchant Id. You can also choose the status for which you are searching the application for.

View Details
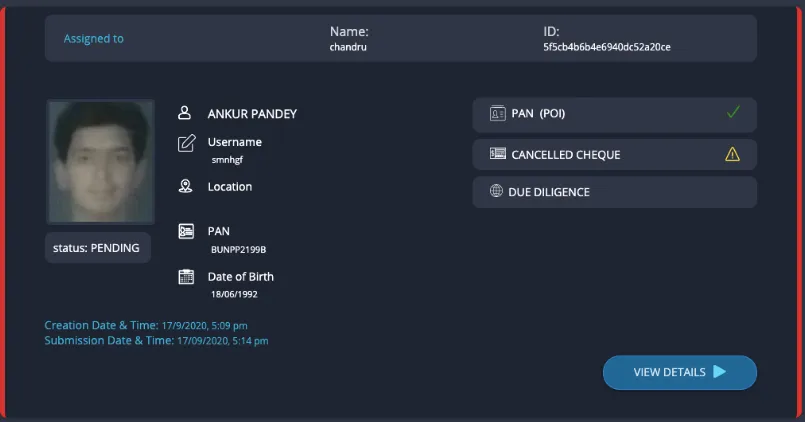
- This functionality is available on the summary page of the application and it is applicable for each application in order to view the details provided by the applicant.
- You can also view the distributor name under which the application has been submitted and also view the Backops user assigned to review the application.
- The creation and Submission Date along with time is also available. Upon clicking the “View details” you can view the details of the application which has 7 sections.
In Detailed View of The Submitted Application
Data and Document
- This section provides the document uploaded for each step POI, POA, CPOA, Signature and Photo.
- For Proof of Identity(POI), Proof of Address(POA) and Correspondence Proof of Address(CPOA) it displays the data from the documents like Name, UID, address, date of birth, date of issual, date of expiry etc.
- It gives the verification result as well as the text match result(Match, Partial Match, No match) by comparing the date filled and data on the document uploaded.
- DigiEye Score is also displayed for these sections. We have also given zoom and rotate functionality inorder to zoom in, zoom out and rotate the document.

Cross Verification of The Customer Details and Comparison of The Uploaded Documents
- This section will allow us to compare data from 2 different documents and give the match result(Match, Partial Match, No match).
- The name match result and Date of Birth result from POI and POA. You can also upload 2 different documents and compare them.

Customer Data Due Diligence Checks
- The Due Diligence section provides data by performing various checks like AML check, Sanctioned Check, Digital check.
- It also provides the information based on the Social Media handle(if provided by the applicant), the GEO location of the applicant and the browser data of the applicant performing the KYC.

Image Analysis of The Uploaded Video and ID. Also, Face Match and Audio Match Score
- The Forensics section displays the POI Image and Video recorded by the applicant,
- The backops Admin can play the video and match the face from the POI image to ensure the investor themselves perform the Video Verification.
- The Forensics analysis based on the face match and audio match is displayed in this section like Face match score, Audio Match score, Pre recorded risk, Static Risk, Coefficient of Verification.

For VCIP journey the Call start time and End time can be viewed in the Forensics Section. The VCIP Admin details under which the application is created are also available.

Overview of The Customer Data Filled in The KYC Form
The Forms section displays the data filled by the applicant in the KYC data step which includes applicant’s information like Gender, Place of Birth, Annual Income, Occupation, Father’s/Spouse name etc. It also includes the FATCA information provided by the applicant.

View of the Contract Generated, and Smart Signed by the Customer
The Contract section will display the digitally Signed Contract PDF generated from the application submitted by the applicant.
- The Contract can be signed in two methods, normal E-sign and Aadhar E-sign.

Application Accept/Reject/Move to Drafts
- Backops user can take a decision based on the data verified by him to either accept/reject/move the application to drafts.
- Backops user can select from the list of pre defined reasons for the application or write his own reason for the same and take action on the application.
- At the bottom of the Contract section the Admin can see three buttons which are Accept, Reject, Move to Redo inorder to take an action on the application.

Internal Notes
- In this section you can view the notes added by the Backops admin/user.
- It will also Display the Rejection reasons for the rejected application and Redo reason for applications moved to Redo along with the name of the Backops user who created the note and date of creation.
- Add new note button is provided to add additional notes.

Dashboard
- This feature on the Backops will allow the Admin to have an overview of the total number Onboardings based on month, week or day.
- You can also generate an Onboarding Report by choosing Days, Week, Month, Custom dates. The total verified Onboarding percentage will also be available.
