---
title: Windows Web: Prod and Preprod
slug: contract360/N-xM-windows-web-prod-and-preprod
createdAt: 2024-10-29T06:33:49.979Z
---

# Introduction

This document aims to provide comprehensive guidance for performing the **Fingerprint signing&#x20;**&#x77;ith the help of the **Mantra MFS110 L1&#x20;**&#x64;evice in the **Windows web browser&#x20;**&#x77;ith **CDSL&#x20;**&#x61;s the Esigning Service Provider (ESP) in both the **Production&#x20;**&#x61;nd **Pre-Production&#x20;**&#x65;nvironment.

## Contract Signing In Production Environment:

### Prerequisites Required:

Below are the prerequisites required to perform the Aadhaar-based fingerprint signing in the production environment with the help of the Mantra MFS110 L1 device.

1\. **MFS110 Driver**

2\. **MFS110 Windows RD Service**

3\. Mantra Biometric Device L1 **(MFS110 L1)**.

Below are the steps required to set up the above-mentioned drivers to perform the signing.

### Steps to Follow:

**Step 1: Visit&#x20;**&#x74;he Mantra official website to install the drivers [https://www.mantratec.com/Download/User](https://www.mantratec.com/Download/User). Select the product category “Authentication Device- Aadhar” and select the “MFS110 L1”.

![Mantra Website](https://api.archbee.com/api/optimize/qSNGjc2nDdmTfGm_rfzKG-VmgaAPiIPaEp7Ipm_vhN3-20240807-170811.png)

**Step 2:&#x20;**&#x43;lick on the driver and download the “**MFS110 Driver**”. **Double-click** on the downloaded file. The installation process will start.

![Installation Interface](https://api.archbee.com/api/optimize/qSNGjc2nDdmTfGm_rfzKG-Sy7qmuu1D4olXti-G1dxT-20240807-170941.png)

**Step 3:&#x20;**&#x43;lick the “**Install**” and the installation process will start. Once the installation is completed click on the “**Finish**” Button to complete the installation.

![Installation Interface](https://api.archbee.com/api/optimize/qSNGjc2nDdmTfGm_rfzKG-8zU_gd3TZhRXesIcrFflT-20240807-171054.png)

**Step 4:&#x20;**&#x43;lick on the “**RD Service**” and download the “**MFS110 Windows RD Service**”.

![Mantra Website Interface](https://api.archbee.com/api/optimize/qSNGjc2nDdmTfGm_rfzKG-lfREovnz6U-5Df4459tHX-20240807-171203.png)

**Step 5: Double-click** on the downloaded file to start the installation process. Click on “**Next**”. Click on “**Install**” to install the device.

![Installation Interface](https://api.archbee.com/api/optimize/qSNGjc2nDdmTfGm_rfzKG-Z-cUCMTvPRyBQ5cEwA4Fm-20240807-171416.png)

**Step 6:&#x20;**“Click on the “**Finish**” button to complete the installation of the MFS110 RD Service.

![Installation Interface](https://api.archbee.com/api/optimize/qSNGjc2nDdmTfGm_rfzKG-FqOgSYPWSAJOeh81_CDcj-20240807-171515.png)

**Step 7:&#x20;**&#x49;nsert the biometric device. The confirmation will appear at the bottom right side of the screen stating “**Device Attached**”.

![Success Message Interface](https://api.archbee.com/api/optimize/qSNGjc2nDdmTfGm_rfzKG-2lhJLADwDa542xeiPQD7E-20240807-171611.png)

**Step 8:&#x20;**&#x41;fter the above confirmation message a “**Framework is ready to use**” message will appear leading to the device ready to perform the signing.

![Device ready to use Interface](https://api.archbee.com/api/optimize/qSNGjc2nDdmTfGm_rfzKG-fXZSb6yTRuuAteGvcORU8-20240807-171719.png)

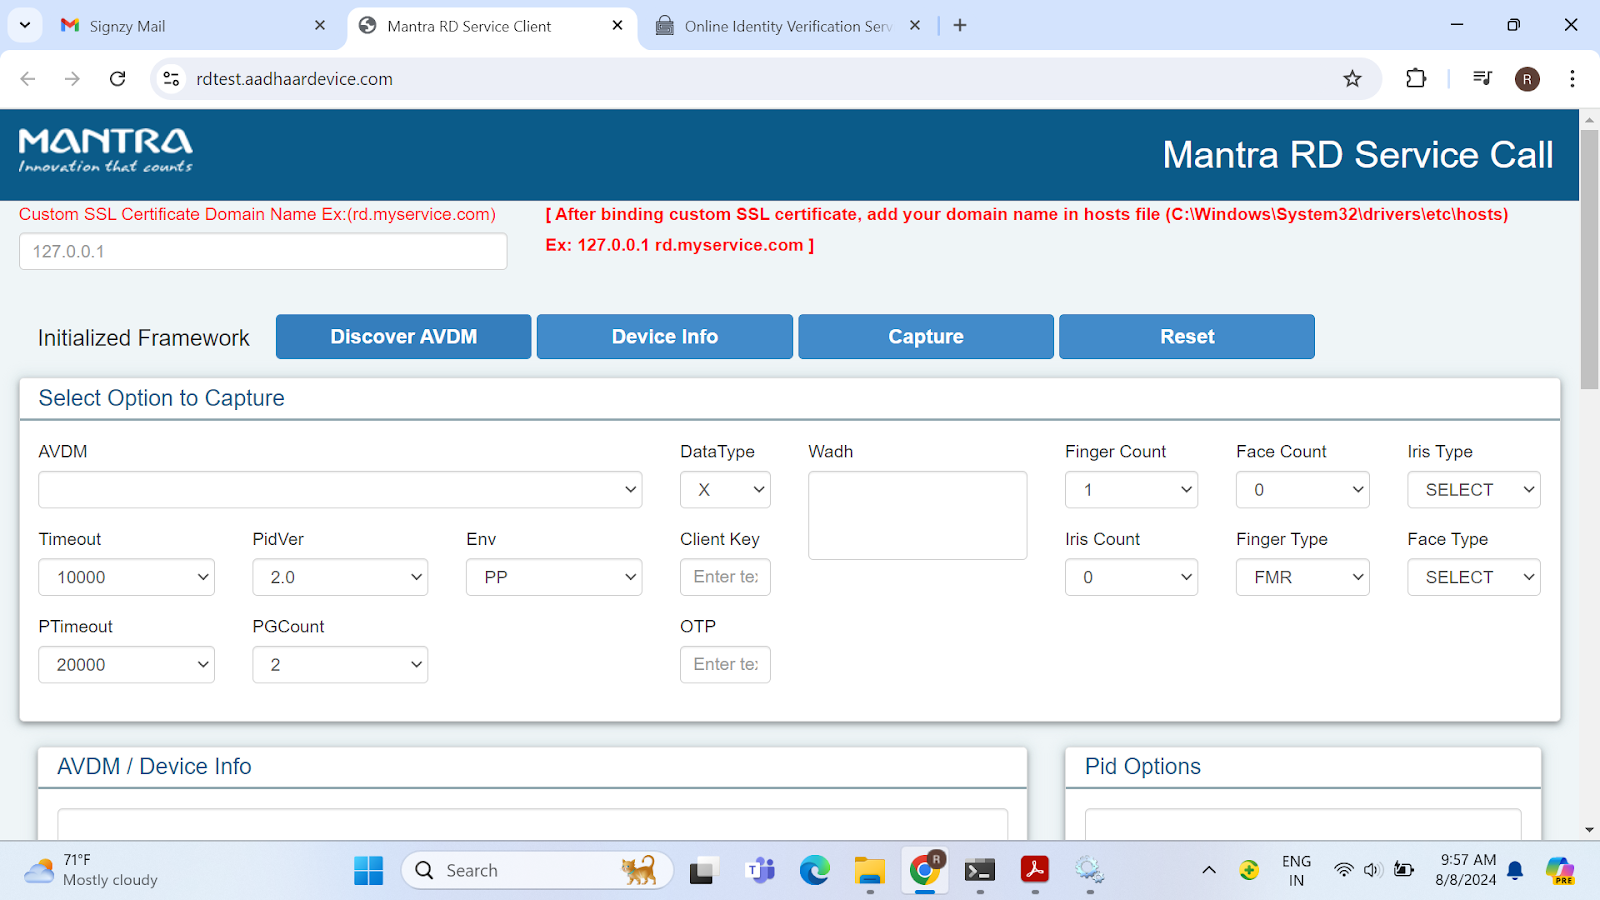
**Step 9:&#x20;**&#x4F;pen [https://rdtest.aadhaardevice.com/](https://rdtest.aadhaardevice.com/)<u>  </u>and click on “Discover AVDM”.

![](https://lh7-rt.googleusercontent.com/docsz/AD_4nXfPHN8aVi0XVhpd3PUdZ074MgWyTfLJlV4_hBI2yuatjGfYcCfq0VbyVrx3zvoiuW4WRWegrXAqIq4HRXpG2DdIiiZmUjPuZhiJGO8RQf9RXVwzjVnQktMtayAfdVHPBerR3UTieSJJdyQuSTU9-oerf_-q?key=nigJM-F9A59Nhnyna3tcIw)

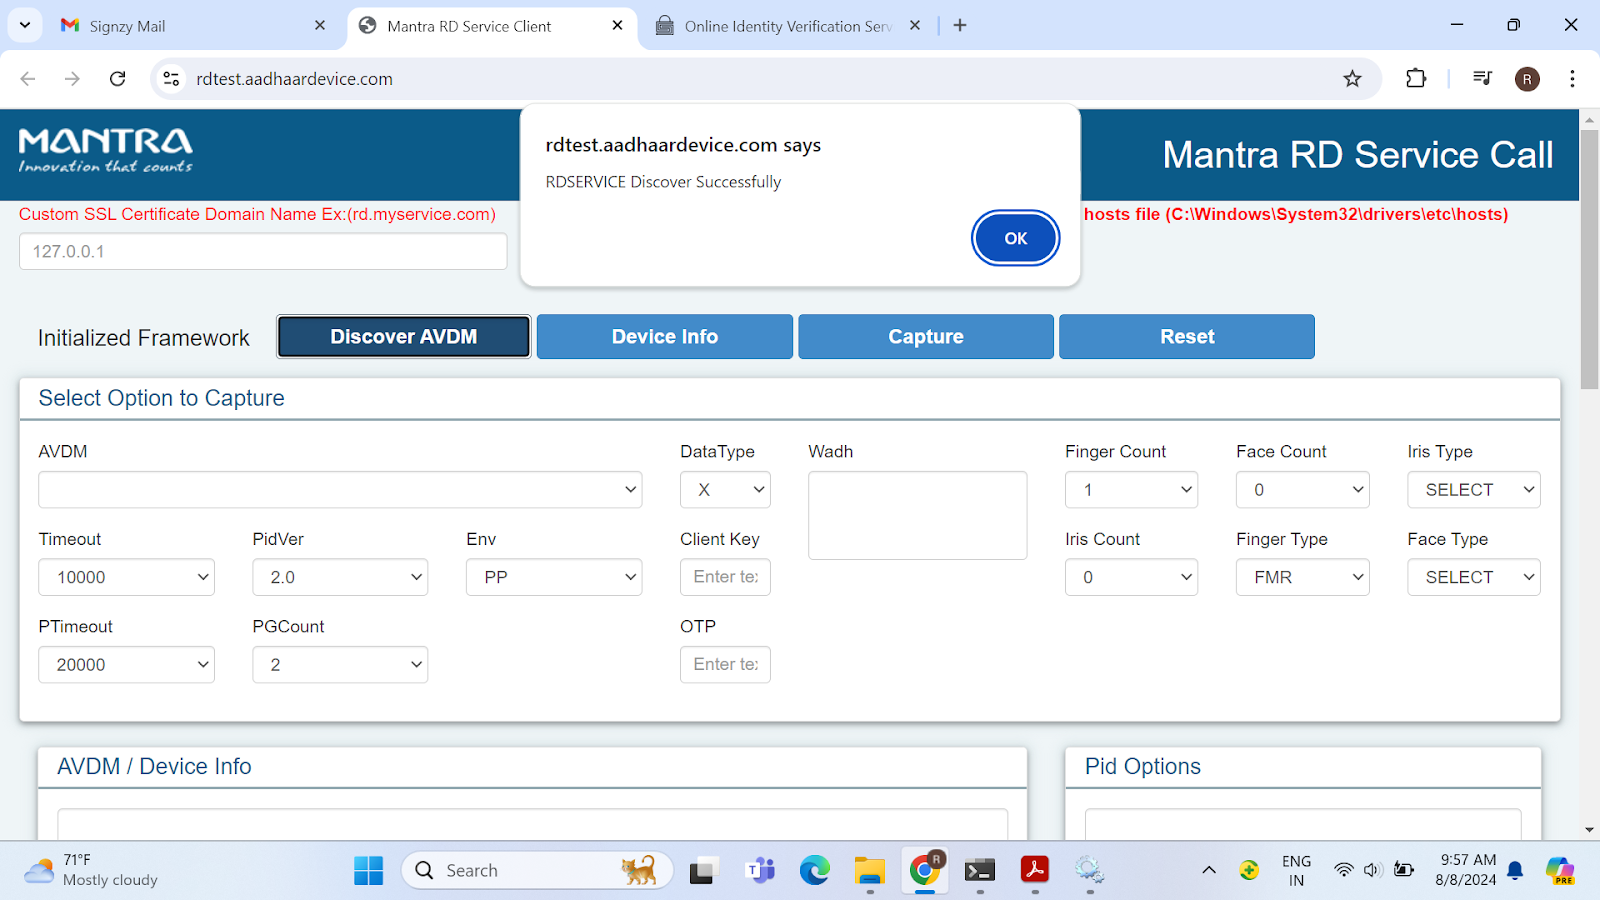
**Step 10:&#x20;**&#x41; confirmation message will appear stating “RDSERVICE Discover Successfully”. Click the “OK” button.
![](https://lh7-rt.googleusercontent.com/docsz/AD_4nXe3yjAfD9qxQ_xgPRV4ZuB29Y-naIqP8Xy97u6iAFTycKssBRi-77R0JwurUMHC1Qzl3ErtuBM9F50H_q6-a7eYQaSnDTyaJk50wR5kL46OXJQRLW3bgpfljiEO_PYx4zIzY91sm1-Dc3bdmVMTwUPmt0ZJ?key=nigJM-F9A59Nhnyna3tcIw)

**Step 11:&#x20;**&#x4E;avigate to the **signing link** sent to the signer’s email (provided while initiating the contract).

![Email Interface](https://api.archbee.com/api/optimize/qSNGjc2nDdmTfGm_rfzKG-8-gzz5rNjQRs5sTfzLctl-20240807-171844.png)

**Step 12:&#x20;**&#x54;he pre-verification page will open, where the user needs to perform verification using a one-time OTP. Click on the “**Get OTP**” button.

![OTP Verification Page](https://api.archbee.com/api/optimize/qSNGjc2nDdmTfGm_rfzKG-SYgydeXLvmC65q_PXfVGK-20240807-172002.png)

**Step 13:&#x20;**&#x54;he user will receive the OTP on the **email** provided during contract initiation.

![Email OTP Interface](https://api.archbee.com/api/optimize/qSNGjc2nDdmTfGm_rfzKG-FTl6tk6hOzw6pZMVFxx1Y-20240807-172121.png)

**Step 14:&#x20;**&#x45;nter the OTP received via email and click on the “**Verify**” button.

![OTP Verification Page](https://api.archbee.com/api/optimize/qSNGjc2nDdmTfGm_rfzKG-TIUJiqUDVvpV-xt0i7wpx-20240807-172223.png)

**Step 15:&#x20;**&#x55;pon successful verification, the user will land on the contract page. Click on the “**I want to sign**” button to proceed.

![Contract Page](https://api.archbee.com/api/optimize/qSNGjc2nDdmTfGm_rfzKG-eVZyHd0gT5LF30cd0Y9D0-20240807-172320.png)

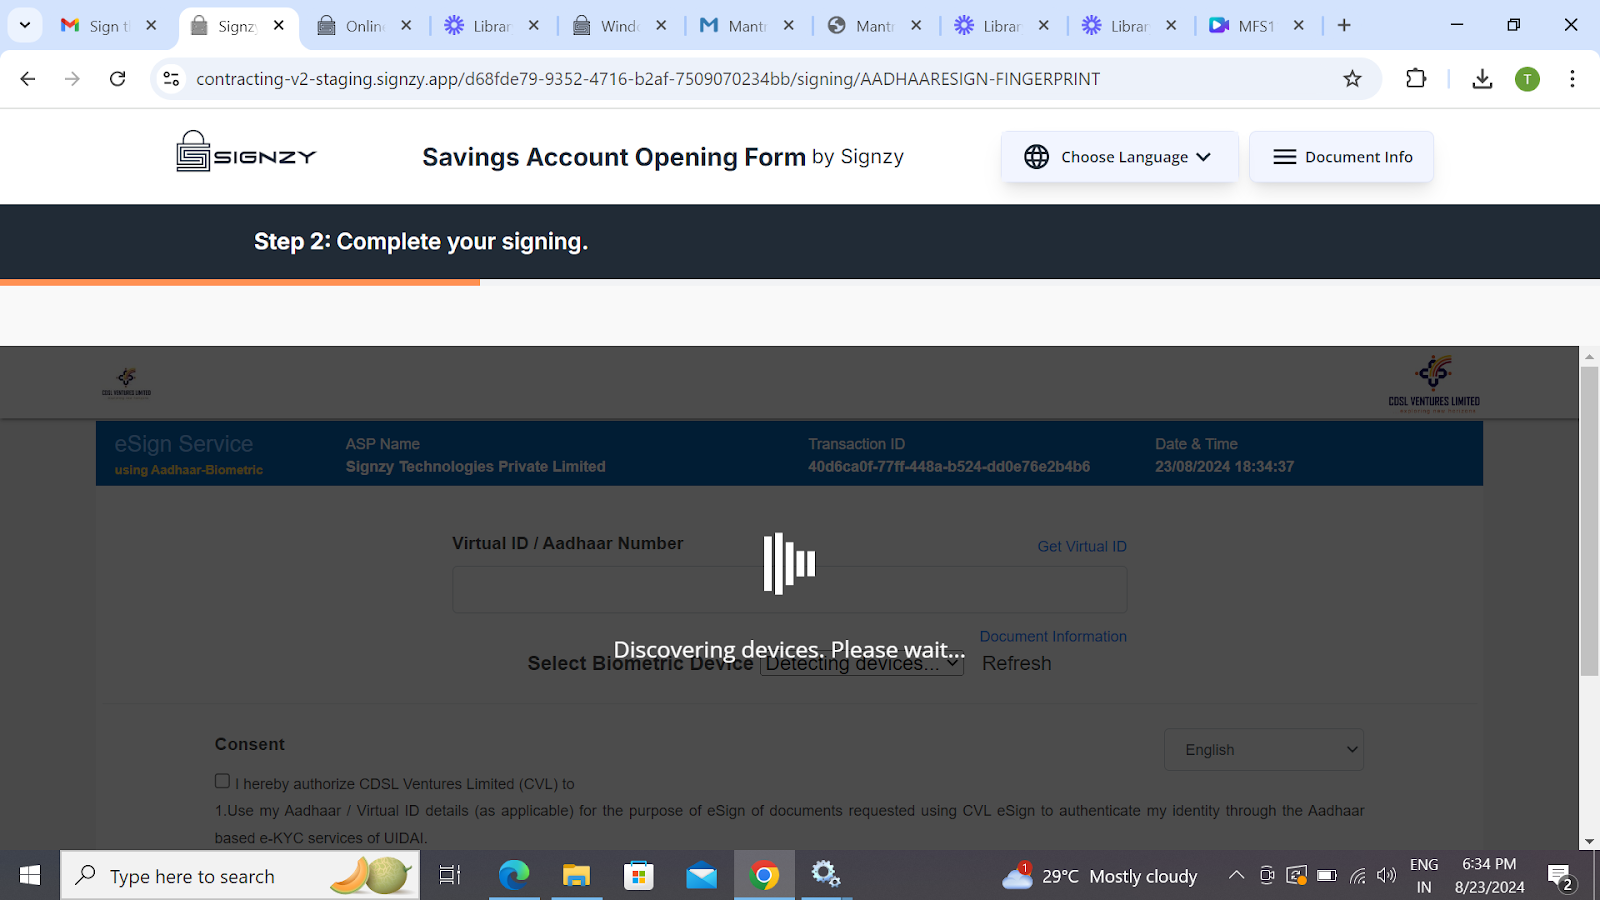
**Step 16:&#x20;**&#x54;he CDSL Interface will open, Please wait for a second. It will automatically discover the RD Service Installed on the device.
![](https://lh7-rt.googleusercontent.com/docsz/AD_4nXdDz-4YFrfTnuAupbDrmkrQ5KecpiWSC8_ng0poKACO8ztbdMGf_CA8O6Kt66lGUGDIH4CGCNZv5oY4Km2mXzdcqVUoRW_ziAQJ3SKQ3q9fSdWKmJIFVPWiMI7sLYJrvmhFtDUSnn-4RJMBogjo4dRKeG8Z?key=nigJM-F9A59Nhnyna3tcIw)

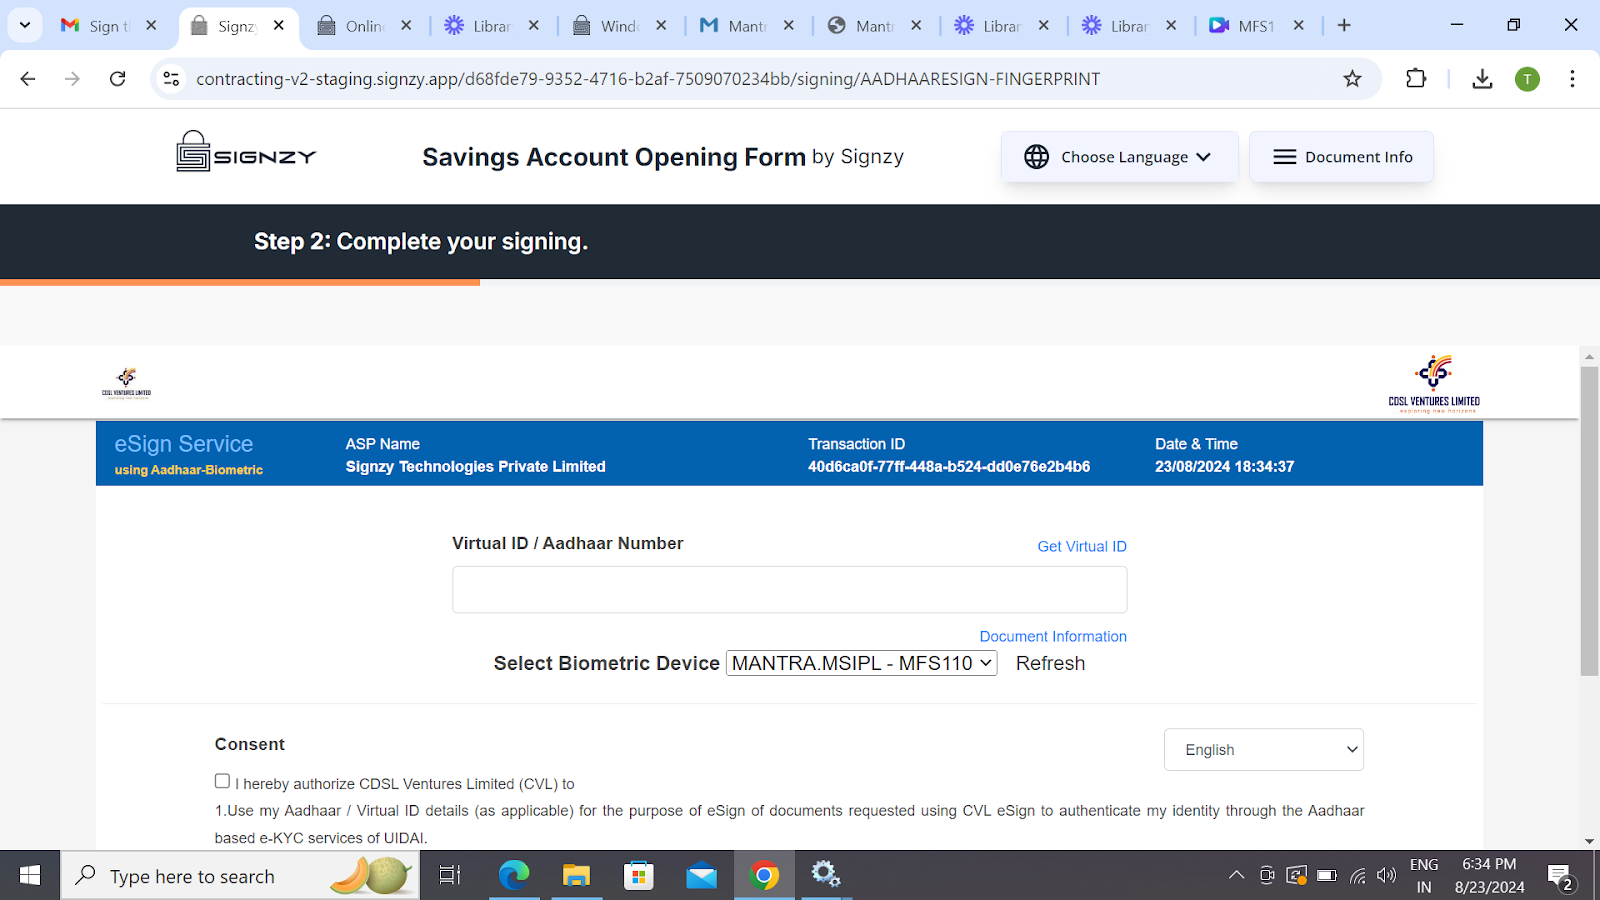
**Step 17:&#x20;**&#x4F;nce device discovery is completed. The RD service will automatically detected.
![](https://lh7-rt.googleusercontent.com/docsz/AD_4nXcJsf9ncOXE6biSOJK2QAG5b5PduZyG0VheLTf4fHqu6FTy_f0UhEI7bQt78mFkUiA_28DIK7LjQ6gK2aDsmxuiZS7YNE9h58Nq1ae1nzdhjGhWANa3g4_1dr8Unt1PfJlEBu6MlV8IEyhy3gkzNspC7FbE?key=nigJM-F9A59Nhnyna3tcIw)

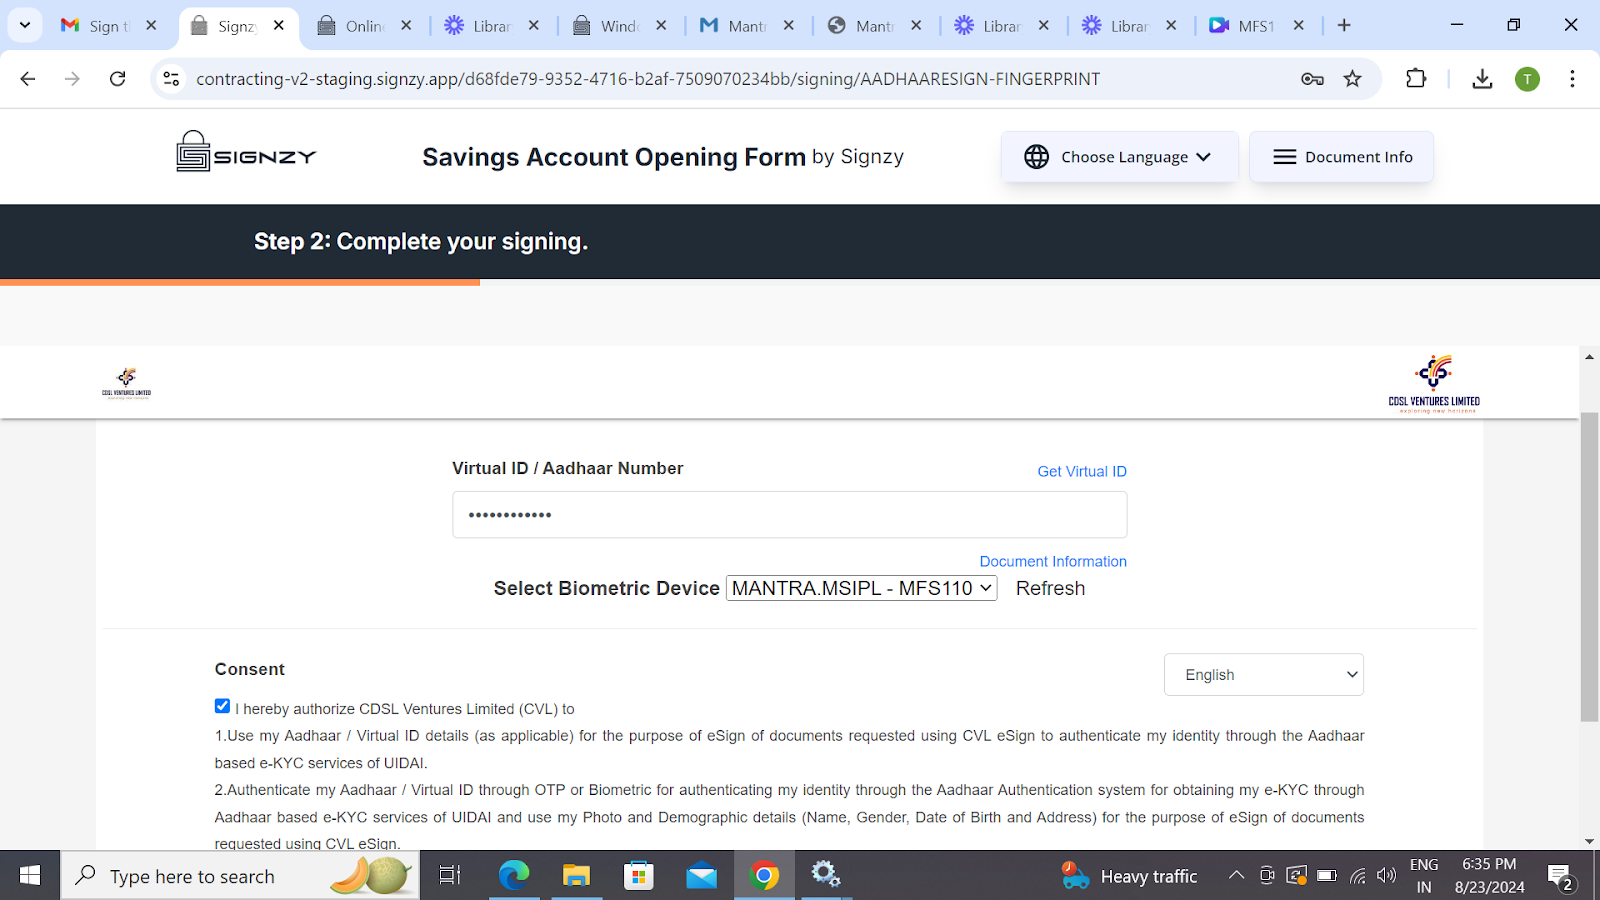
**Step 18:&#x20;**&#x46;ill in the Aadhaar Number. Tick the consent Box
![](https://lh7-rt.googleusercontent.com/docsz/AD_4nXdhWabk7Eq-hYmHUxYHBw3cCpEO5EYz1RkryMvtBmd4bVxw2e9BHTcucOWu7DkPvUiDv0On4o16EwpFNP7BUvJd5ocF4wzyxYdOenpW8kEdy8227EJWPvfCZeY-y55bYDGsdaEBuGF0XanurU_CKGoqrus?key=nigJM-F9A59Nhnyna3tcIw)

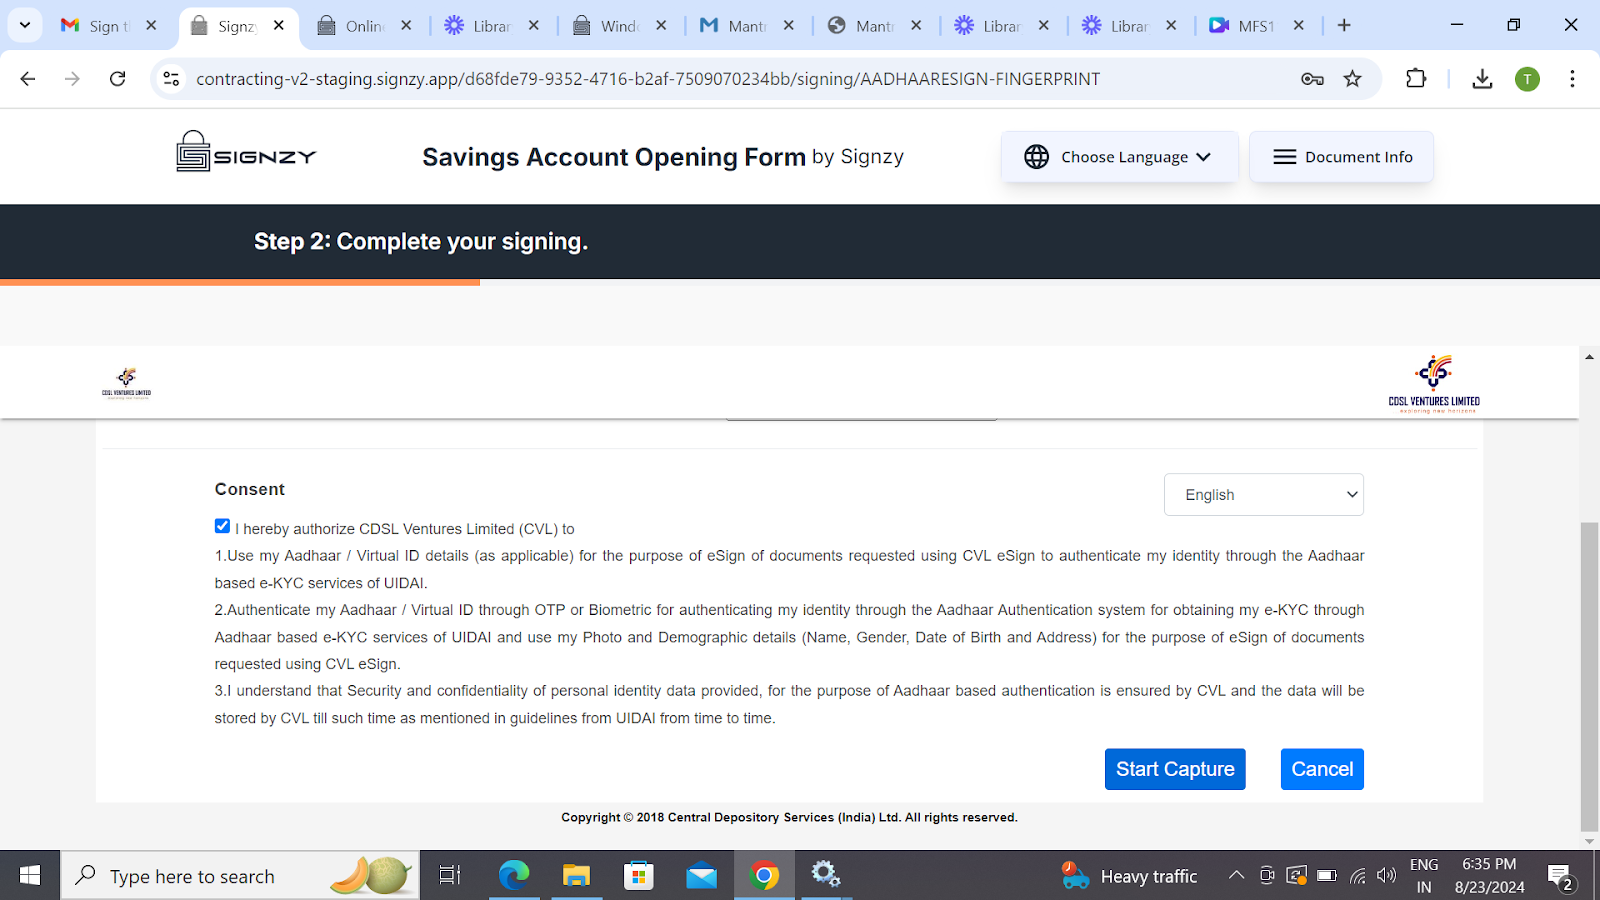
**Step 19:&#x20;**&#xA0;Click on the “Start Capture” button to perform the signing.
![](https://lh7-rt.googleusercontent.com/docsz/AD_4nXcQDjGLiEgg7oFIZbxyQLscmMNshcFCUV0hHvkGtITJi4YJR6Zo6Rt_3TfZ28Y5Qatpe-Ea-2ZMM0jw3xE-lg4CmhKCXJXVXp-8zy--Fz07_IhkdhjScnV-jSq_8_ZBFI3rrTuqlxifDUf25QPkXZdmj4iS?key=nigJM-F9A59Nhnyna3tcIw)

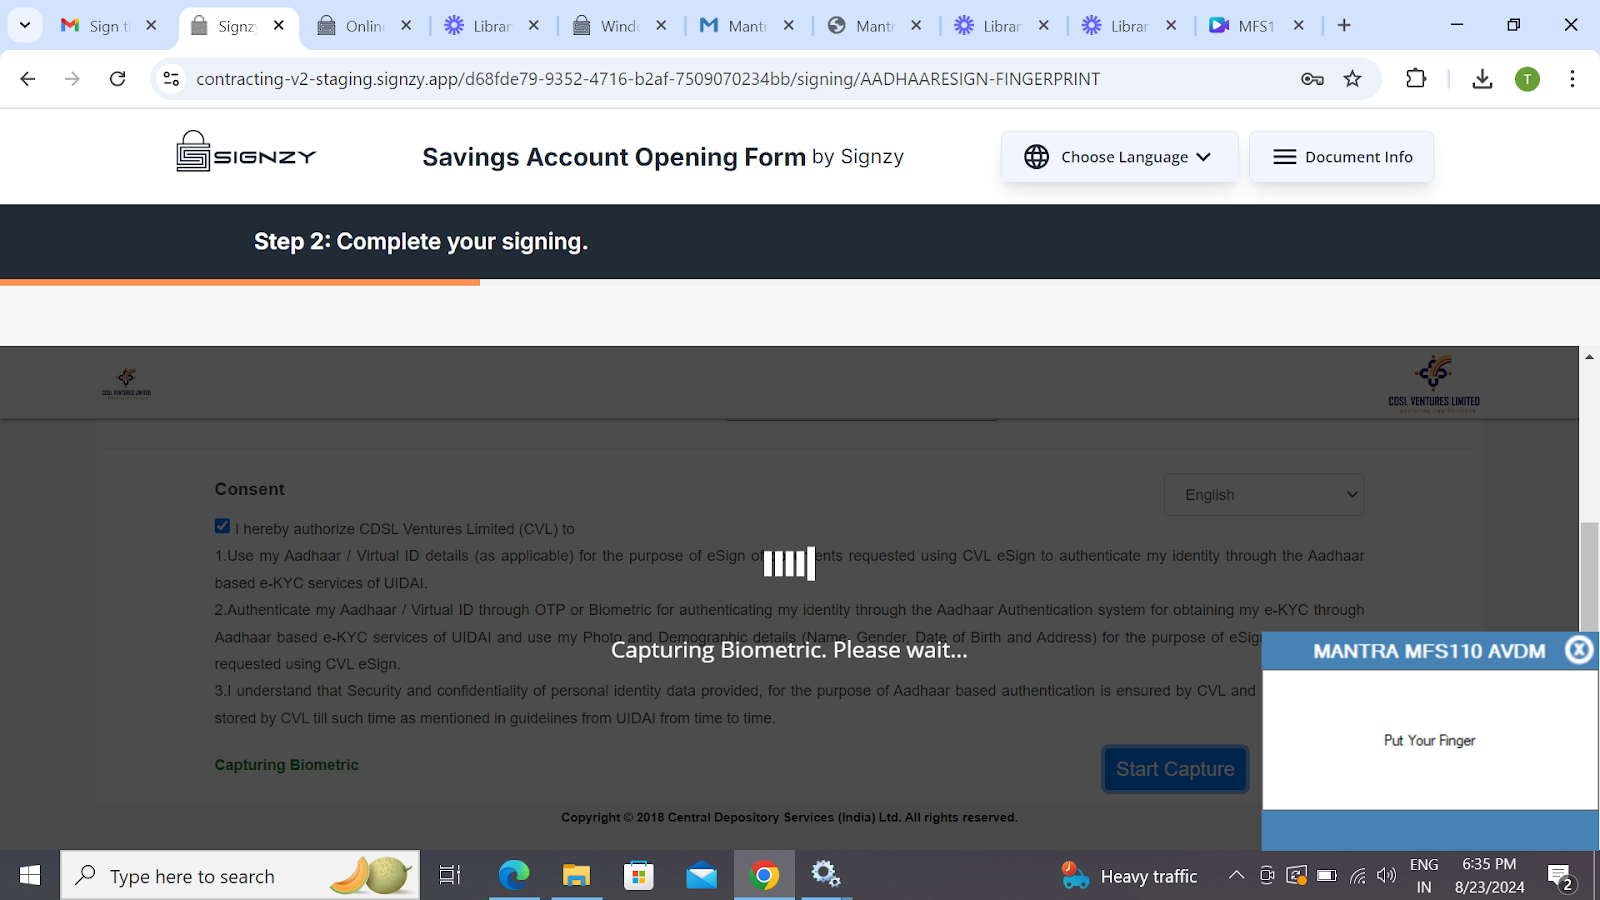
**Step 20:&#x20;**&#x41; notification will appear on the bottom left side of the screen stating “Put Your Finger”.
![](https://lh7-rt.googleusercontent.com/docsz/AD_4nXcfeotXuxlPO25Z15vsx78OFWlaSDHhaCIR2wqmCH9hKAjWxDvAVGxq2GItWRyTmOqnrQ5h8kcdBxwz9Xg3ygW9X5Hq1WRTrtK90HzQJNED3-sIDJAknBtLq_LORfCXQgGQnYqBReb9EQO59Qy-JB8tW4Y?key=nigJM-F9A59Nhnyna3tcIw)

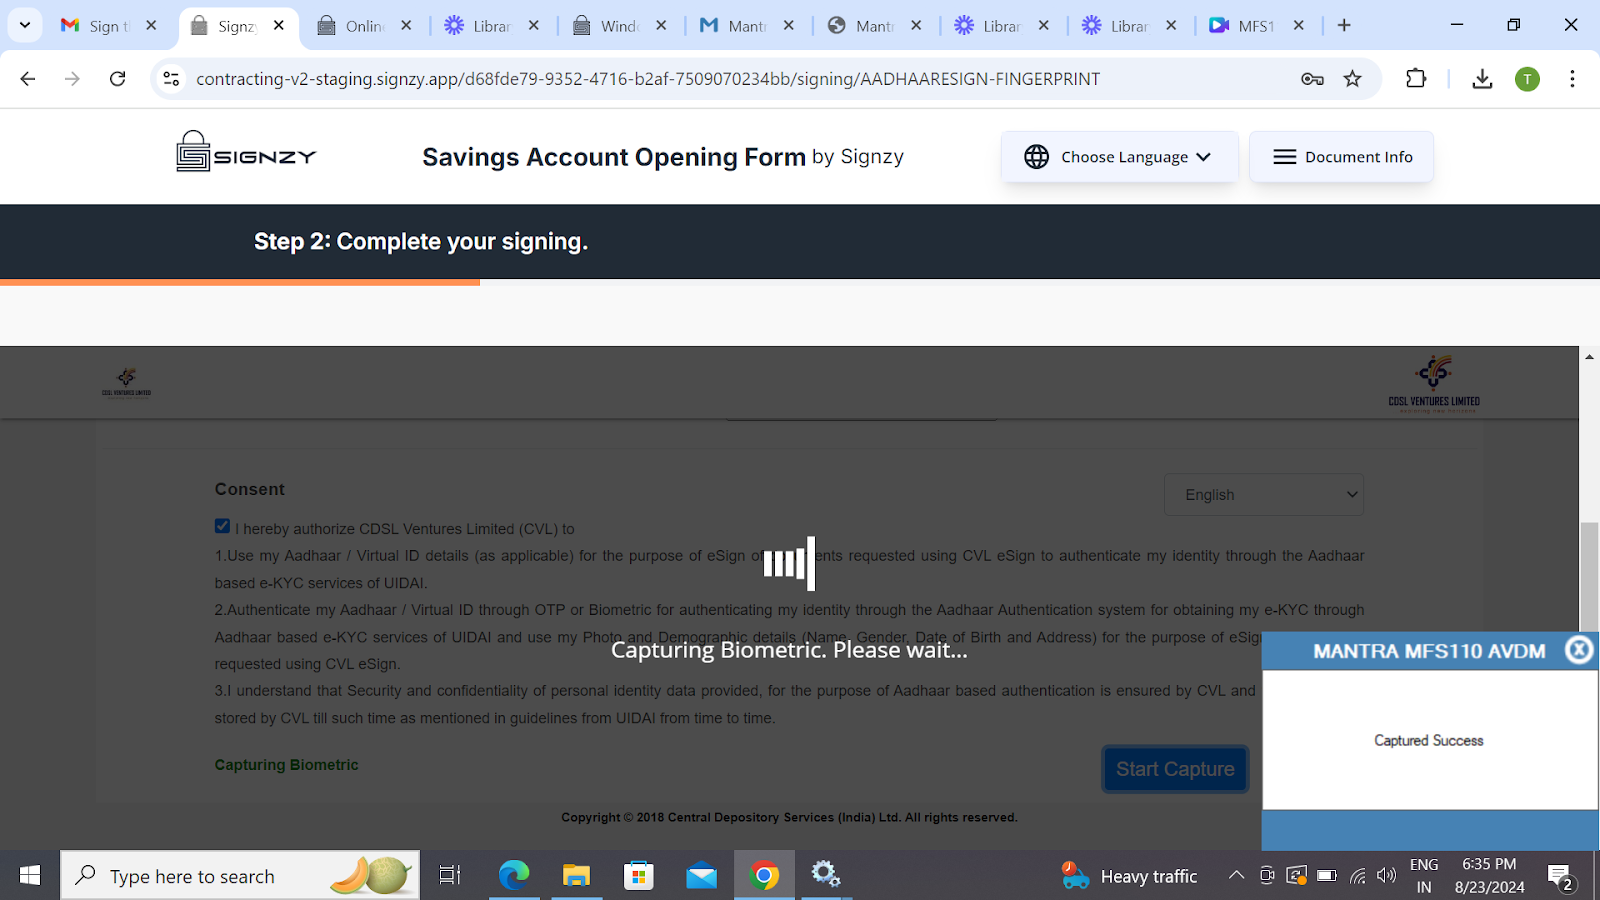
**Step 21:&#x20;**&#x50;lace your finger firmly on the device. The finger will be automatically captured and a notification will appear on the bottom left side of the screen stating “Capture Success”.
![](https://lh7-rt.googleusercontent.com/docsz/AD_4nXe3XouKK-OPLoTmTkLj5UirEBfsq9sogZLTIfQwP4BPaXb46ZeeExEpgJRopV_Yo27QsXjY1FgT6_yfHmBW-KwNdC-xmrIsOtaCti4fqz6s-3yp3vpVjx6sL9QQd8ENQ0ze1x_z4ZSlE1uJeZEf-cXRL2yT?key=nigJM-F9A59Nhnyna3tcIw)

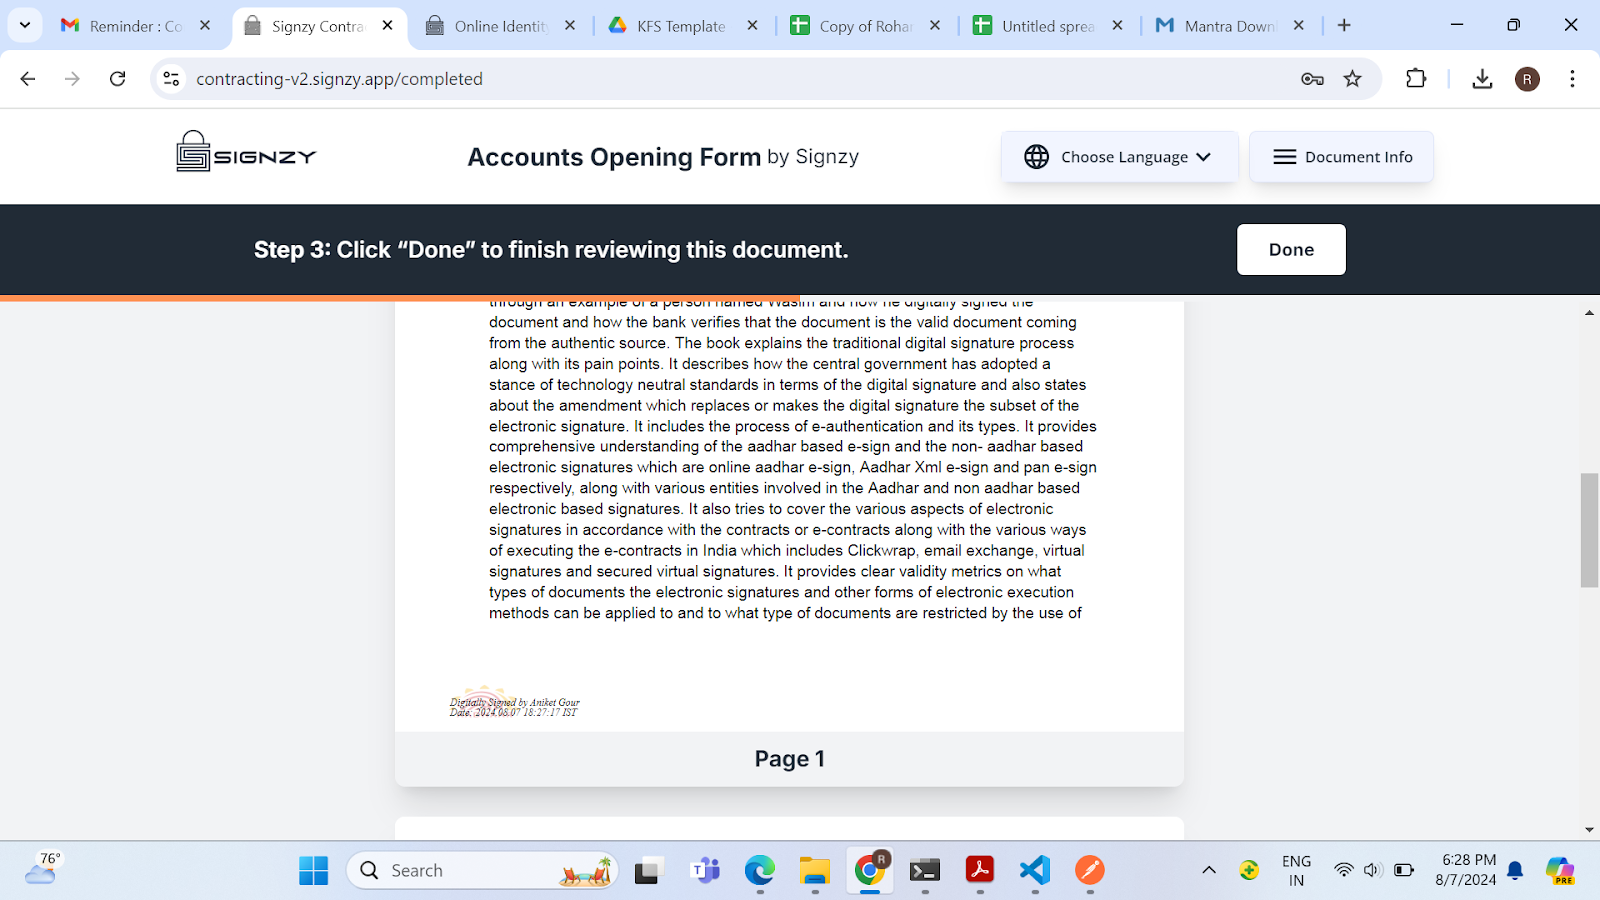
**Step 22:&#x20;**&#x54;he user will be automatically redirected to the signed contract where they can see their signature affixed to it. Click on “Done” to complete the signing process.
![](https://lh7-rt.googleusercontent.com/docsz/AD_4nXdn_gdAE8QGRnHwowpaFfhhiKTuSfh-i6tJYrut4ZvVEGCRz262mC5uVvj_kc3g4uQAzOPxVxdnm9Uww8O_tf3KrvdE7tGcNOtf8xAHCAOQMvJUF9tE0b4tLTxuuRPAZRTR9uDwB2BmPsCA4ddq0UpP8MQc?key=nigJM-F9A59Nhnyna3tcIw)

**Step 23:&#x20;**&#x54;he user will see the Success page and can click on the “**Great**” button or be redirected to the success URL set by the contract initiator after 5 seconds.

![Success Page](https://api.archbee.com/api/optimize/qSNGjc2nDdmTfGm_rfzKG-0RHDGCnTFe1A4iFtyC9St-20240807-173201.png)

**Step 24: &#x20;**&#x54;he user will receive a confirmation email with the header “**Confirmation of signing the document**,” containing the signed contract.

![Email Interface](https://api.archbee.com/api/optimize/qSNGjc2nDdmTfGm_rfzKG-pG_87pMZyQYBYjCVZ3MyJ-20240807-173305.png)

**Step 25:&#x20;**&#x4F;nce all signers have signed the contract, the user will receive another email with the header “Your document signing has been finalized successfully,” containing the **final signed contract&#x20;**&#x61;nd the **Audit Trail Certificate**.

![](https://api.archbee.com/api/optimize/qSNGjc2nDdmTfGm_rfzKG-0W-IgsCkrfp321PfWTaJ8-20240807-173413.png)

## Contract Signing In Pre-Production Environment:

The Mantra MFS110 L1 Device is registered for the production environment by default to register the device for the pre-production environment please drop an email to the [servico@mantratec.com](mailto\:servico@mantratec.com) along with the device serial number requesting to register the device for the pre-production environment.

## Prerequisites Required:

Below are the prerequisites required to perform the Aadhaar-based fingerprint signing in the production environment with the help of the Mantra MFS110 L1 device.

1\. **MFS110 Driver**

2\. **MFS110 Windows RD Service**

3\. Mantra Biometric Device L1 **(MFS110 L1)**.

Below are the steps required to set up the above-mentioned drivers to perform the signing in a prep-production environment.

### Video Tutorial:

To make the setup process for fingerprint signing easier, we have included a video tutorial in the documentation. This video offers a step-by-step guide on how to configure the fingerprint device to perform secure signings.

[https://drive.google.com/file/d/1jbfiL8LeAqAduez-5GGkS\_80NOOgsjyF/view?usp=sharing](https://drive.google.com/file/d/1jbfiL8LeAqAduez-5GGkS_80NOOgsjyF/view?usp=sharing)

### Steps to Follow:

**Step 1: Visit&#x20;**&#x74;he Mantra official website to install the drivers [https://www.mantratec.com/Download/User](https://www.mantratec.com/Download/User). Select the product category “Authentication Device- Aadhar” and select the “MFS110 L1”.

![Mantra Website](https://api.archbee.com/api/optimize/qSNGjc2nDdmTfGm_rfzKG-VmgaAPiIPaEp7Ipm_vhN3-20240807-170811.png)

**Step 2:&#x20;**&#x43;lick on the driver and download the “**MFS110 Driver**”. Double-click on the downloaded file. The installation process will start.

![Installation Interface](https://api.archbee.com/api/optimize/qSNGjc2nDdmTfGm_rfzKG-Sy7qmuu1D4olXti-G1dxT-20240807-170941.png)

**Step 3:&#x20;**&#x43;lick the “I**nstall**” and the installation process will start. Once the installation is completed click on the “**Finish**” Button to complete the installation.

![Installation Interface](https://api.archbee.com/api/optimize/qSNGjc2nDdmTfGm_rfzKG-8zU_gd3TZhRXesIcrFflT-20240807-171054.png)

**Step 4:&#x20;**&#x43;lick on the “**RD Service**” and download the “MFS110 Windows RD Service”.

![Mantra Website Interface](https://api.archbee.com/api/optimize/qSNGjc2nDdmTfGm_rfzKG-lfREovnz6U-5Df4459tHX-20240807-171203.png)

**Step 5: Double-click** on the downloaded file to start the installation process. Click on “Next”. Click on “Install” to install the device.

![Installation Interface](https://api.archbee.com/api/optimize/qSNGjc2nDdmTfGm_rfzKG-Z-cUCMTvPRyBQ5cEwA4Fm-20240807-171416.png)

**Step 6:&#x20;**&#x43;lick on the “**Finish**” button to complete the installation of the MFS110 RD Service.

![Installation Interface](https://api.archbee.com/api/optimize/qSNGjc2nDdmTfGm_rfzKG-FqOgSYPWSAJOeh81_CDcj-20240807-171515.png)

**Step 7: Insert&#x20;**&#x74;he biometric device. The confirmation will appear at the bottom right side of the screen stating “**Device Attached**”.

![Success Message Interface](https://api.archbee.com/api/optimize/qSNGjc2nDdmTfGm_rfzKG-2lhJLADwDa542xeiPQD7E-20240807-171611.png)

**Step 8:&#x20;**&#x41;fter the above confirmation message a “**Framework is ready to use**” message will appear leading to the device ready to perform the signing.

![Device ready to use Interface](https://api.archbee.com/api/optimize/qSNGjc2nDdmTfGm_rfzKG-fXZSb6yTRuuAteGvcORU8-20240807-171719.png)

**Step 9:&#x20;**&#x47;o to the “**Local Disk (C)**" Open **Program Files**. Look for the **Mantra folder** and open the **RD Service folde**r. Click on th&#x65;**&#x20;MFS110**. Find Config.xml file.&#x20;
Path (C:\Program Files\Mantra\RDService\MFS110).&#x20;

![Mantra Folder Files ](https://api.archbee.com/api/optimize/qSNGjc2nDdmTfGm_rfzKG-aDHgcDw8TbCAd0b8z304B-20240808-071628.png)

**Step 10:&#x20;**&#x4F;pen the **Config.xml&#x20;**&#x66;ile with Notepad.

![Permission Interface](https://api.archbee.com/api/optimize/qSNGjc2nDdmTfGm_rfzKG-igXraTQ0rjvVobz08zuSk-20240808-071911.png)

**Step 11:&#x20;**&#x42;y default, the RD Service is set for production which is shown \<Settings env=”p” />.&#x20;

![Note Pad Interface](https://api.archbee.com/api/optimize/qSNGjc2nDdmTfGm_rfzKG-EtGG4aSmdVdg93QrZPW9L-20240808-072007.png)

**Step 12:&#x20;**&#x49;n the \<Settings env=”p” / change the “p” to “**pp**”.

![Note Pad Interface](https://api.archbee.com/api/optimize/qSNGjc2nDdmTfGm_rfzKG-zLgo9QGzm8AezUFBQvTWE-20240808-083300.png)

**Step 13:&#x20;**&#x50;ress ctrl+s and **save&#x20;**&#x74;he file on the desktop.

![Windows file saving Interface](https://api.archbee.com/api/optimize/qSNGjc2nDdmTfGm_rfzKG-FIiIGpIF0cofJIZzDmgYQ-20240808-083429.png)

**Step 14: Locate** the saved config file on the desktop. Copy the “Config” file and paste it into the (C:\Program Files\Mantra\RDService\MFS100) folder. A message will pop on the screen. Click on “**Continue**”.

![Copying Image Interface](https://api.archbee.com/api/optimize/qSNGjc2nDdmTfGm_rfzKG-81rkw-BZSmBBdP7XjzHoD-20240808-083604.png)

**Step 15:&#x20;**&#x43;lick the “**Replace this file on the destination folder**”.The files copied file will replace the old Config file.

![Replace File Interface](https://api.archbee.com/api/optimize/qSNGjc2nDdmTfGm_rfzKG-tRBgV6XZTcUhJp5ayBdJk-20240808-083750.png)

**Step 16:&#x20;**&#x54;o ensure the file is copied successfully. **Open&#x20;**&#x74;he new saved config file with Notepad. The \<settings env=”pp” /> will be set.

![Note Pad Interface](https://api.archbee.com/api/optimize/qSNGjc2nDdmTfGm_rfzKG-9YW8VrfCAFrcAYy0uDqnK-20240808-084222.png)

**Step 17:&#x20;**&#x53;earch for the “**Service**” from the Windows settings and click on it.

![Windows Service Setting](https://api.archbee.com/api/optimize/qSNGjc2nDdmTfGm_rfzKG-3TplPPSxXkCPDqQio3Saq-20240808-084404.png)

**Step 18:&#x20;**&#x54;he Service Interface will open. Look for the “**Mantra MFS110 AVDM**”. Click on it. Besides a taskbar will appear. Click on the “**Restart**” service button.

![Serivce Interface](https://api.archbee.com/api/optimize/qSNGjc2nDdmTfGm_rfzKG-3AZApuDuoejjil1lEAkho-20240808-084509.png)

**Step 19:&#x20;**&#x54;he Mantra RD Service will restart. Please wait for a second to complete the process.

![Serivce Interface](https://api.archbee.com/api/optimize/qSNGjc2nDdmTfGm_rfzKG-zAgRjr2P1G-QcWwNqHkyU-20240808-084605.png)

**Step 20:&#x20;**&#x50;lug the Mantra MFS110 L1 device into the Windows system. A confirmation message will appear stating “**Device Attached**” at the bottom right of the screen.

![Service Interface](https://api.archbee.com/api/optimize/qSNGjc2nDdmTfGm_rfzKG-_3sjXd2SgNzywe-Jh2tDf-20240808-084749.png)

**Step 21:&#x20;**&#x41;fter the confirmation, another message will pop up at the bottom right corner of the screen stating “**You have successfully converted the device into an Aadhaar L1 registered device**”.

![Service Interface](https://api.archbee.com/api/optimize/qSNGjc2nDdmTfGm_rfzKG-qt4uJ6R6OrKhUeqU3IOBR-20240808-084843.png)

**Step 22:&#x20;**&#x50;lease unplug the device and replug it. A confirmation message will appear stating that the **device is attached** along with a confirmation message “**Framework is ready to use**”.

![Service Interface](https://api.archbee.com/api/optimize/qSNGjc2nDdmTfGm_rfzKG-ojfMOl_KUCzEwZSWsIDo_-20240808-084949.png)

**Step 23: Open** [https://rdtest.aadhaardevice.com/](https://rdtest.aadhaardevice.com/)<u>  </u>and click on “Discover AVDM”.

![RD Test Interface](https://api.archbee.com/api/optimize/qSNGjc2nDdmTfGm_rfzKG-OmXDfjWxGo3TEIwSRRCmF-20240808-085124.png)

**Step 24:&#x20;**&#x41; confirmation message will appear stating “RDSERVICE Discover Successfully”. Click the “**OK**” button.

![](https://api.archbee.com/api/optimize/qSNGjc2nDdmTfGm_rfzKG-2lCa8UAx-PzEV6pvoYNpc-20240808-085237.png)

**Step 25:&#x20;**&#x4E;avigate to the **signing link** sent to the signer’s email (provided while initiating the contract).

![Email Interface](https://api.archbee.com/api/optimize/qSNGjc2nDdmTfGm_rfzKG-8-gzz5rNjQRs5sTfzLctl-20240807-171844.png)

**Step 26:&#x20;**&#x54;he pre-verification page will open, where the user needs to perform verification using a one-time OTP. Click on the “**Get OTP**” button.

![OTP Verification Page](https://api.archbee.com/api/optimize/qSNGjc2nDdmTfGm_rfzKG-SYgydeXLvmC65q_PXfVGK-20240807-172002.png)

**Step 27:&#x20;**&#x54;he user will receive the OTP on th&#x65;**&#x20;email** provided during contract initiation.

![Email OTP Interface](https://api.archbee.com/api/optimize/qSNGjc2nDdmTfGm_rfzKG-FTl6tk6hOzw6pZMVFxx1Y-20240807-172121.png)

**Step 28:&#x20;**&#x45;nter the OTP received via email and click on the “**Verify**” button.

![OTP Verification Page](https://api.archbee.com/api/optimize/qSNGjc2nDdmTfGm_rfzKG-TIUJiqUDVvpV-xt0i7wpx-20240807-172223.png)

**Step 29:&#x20;**&#x55;pon successful verification, the user will land on the contract page. Click on the “**I want to sign**” button to proceed.

![Contract Page](https://api.archbee.com/api/optimize/qSNGjc2nDdmTfGm_rfzKG-eVZyHd0gT5LF30cd0Y9D0-20240807-172320.png)

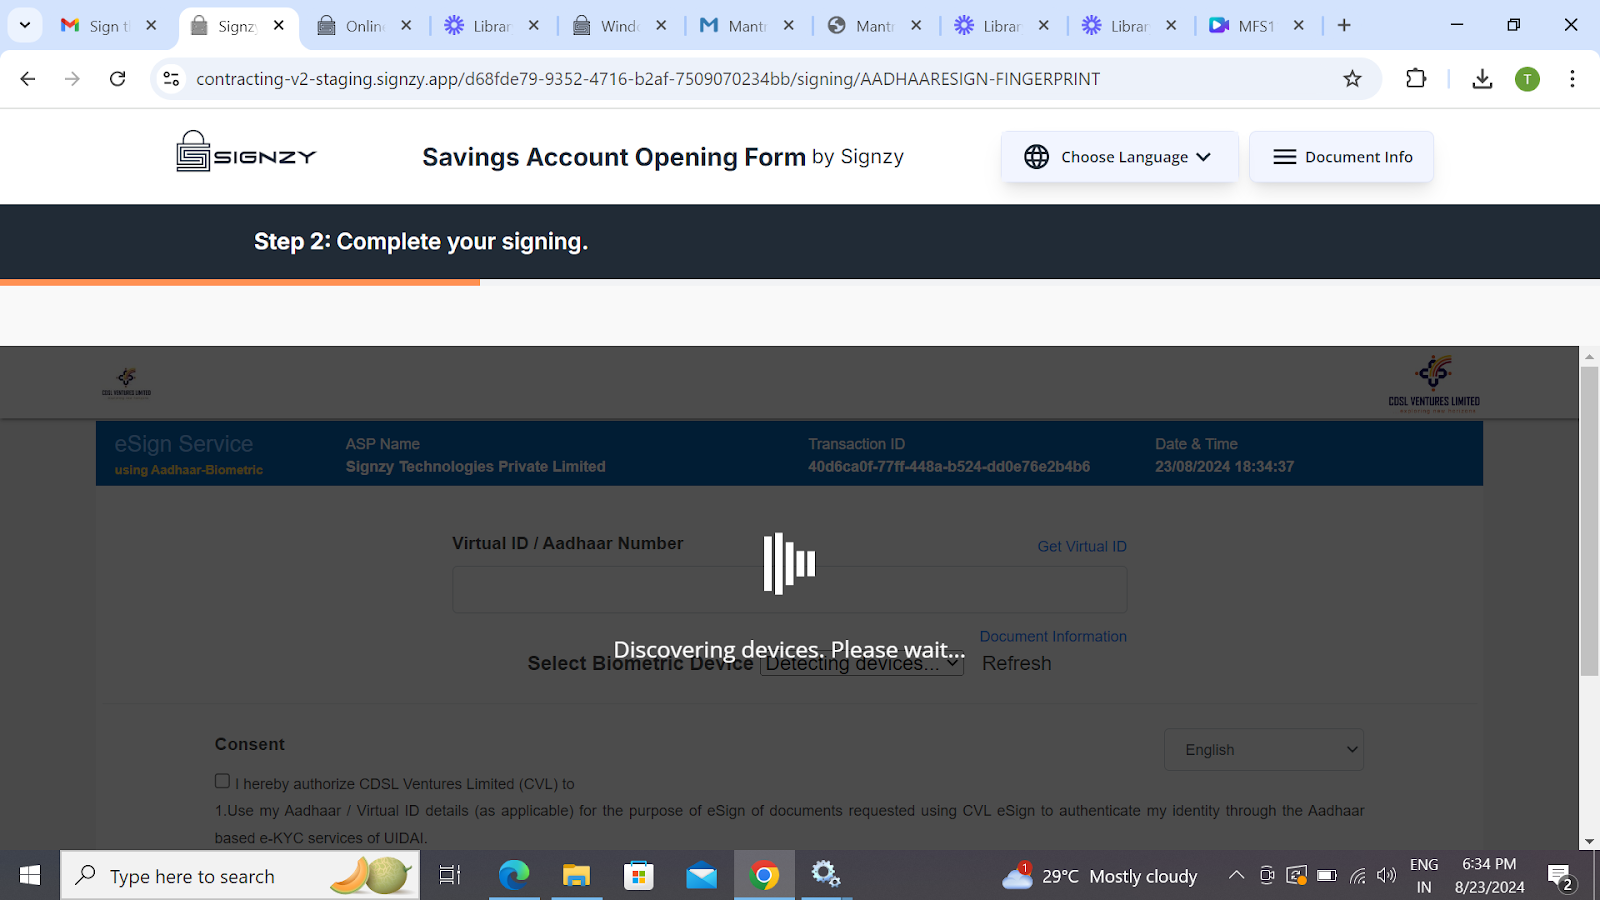
**Step 30:&#x20;**&#x54;he CDSL Interface will open, Please wait for a second. It will automatically discover the RD Service Installed on the device.
![](https://lh7-rt.googleusercontent.com/docsz/AD_4nXcjZjHcH7u8nor6OiWjmXWTnNgl4X5n8ZbHniNd_yiROQGkIguLmUVvJ41IdEcwUo5uOrNYZH0YYFYxQVl7TQLDhR9zeXZOkYEqeq1bsEAkVwg9xRSWXj4bT3EvuCpszqcIvu50f_AmQ22Zw62FAXpmnz2u?key=BGY8KKpMGC4ycAhVj6wFcA)

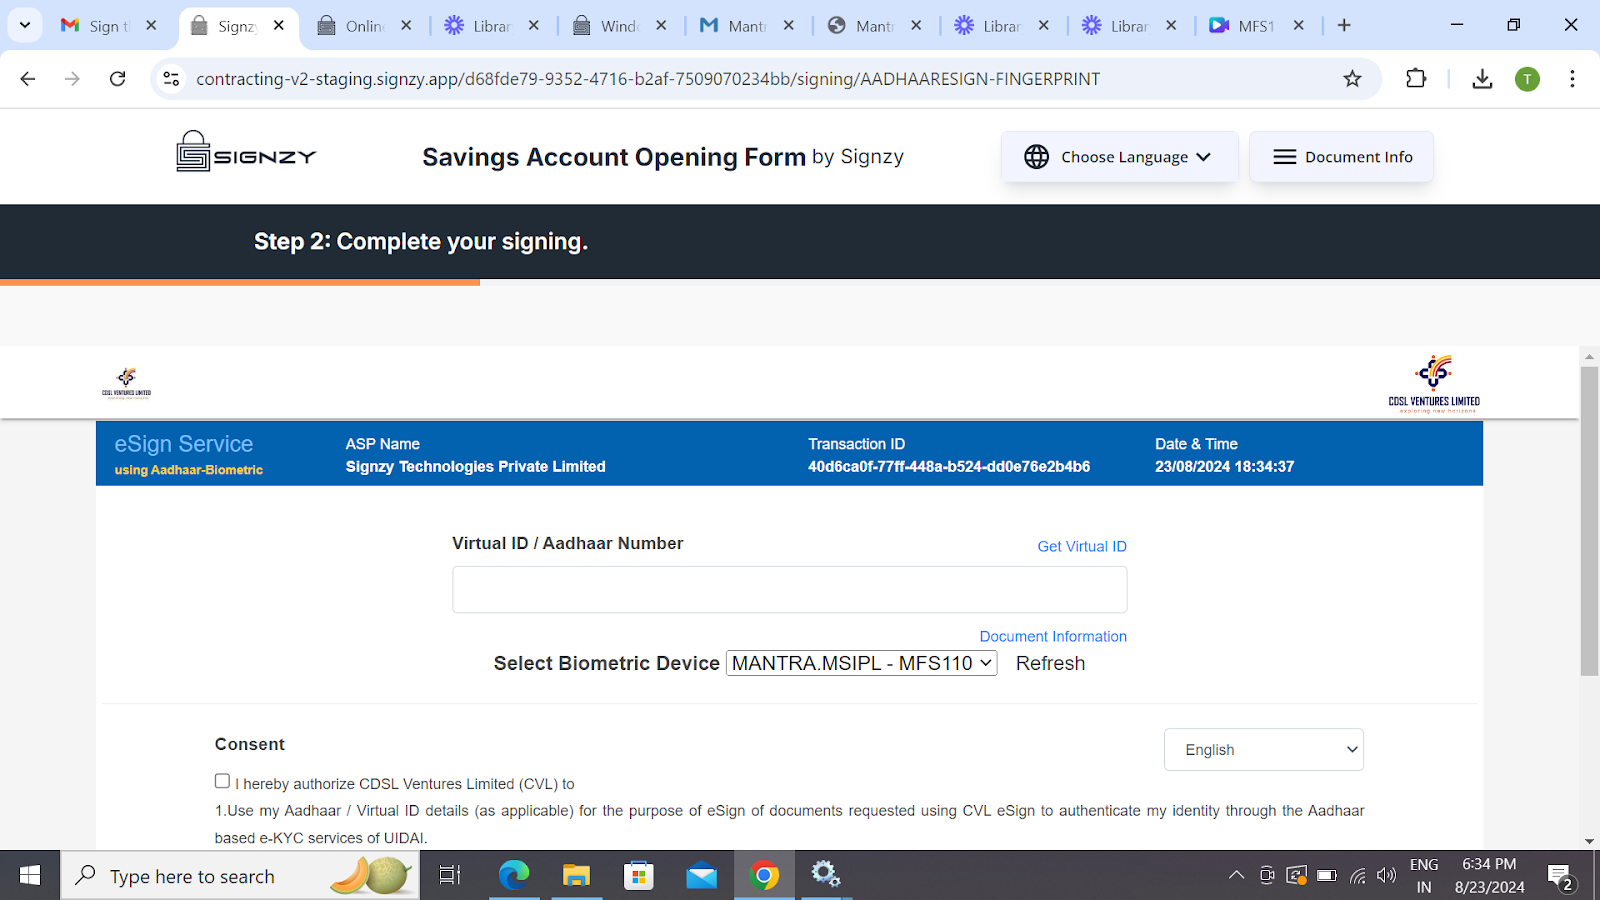
**Step 31:&#x20;**&#x4F;nce device discovery is completed. The RD service will automatically detected.
![](https://lh7-rt.googleusercontent.com/docsz/AD_4nXfeq--6yObNLWEOUwFhGmXZcQAO9r0BtekjuJc4nljDFznedSBDOPFZqq-cNgLF-wfR0fst1FdIsth4WG6Nh61Lj-5Ab52iKK4DXY2WFZpGQ3bRadPuJxUQy7D-3BIzJ6t5EPRiVXzR8H2zwvIIyDMWPyzu?key=BGY8KKpMGC4ycAhVj6wFcA)

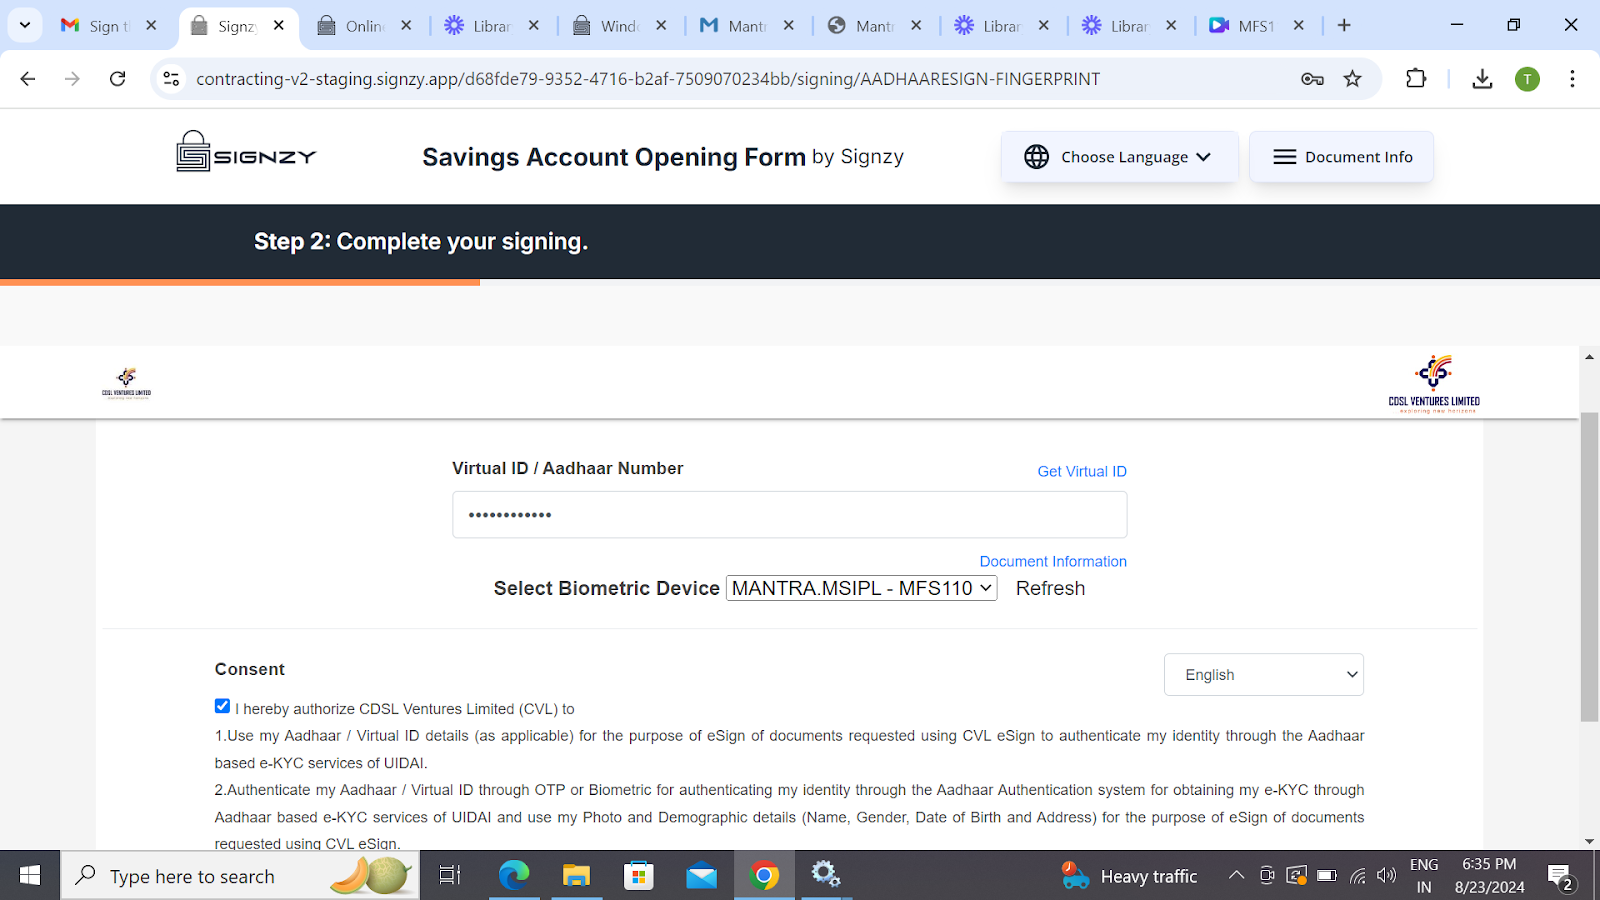
**Step 32:&#x20;**&#x46;ill in the Aadhaar Number. Tick the consent Box
![](https://lh7-rt.googleusercontent.com/docsz/AD_4nXeAVOICantDBEuaOZeBbJxVwi5TPrxrEj0PcHOEtAJd8g1emeirqdnCEmjuZ7gQqoTNNaf7zEnlKD10lLUOAaP676mKUIPDclqQ_tCVHHqHWVHVaT25f8rWUMv6O3oWw9VXNVF7XjEfpREylZ8rseJXQzL7?key=BGY8KKpMGC4ycAhVj6wFcA)

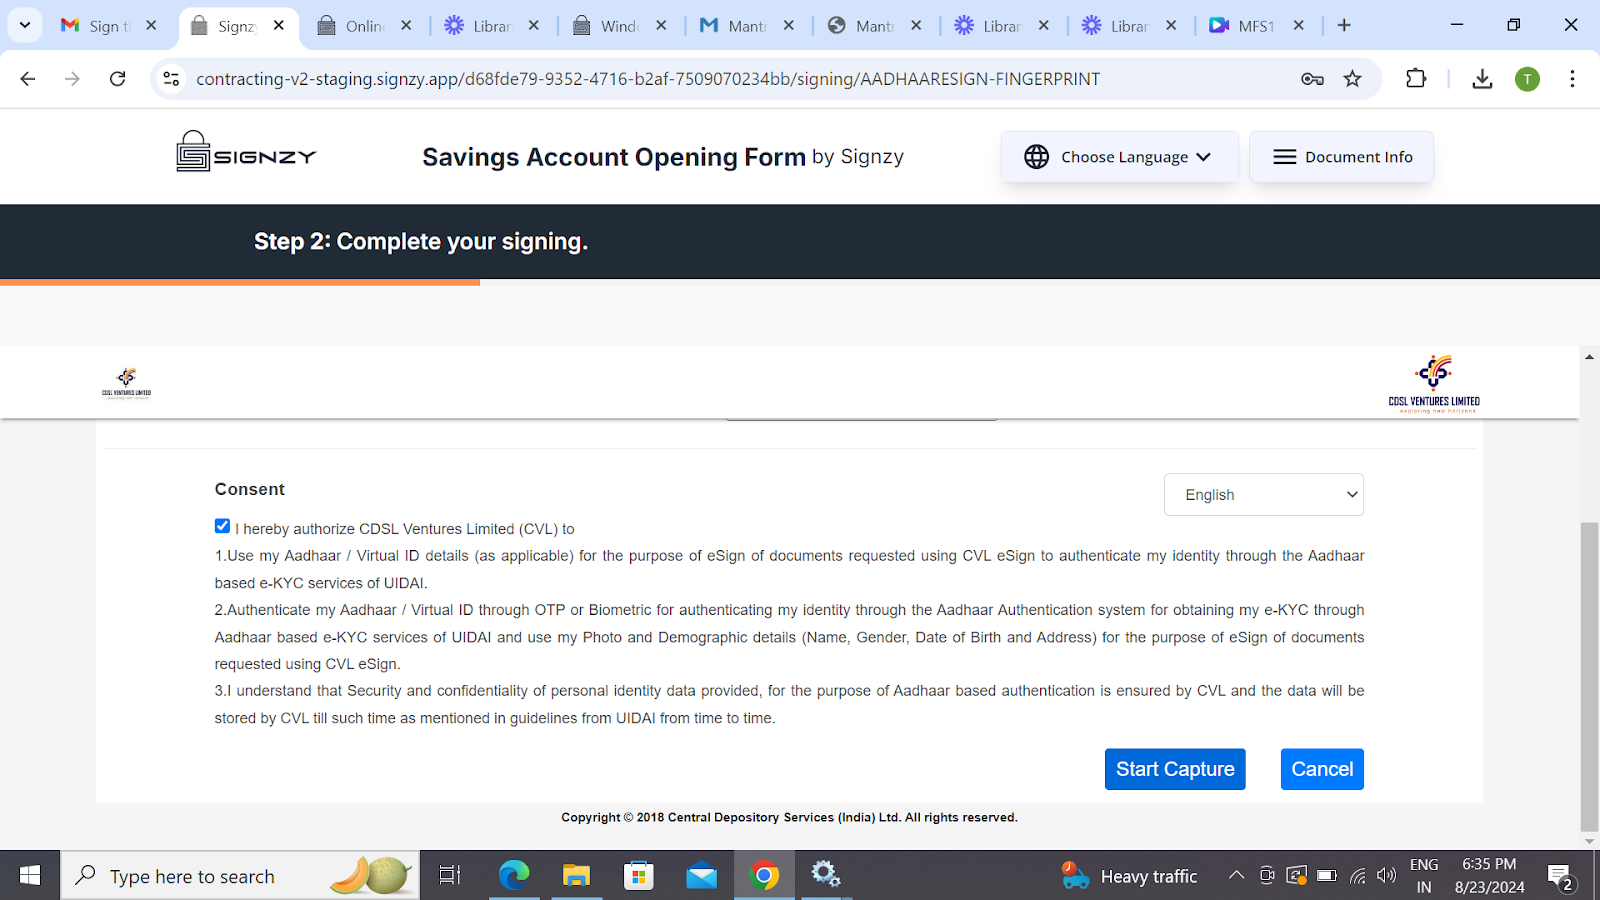
**Step 33:&#x20;**&#xA0;Click on the “Start Capture” button to perform the signing.
![](https://lh7-rt.googleusercontent.com/docsz/AD_4nXdlCSFQY7EqusGKmMWAgyWAXl8EFMP8FDEm1VwMLj4wmyvj372hbh1B1Najb4UOk7-3kA0Bupca2d9Mo8upGVehHRnhGp24XAgDoMu8pXI9XB2Uize711hg6fwVd8c9MiZrVddrFXbKm7-756fvDQt7INE?key=BGY8KKpMGC4ycAhVj6wFcA)

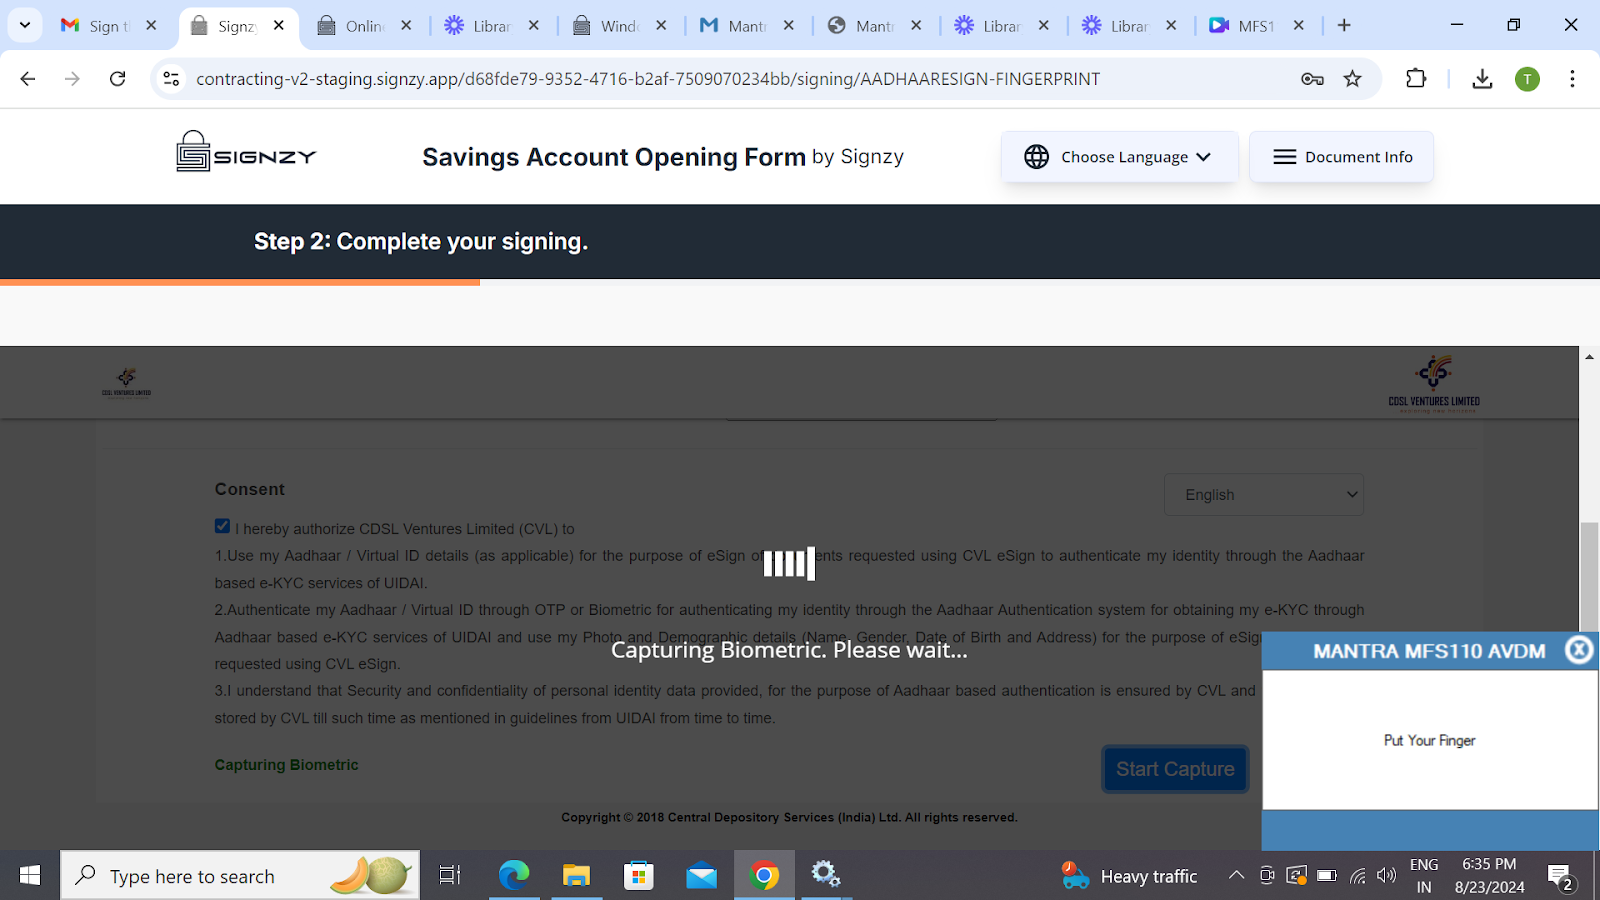
**Step 34:&#x20;**&#x41; notification will appear on the bottom left side of the screen stating “Put Your Finger”.
![](https://lh7-rt.googleusercontent.com/docsz/AD_4nXd9-dLcYiynVYl7W4nYTmWm3I2hoOIb7SOdAD5rEmhBPbGINUeUfQMYPHMueFwAt5jymZ-2njM1bIxliJH5juKfKn9_IH1oRZOVuGXSGPwDvl5q24dfhSSq-DGwPgCeRyOXDwmCZQD1u7C36poIdm5Ncb8?key=BGY8KKpMGC4ycAhVj6wFcA)

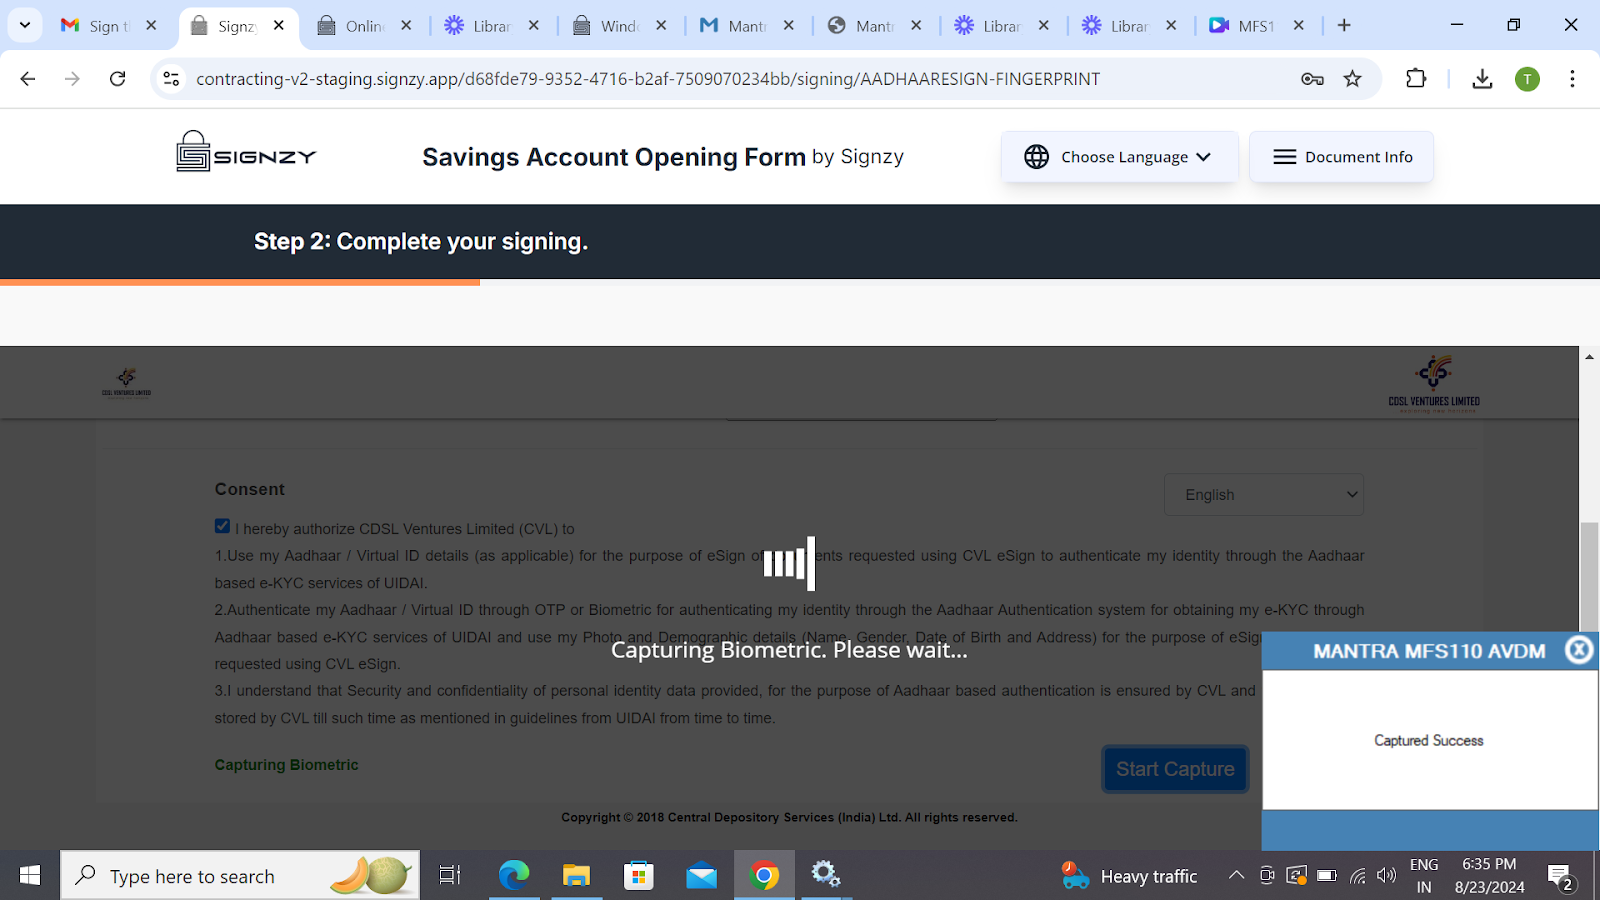
**Step 35:&#x20;**&#x50;lace your finger firmly on the device. The finger will be automatically captured 

and a notification will appear on the bottom left side of the screen stating “Capture Success”.
![](https://lh7-rt.googleusercontent.com/docsz/AD_4nXfjKMOtpfFD7oiyK-K4OZimjeCX0gNLAK3r8-9yBjaZfZ6MxfBjPp86Hx7qDVOiUbTqp65BoER2Opom1btb5562scSjB95M3dT71sw462lYTyFoLGtTKJLH2psUfzESAcEecy7VL6pOZBFPYaC141EUffjp?key=BGY8KKpMGC4ycAhVj6wFcA)

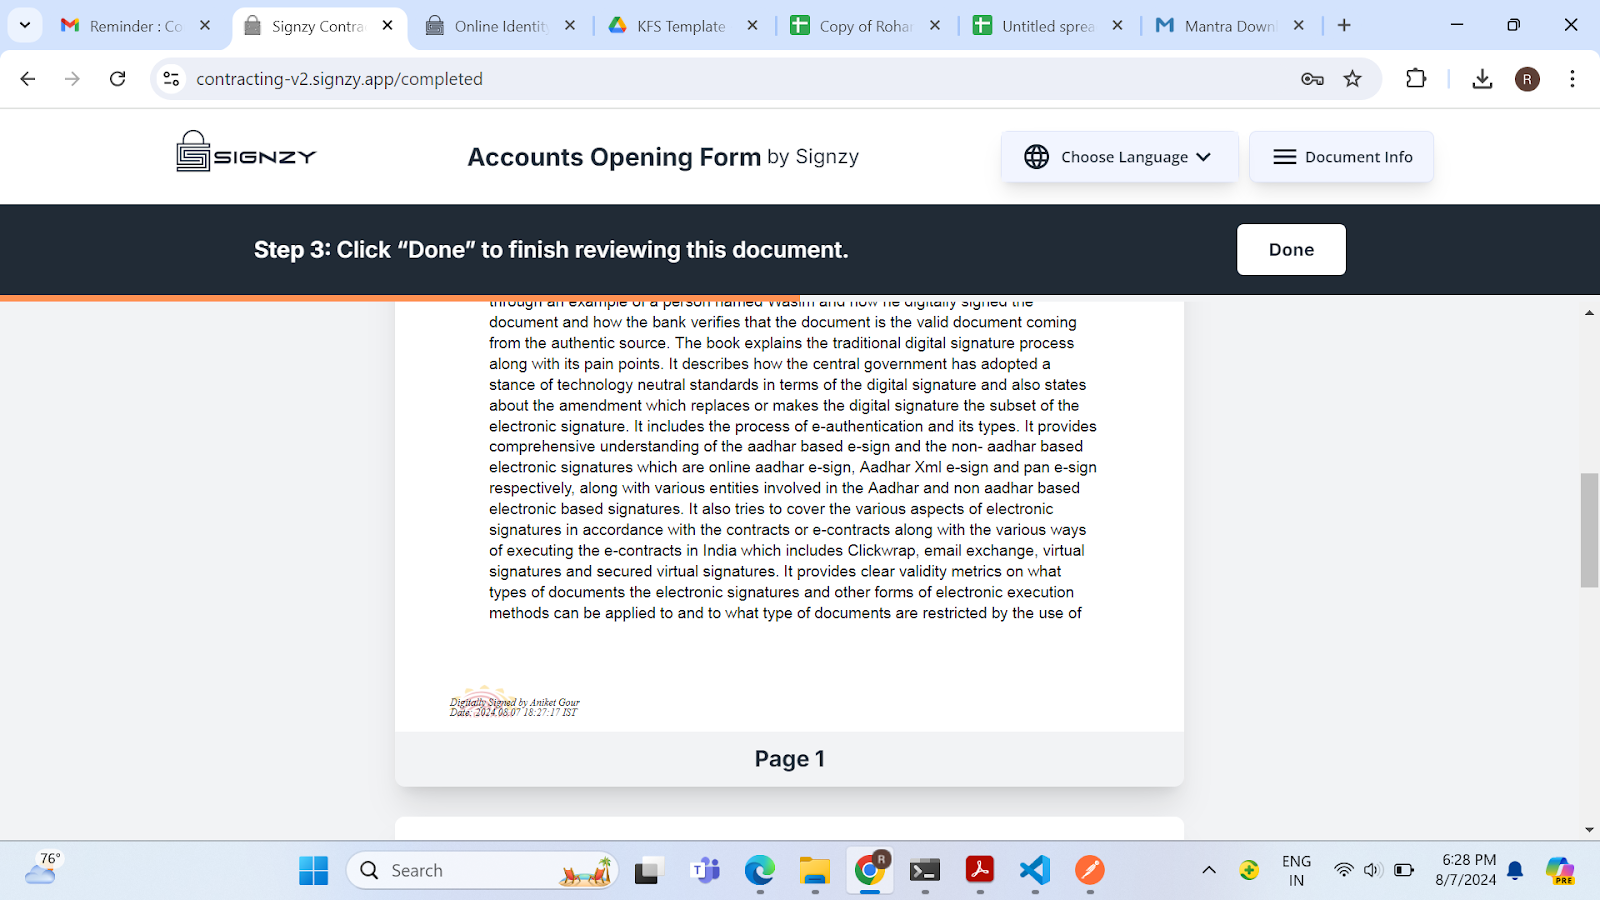
**Step 36:&#x20;**&#x54;he user will be automatically redirected to the signed contract where they can see their signature affixed to it. Click on “Done” to complete the signing process.
![](https://lh7-rt.googleusercontent.com/docsz/AD_4nXfkhEDyAanJvRG7Yqb--NHyRcFteVkzRhveKrtl205DcQTDpQlXkVe9Y6u0P2Dmu7GZEa3dzD-yOw_cnTn2zgIPlfR25p4dy4xGgWCTnoMlal3JLn1HPrHJmx04KDsiooikvBIsJorRmZQIdlZwMax-xmE?key=BGY8KKpMGC4ycAhVj6wFcA)

**Step 37:&#x20;**&#x54;he user will see the Success page and can click on the “**Great**” button or be redirected to the success URL set by the contract initiator after 5 seconds.

![Success Page](https://api.archbee.com/api/optimize/qSNGjc2nDdmTfGm_rfzKG-0RHDGCnTFe1A4iFtyC9St-20240807-173201.png)

**Step 38: &#x20;**&#x54;he user will receive a confirmation email with the header “**Confirmation of signing the document**,” containing the signed contract.

![Email Interface](https://api.archbee.com/api/optimize/qSNGjc2nDdmTfGm_rfzKG-pG_87pMZyQYBYjCVZ3MyJ-20240807-173305.png)

**Step 39:&#x20;**&#x4F;nce all signers have signed the contract, the user will receive another email with the header “Your document signing has been finalized successfully,” containing the **final signed contract&#x20;**&#x61;nd the **Audit Trail Certificate**.

![Email Interface](https://api.archbee.com/api/optimize/qSNGjc2nDdmTfGm_rfzKG-pG_87pMZyQYBYjCVZ3MyJ-20240807-173305.png)