---
title: Windows Web: Prod and Pre-Prod
slug: contract360/5PNn-windows-web-prod-and-pre-prod
createdAt: 2024-08-11T19:29:25.004Z
---

# Introduction

This document aims to provide comprehensive guidance for performing the **Fingerprint signing&#x20;**&#x77;ith the help of the **IDEMIA Morpho L1&#x20;**&#x64;evice in the **Windows web browser&#x20;**&#x77;ith **NSDL&#x20;**&#x61;s the Esigning Service Provider (ESP) in both the **production and pre-production&#x20;**&#x65;nvironment.

## Contract Signing In Production Environment

To use the IDEMIA MSO 1300 E3 RD 1 device in the production environment it should be whitelisted for the production environment. By default, the device is whitelisted for the production environment.

You can verify the status of the device by visiting:[ https://rdserviceonline.com/pages/172iserialvalidatenumber](https://rdserviceonline.com/pages/172iserialvalidatenumber). Enter the serial number of the device and the device status will appear as "Whitelisted".

If the IDEMIA MSO 1300 E3 RD 1 device is not whitelisted for the production environment please drop an email to [support@rdserviceonline.com](mailto\:support@rdserviceonline.com) along with the device serial number requesting to whitelist the device for the production environment.

### Prerequisites Required:

Below are the prerequisites required to perform the Aadhaar-based fingerprint signing in the production environment with the help of the IDEMIA MSO 1300 E3 RD 1  device.

1\.  W**indow L1 RD (https/localhost)**: Click here to visit the [website](https://rdserviceonline.com/?gad_source=1\&gclid=Cj0KCQjwwuG1BhCnARIsAFWBUC16U1ZIROSCbsGrnKYmBaeE0aAUkAQTTtk0oUlUzdzL3GeR86m0CrQaAtmmEALw_wcB).

3\. IDEMIA Morpho Biometric Device L1 **( MSO 1300 E3 RD 1** **)**.

Once you have all the above-mentioned prerequisites follow the below steps to set up the IDEMIA Morpho L1 device to perform the signing.

### Steps to Follow:

**Step 1:&#x20;**&#x56;isit[ https://rdserviceonline.com/](https://rdserviceonline.com/). Click on the **download**. Select the MS01300E3 RD L1 and click on the  **Window L1 RD (https/localhost)**. The driver will be downloaded.

![Morhpo Website Interface](https://api.archbee.com/api/optimize/qSNGjc2nDdmTfGm_rfzKG-pIHs1Qcchlk12mUfFNDdM-20240811-193251.png)

**Step 2: Double-click** on the downloaded zip file.

![Morpho Webiste Interface](https://api.archbee.com/api/optimize/qSNGjc2nDdmTfGm_rfzKG-xMZ_ibTIz7F_Hthg8ZMqa-20240811-193449.png)

**Step 3:&#x20;**&#x54;he folder will open.**&#x20;Double-click** on the **Windows L1-L0 RDService-HTTPs-LocalHost** file.

![Windows Folder Interface](https://api.archbee.com/api/optimize/qSNGjc2nDdmTfGm_rfzKG-Mi7eug3nO9OEltqfg-wEU-20240811-193536.png)

**Step 4:&#x20;**&#x41; folder will open. **Double-clic**k on the “**Setup**” folder.

![Windows Folder Interface](https://api.archbee.com/api/optimize/qSNGjc2nDdmTfGm_rfzKG-hqQYTjWRfFEgPK1gbSliu-20240811-193626.png)

**Step 5: Double-clic**k on the Windows\_L1-L0\_RDService-HTTPs-LocalHost application.

![Windows Folder Interface](https://api.archbee.com/api/optimize/qSNGjc2nDdmTfGm_rfzKG-zsMgfsSS8a8WuhnezNfRn-20240811-193729.png)

**Step 6:&#x20;**&#x41; window will appear asking to extract the file. Click the “**Extract all”** button.

![Windows Folder Interface](https://api.archbee.com/api/optimize/qSNGjc2nDdmTfGm_rfzKG-Ka482a_VwaoCE_MDZrkNP-20240811-193928.png)

**Step 7:&#x20;**&#x4C;eave the destination folder as default. Click the “**Extract**” button.

![Windows Folder Interface](https://api.archbee.com/api/optimize/qSNGjc2nDdmTfGm_rfzKG-dW4uXLnwl9hrRsFHu5XPH-20240811-194013.png)

**Step 8:&#x20;**&#x4F;nce the file is extracted. A folder will appear. Double-click on the “**Windows\_L1-L0\_RDService-HTTPs-LocalHost**” folder

![Windows Folder Interface](https://api.archbee.com/api/optimize/qSNGjc2nDdmTfGm_rfzKG-avYgmo-aNMB4ym422oqQv-20240811-194107.png)

**Step 9:&#x20;**&#x44;ouble-click on the “**Stepup**” folder.

![Windows Folder Interface](https://api.archbee.com/api/optimize/qSNGjc2nDdmTfGm_rfzKG-9OUZ9Zmq5wVH9T6xvBijW-20240811-194148.png)

**Step 10:&#x20;**&#x44;ouble-click on the “**Windows\_L1-L0\_RDService-HTTPs-LocalHost**”. An administrator window will appear. Click the “**Yes**” button.

![Windows Folder Interface](https://api.archbee.com/api/optimize/qSNGjc2nDdmTfGm_rfzKG-sbU232nr9rA2NWn3zjIIe-20240811-194232.png)

**Step 11:&#x20;**&#x54;he installation **IDEMIA\_L1RDService installation process** will start. Please wait for a few seconds.

![Installation Interface](https://api.archbee.com/api/optimize/qSNGjc2nDdmTfGm_rfzKG-adm14i62wYPvylJ1Nq9t8-20240811-194320.png)

**Step 12:&#x20;**&#x54;he **IDEMIA\_L1\_RDService** will automatically start. Please wait for a few seconds.

![Installation Interface](https://api.archbee.com/api/optimize/qSNGjc2nDdmTfGm_rfzKG-iSkvBODsowvRklU7rEHRR-20240811-194418.png)

**Step 13:&#x20;**&#x54;he IDEMIA\_L1RDService\_**Installation will be completed**.

![Installation Interface](https://api.archbee.com/api/optimize/qSNGjc2nDdmTfGm_rfzKG-JVoL4WrRpfM4HBGwETb-y-20240811-194505.png)

**Step 14:&#x20;**&#x43;lick on the Windows icon from the taskbar and “**Restart**” the system.

![Windows Interface](https://api.archbee.com/api/optimize/qSNGjc2nDdmTfGm_rfzKG-nlmySS9I91URcGnqQYHEU-20240811-195543.png)

**Step 15:&#x20;**&#x4F;nce the system restarted. Insert the IDEMIA Morpho L1 device into the system. Please wait for a few seconds. A message will appear on the screen stating “ **Init Process started**”.  

![Int Process Start Message](https://api.archbee.com/api/optimize/qSNGjc2nDdmTfGm_rfzKG-XUjI8SQDr8Mt_2t4AX-qs-20240811-195910.png)

**Step 16:&#x20;**&#x4F;nce the Int Process is completed. A confirmation message will appear stating “Device Ready to use”. Click on the “**OK**” button.

![Confirmation Message Interface](https://api.archbee.com/api/optimize/qSNGjc2nDdmTfGm_rfzKG-M4z3km6EHnRBlYA-MMplJ-20240811-200005.png)

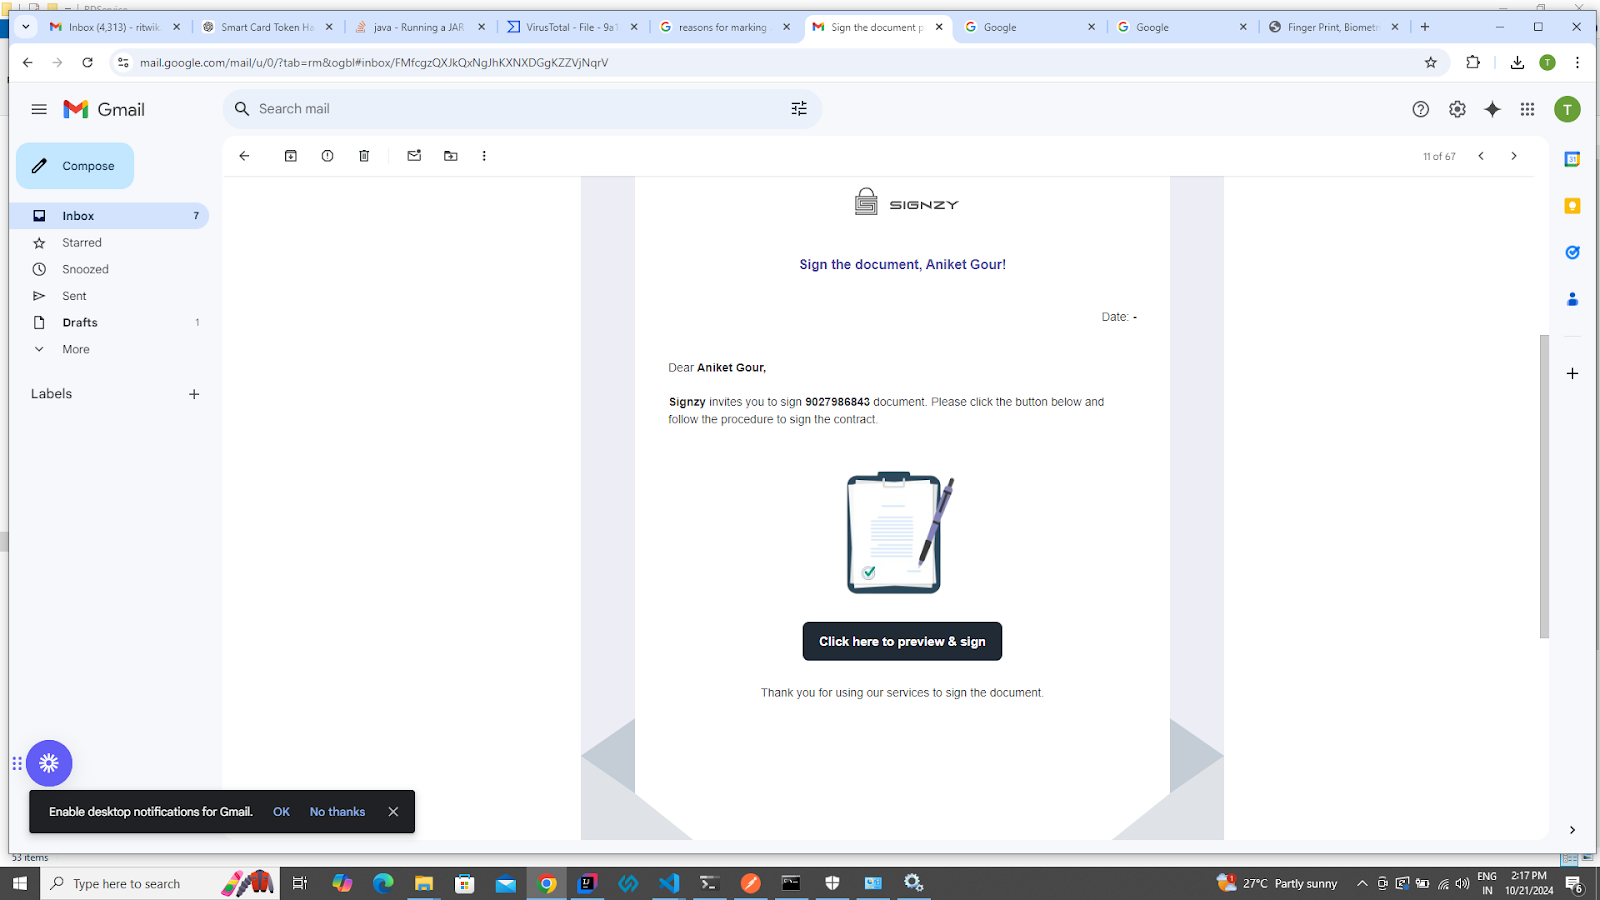
**Step 17:&#x20;**&#x4E;avigate to the **signing link** sent to the signer’s email (provided while initiating the contract).
![Signing URL Email](https://lh7-rt.googleusercontent.com/docsz/AD_4nXd62WBQ7eQBHk0fm5exiNqk1kc2TafBwtKq0cT2ovPR6ayuuY4zP5mW0VMEAdIzLtmrmUornVkxkjHmTeFmZPr0u02QmPaK8HHo3y9vFqofXvOnJIhmg7XiBKMJUtvGDN-M8HtaIcZJAdyHG_5_179MKmE?key=RMS7mIdPO_86hILBTujSbA)

**Step 18:&#x20;**&#x54;he pre-verification page will open, where the user needs to perform verification using a one-time OTP. Click on the “**Get OTP**” button.

![OTP Verification Page](https://api.archbee.com/api/optimize/qSNGjc2nDdmTfGm_rfzKG-SYgydeXLvmC65q_PXfVGK-20240807-172002.png)

**Step 19:&#x20;**&#x54;he user will receive the OTP on the **email&#x20;**&#x70;rovided during contract initiation.

![OTP Email](https://lh7-rt.googleusercontent.com/docsz/AD_4nXdPot_aClS47y9220Y71dc2rNMEx4J3XL7QOwmqFfKcnd9tCeAJTCYHQKhwJsXpD0_kWjjFRzKUk3ZqztHSMYCUeJd-3GtfE6t0EnMlwiKsrTmolpXwcburdNEzPCPyO79wQT4tz4mgM10Nfewdsm3_nt98?key=RMS7mIdPO_86hILBTujSbA)

**Step 20:&#x20;**&#x45;nter the OTP received via email and click on the “**Verify**” button.

![OTP Verification Page](https://api.archbee.com/api/optimize/qSNGjc2nDdmTfGm_rfzKG-TIUJiqUDVvpV-xt0i7wpx-20240807-172223.png)

**Step 21:&#x20;**&#x55;pon successful verification, the user will land on the contract page. Click on the “**I want to sign**” button to proceed.

![Contract Page](https://api.archbee.com/api/optimize/qSNGjc2nDdmTfGm_rfzKG-eVZyHd0gT5LF30cd0Y9D0-20240807-172320.png)

**Step 22:&#x20;**&#x54;he NSDL interface will open. Fill in the **Aadhaar Number**. The device is automatically detected. Select the device “**IDEMIA\_L1\_RDSERVICE(CBME3RD)**”.

![NSDL Interface](https://api.archbee.com/api/optimize/qSNGjc2nDdmTfGm_rfzKG-4UiVTlBKxKizfGTCPFCOM-20240811-200253.png)

**Step 23: Tick** the consent box. Click on the “**capture”** button to perform the signing.

![NSDL Interface](https://api.archbee.com/api/optimize/qSNGjc2nDdmTfGm_rfzKG-3a5s7FDoKZrVCbJ_ItuNs-20240811-200351.png)

**Step 24:&#x20;**&#x41;n embedded message will be displayed. Click the “**OK**” button.

![NSDL Interface](https://api.archbee.com/api/optimize/qSNGjc2nDdmTfGm_rfzKG-60sOS5dKuzwiJeh5ZjJUM-20240811-200448.png)

**Step 25: Place your finger** firmly on the device. The finger will be automatically captured and a notification will appear stating “FINGER\_OK”. Click the “**OK**” button.

![NSDL Interface](https://api.archbee.com/api/optimize/qSNGjc2nDdmTfGm_rfzKG-eXadK3yNJ-2uZr1xKfyPm-20240812-044818.png)

**Step 26:&#x20;**&#x41;n embedded confirmation page will appear with a confirmation message stating “Finger Captured Successfully”. Click the "**OK**" button.

![NSDL Interface](https://api.archbee.com/api/optimize/qSNGjc2nDdmTfGm_rfzKG-1H_3JhHLQpnR-Ntyw0tFU-20240812-044923.png)

**Step 27:&#x20;**&#x54;he user will be automatically redirected to the signed contract where they can see their signature affixed to it. Click on “**Done**” to complete the signing process.

![Contract Page](https://api.archbee.com/api/optimize/qSNGjc2nDdmTfGm_rfzKG-gPbiPAn51VYXpdijEpluZ-20240811-135819.png)

**Step 28:&#x20;**&#x54;he user will see the Success page and can click on the “**Great**” button or be redirected to the success URL set by the contract initiator after 5 seconds.

![Success Page](https://api.archbee.com/api/optimize/qSNGjc2nDdmTfGm_rfzKG-0RHDGCnTFe1A4iFtyC9St-20240807-173201.png)

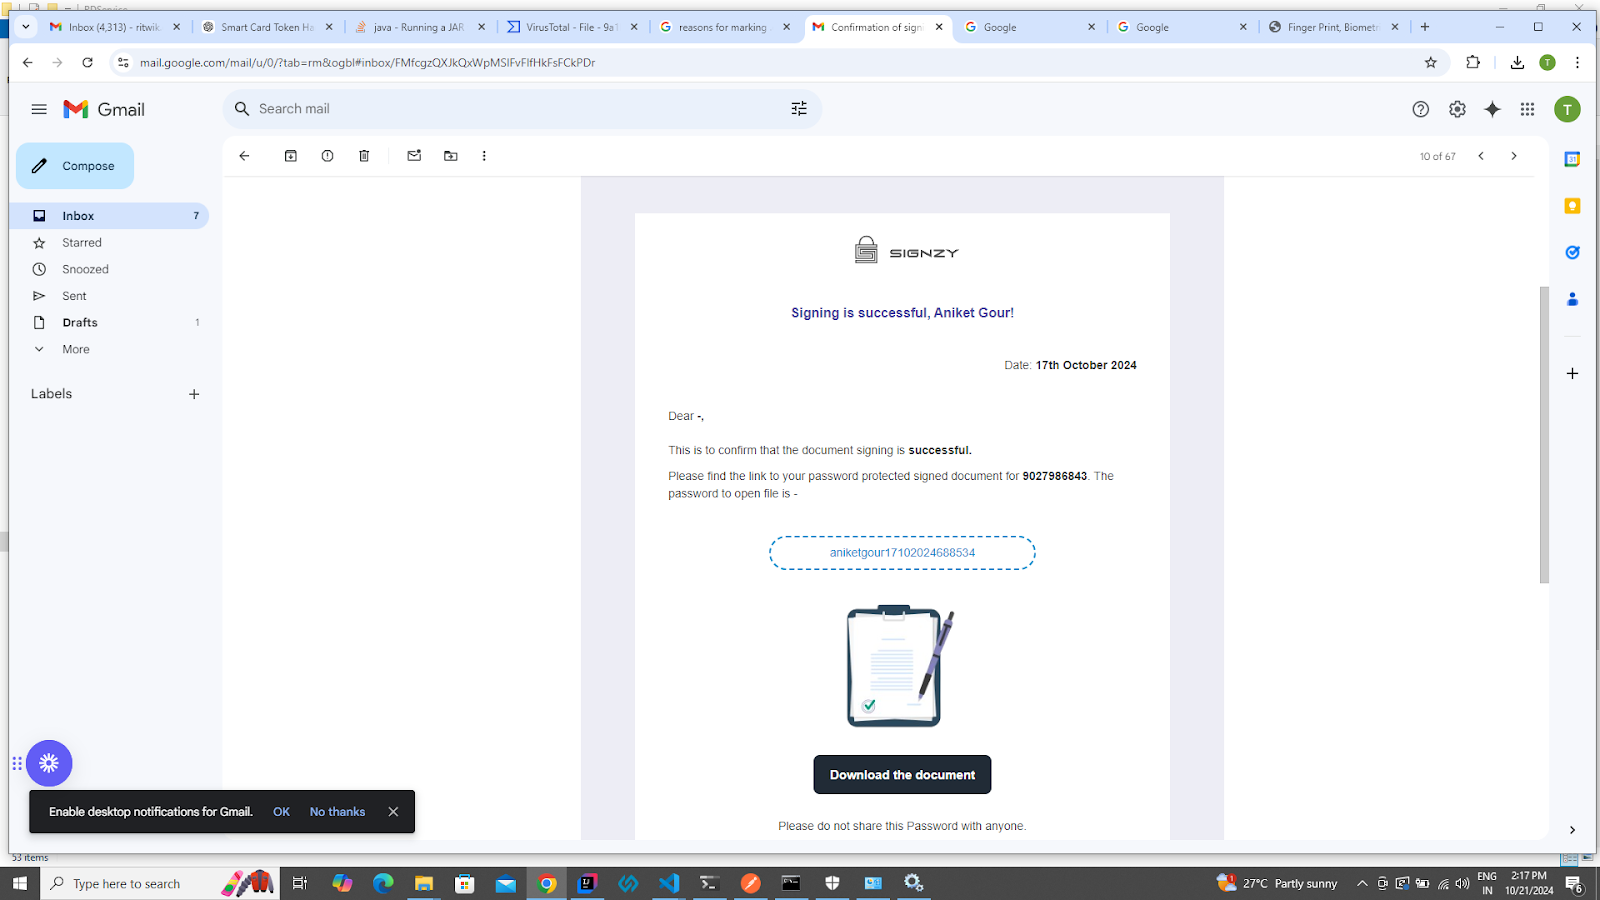
**Step 29: &#x20;**&#x54;he user will receive a confirmation email with the header “**Confirmation of signing the document**,” containing the signed contract.
![Contract Signing Confirmation Email](https://lh7-rt.googleusercontent.com/docsz/AD_4nXetZdxbJGY-p8jGGuvzcGxYTPXKRCptTFPRqNAjht-nupDwinTkaYkjC2m-4NpCrx-a1OjnVqLiiUQnWiMdFAiT7q1MYVPoR1MPWrAQ4a59vUaoC4gpFs8nj5ksPh752NN8-hReJdMP8XNsNYRtyccRWHsL?key=RMS7mIdPO_86hILBTujSbA)

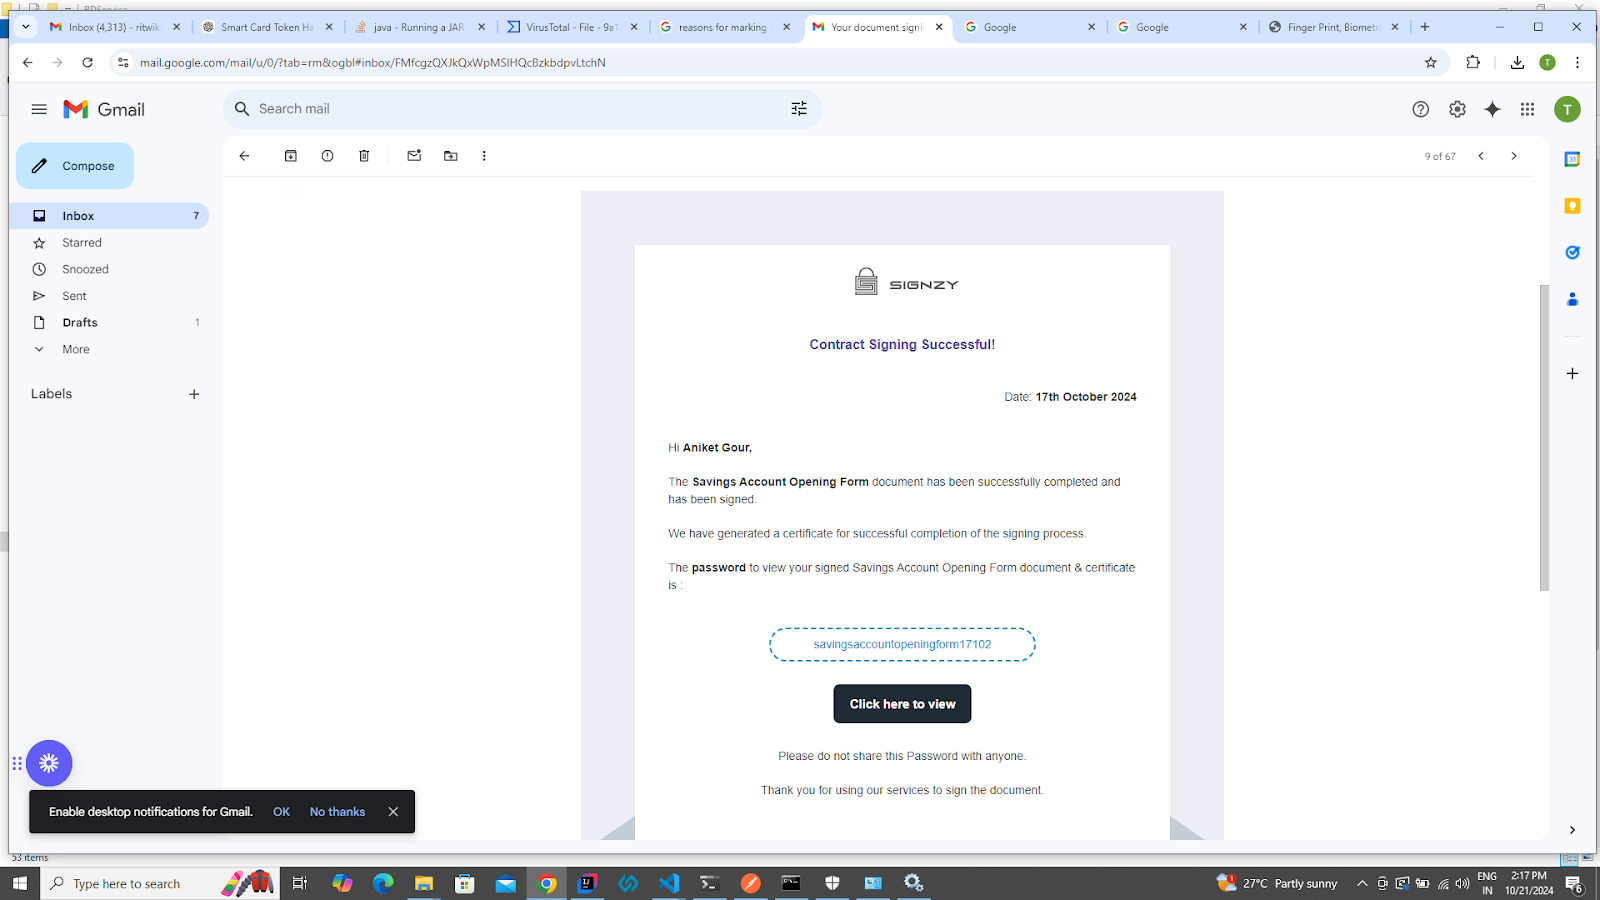
**Step 30:&#x20;**&#x4F;nce all signers have signed the contract, the user will receive another email with the header “Your document signing has been finalized successfully,” containing th&#x65;**&#x20;final signed contract&#x20;**&#x61;nd th&#x65;**&#x20;Audit Trail Certificate**.

![](https://lh7-rt.googleusercontent.com/docsz/AD_4nXdvL9AmFfDa_BRSMGlTOYsZwtFPfSmkH-5cgCd5JlQTzDnPFTvqBE1RkxtSwOSdrtz_VkFOIkGiA_6riwfhvebsSV6CayyQVlswk6QxXScKYh_sUhAdMzRQMHgnQugNvDQo67ttiTR2en14OG2jyh5w3UnT?key=RMS7mIdPO_86hILBTujSbA)

## Contract Signing In Pre-Production Environment

The **IDEMIA MSO 1300 E3 RD 1** device is whitelisted for the production environment by default. To use the Morpho L1 device in a pre-production environment the device needs to be whitelisted for the pre-production environment.

To whitelist the device for the pre-production environment please drop an email to [support@rdserviceonline.com](mailto\:support@rdserviceonline.com) along with the device serial number requesting to whitelist the device for the pre-production environment.

### Prerequisites Required:

Below are the prerequisites required to perform the Aadhaar-based fingerprint signing in the pre-production environment with the help of the IDEMIA MSO 1300 E3 RD 1  device.

1\.  **Window L1 RD (https/localhost)**: Click here to visit the [website](https://rdserviceonline.com/?gad_source=1\&gclid=Cj0KCQjwwuG1BhCnARIsAFWBUC16U1ZIROSCbsGrnKYmBaeE0aAUkAQTTtk0oUlUzdzL3GeR86m0CrQaAtmmEALw_wcB).

3\. IDEMIA Morpho Biometric Device L1 **( MSO 1300 E3 RD 1** **)**.

Once you have all the above-mentioned prerequisites follow the below steps to set up the IDEMIA Morpho L1 device to perform the signing.

### &#x20;Steps to follow:

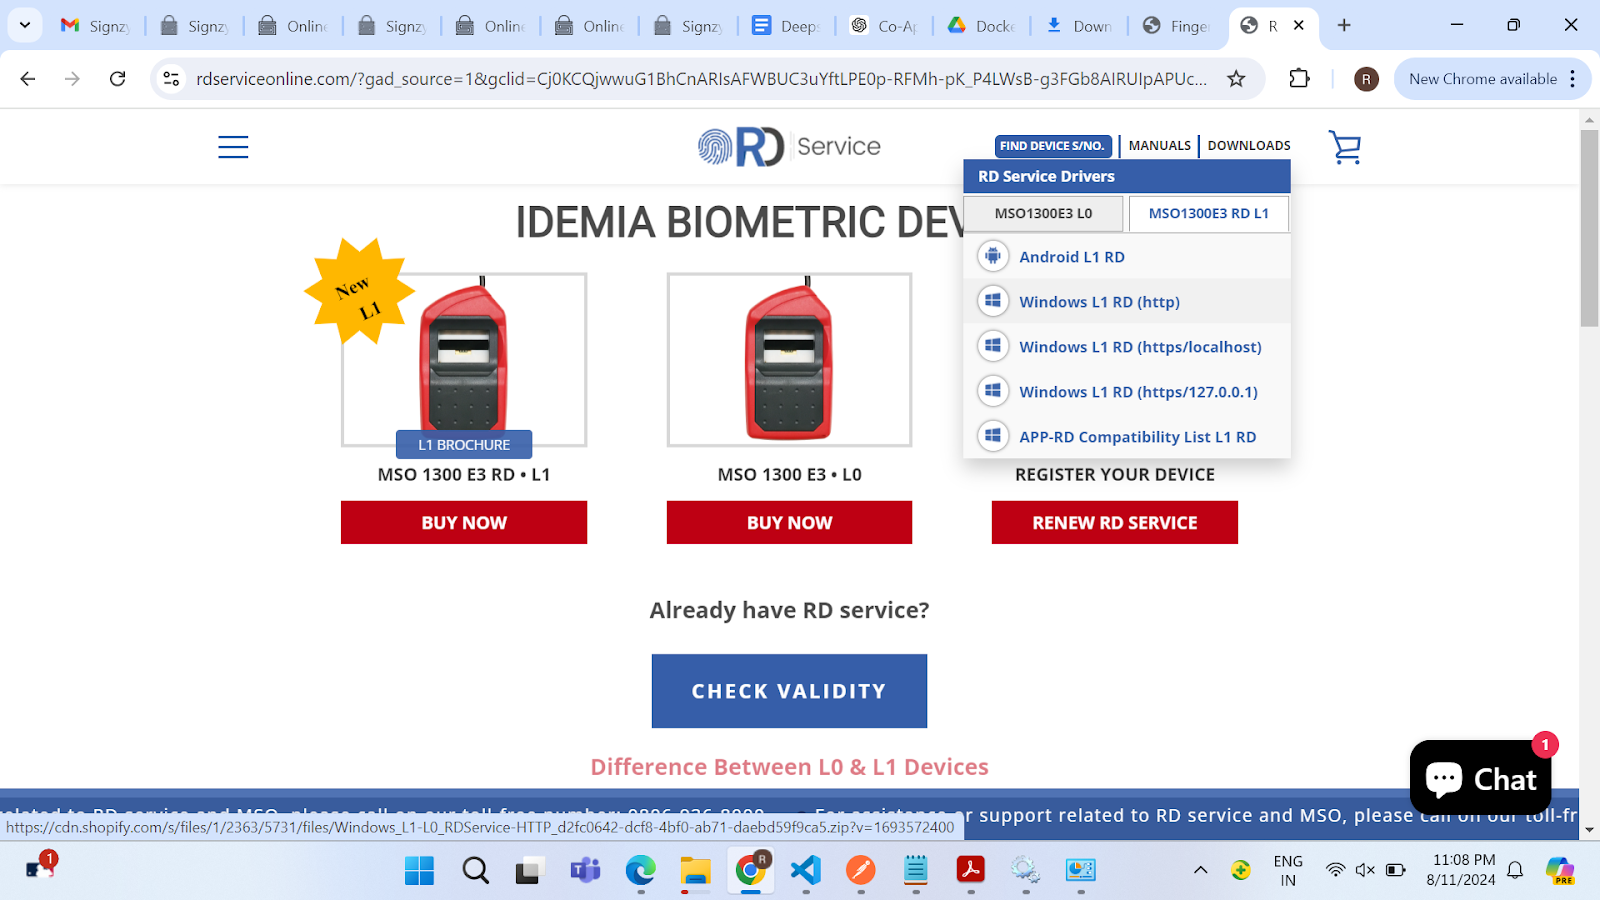
**Step 1:&#x20;**&#x56;isit[ https://rdserviceonline.com/](https://rdserviceonline.com/). Click on the download. Select the MS01300E3 RD L1 and click on the  Window L1 RD (https/localhost). The driver will be downloaded.
![](https://lh7-rt.googleusercontent.com/docsz/AD_4nXefyMod3DBgwEYK4qrXGnAns_gHNtgqHBpeYIewV25WX_ZOtqdfv9oEGePjBTvn4YFUklPzAGRWadTo2Bk_FD6pvp2Zx88afAAKLRhhScYg5OYlrPIqYeJ5LXcE4XM6eKdzHNUs08KYI5_Ivj1YjHuyCpqv?key=_0Cba4i6TK5v38ucsScutA)

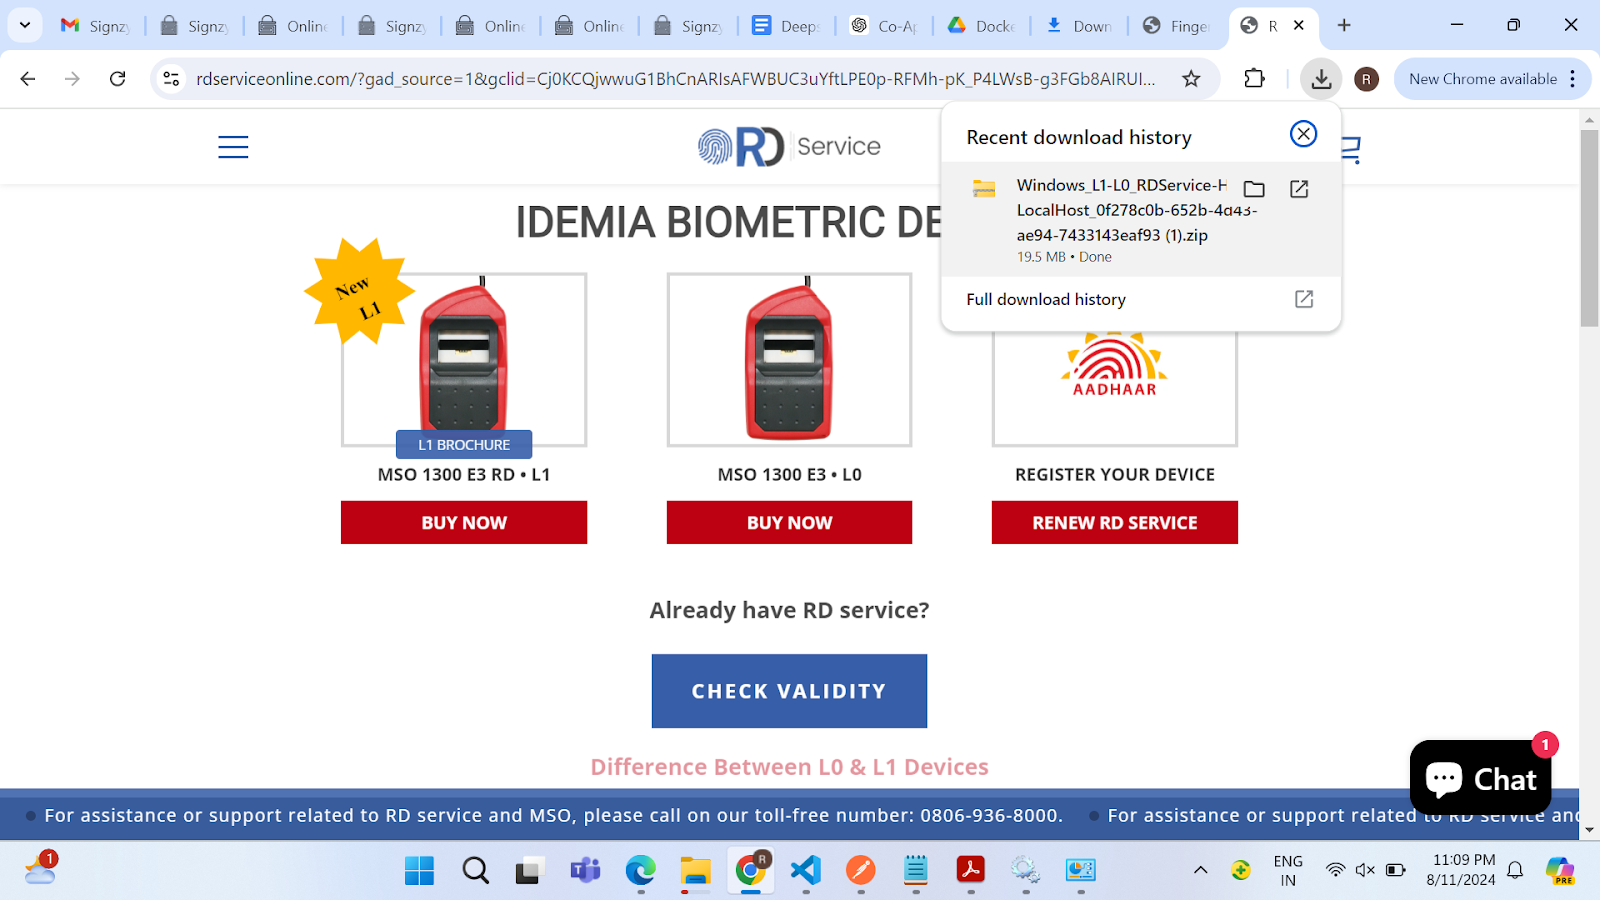
**Step 2:&#x20;**&#x44;ouble-click on the downloaded zip file.
![](https://lh7-rt.googleusercontent.com/docsz/AD_4nXc6WalfafkSqd19VnigJDBm7bCefmHJMFA_74SXaj0BQ6DId75Sr_amke-PTXhsNYjk4v-sJrbwgc3QEyDMBBwSkZWNNLeyvJyHOChKImL3CGJHpZC1_W3GTiMH5qPhwnU9svbPhYxGxMhD8TFUBgExtmIa?key=_0Cba4i6TK5v38ucsScutA)

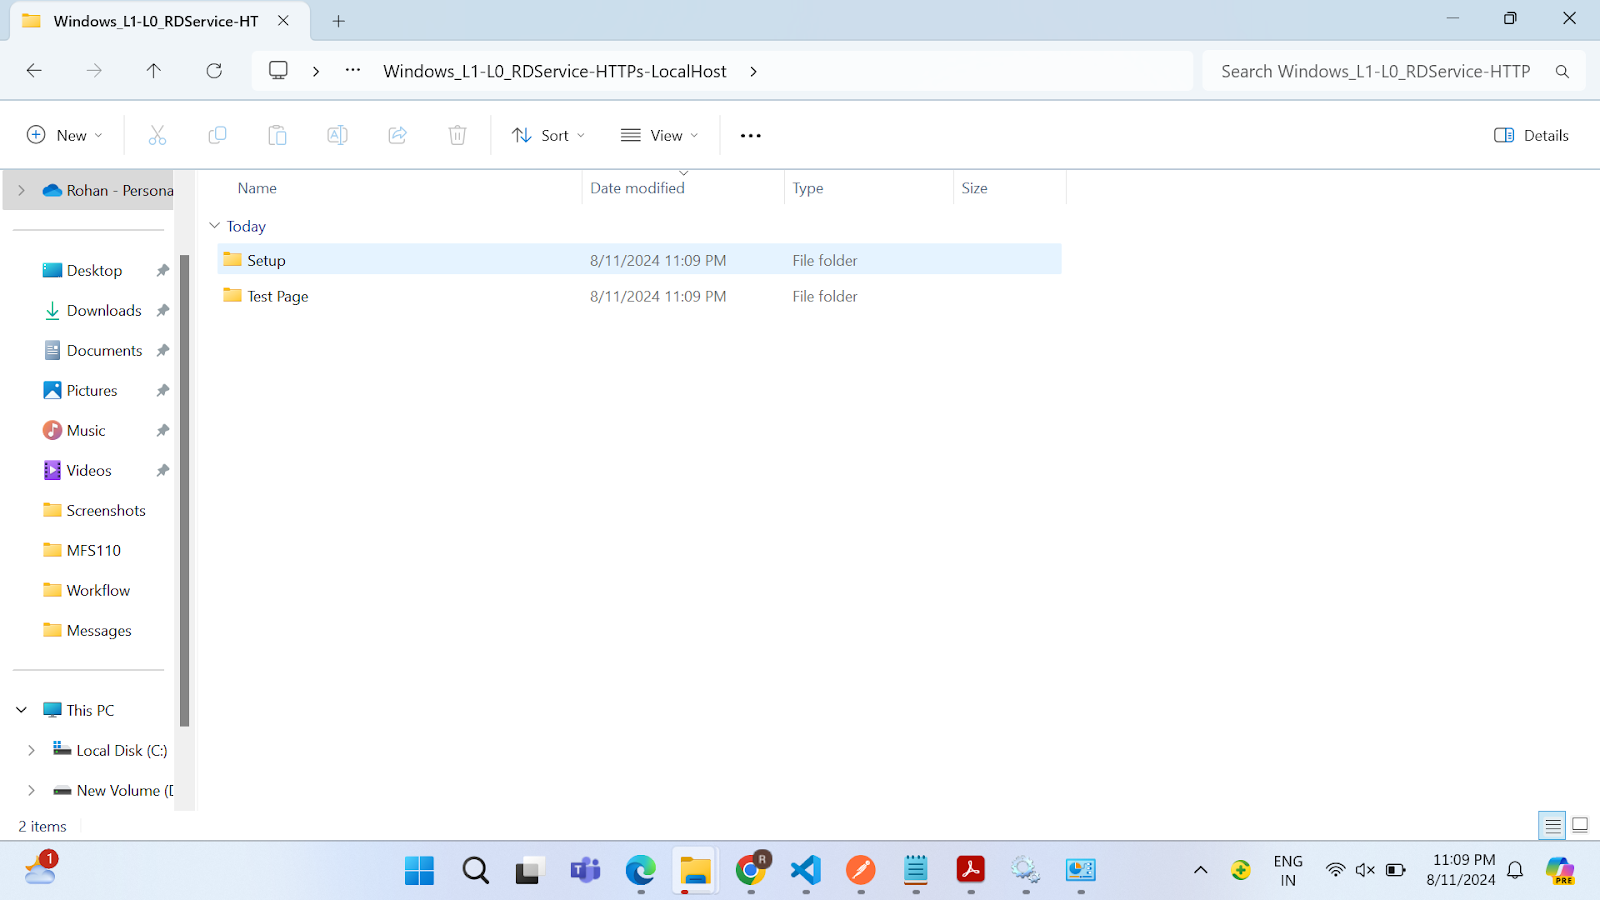
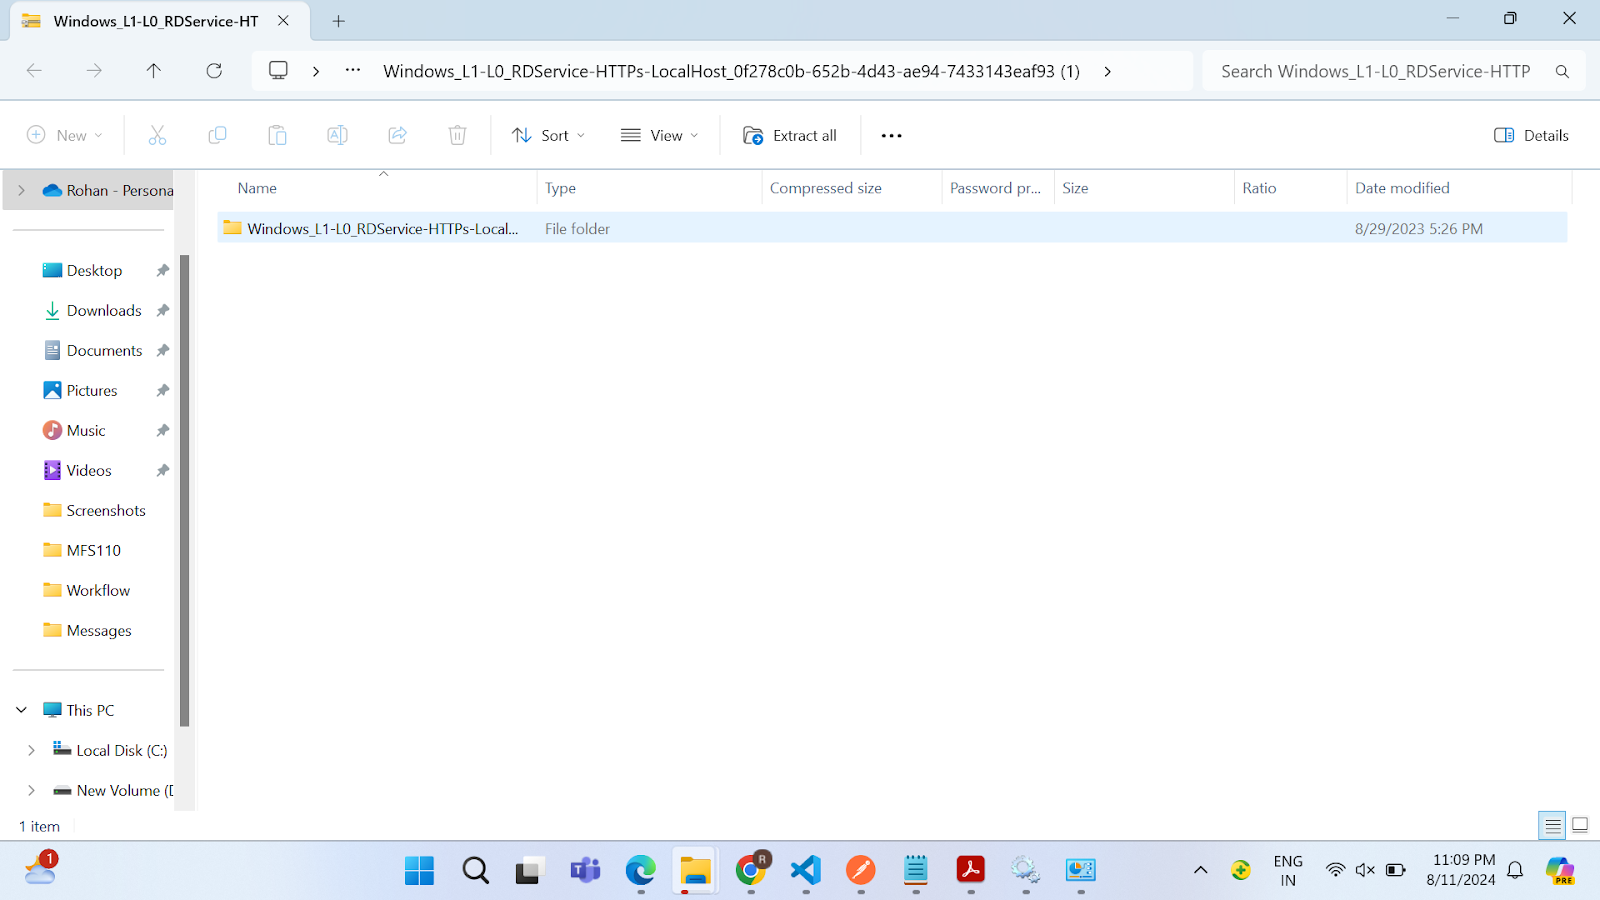
**Step 3:&#x20;**&#x54;he folder will open. Double-click on the Windows L1-L0 RDService-HTTPs-LocalHost file.
![](https://lh7-rt.googleusercontent.com/docsz/AD_4nXdiW0gn0n7K3olk_cMpHTFRjjj5Wh7yAnWWALxWllFG6z_5_-vRrlzLXARQdfj0sczuvs9ofRJK0rsOd45bvafuYj5-z9ovVYvVGmhp9d87gW9w3jsDCbCGF0_AhUI3VfDTDD16QJN4eIu3SaDC5fcreLg?key=_0Cba4i6TK5v38ucsScutA)

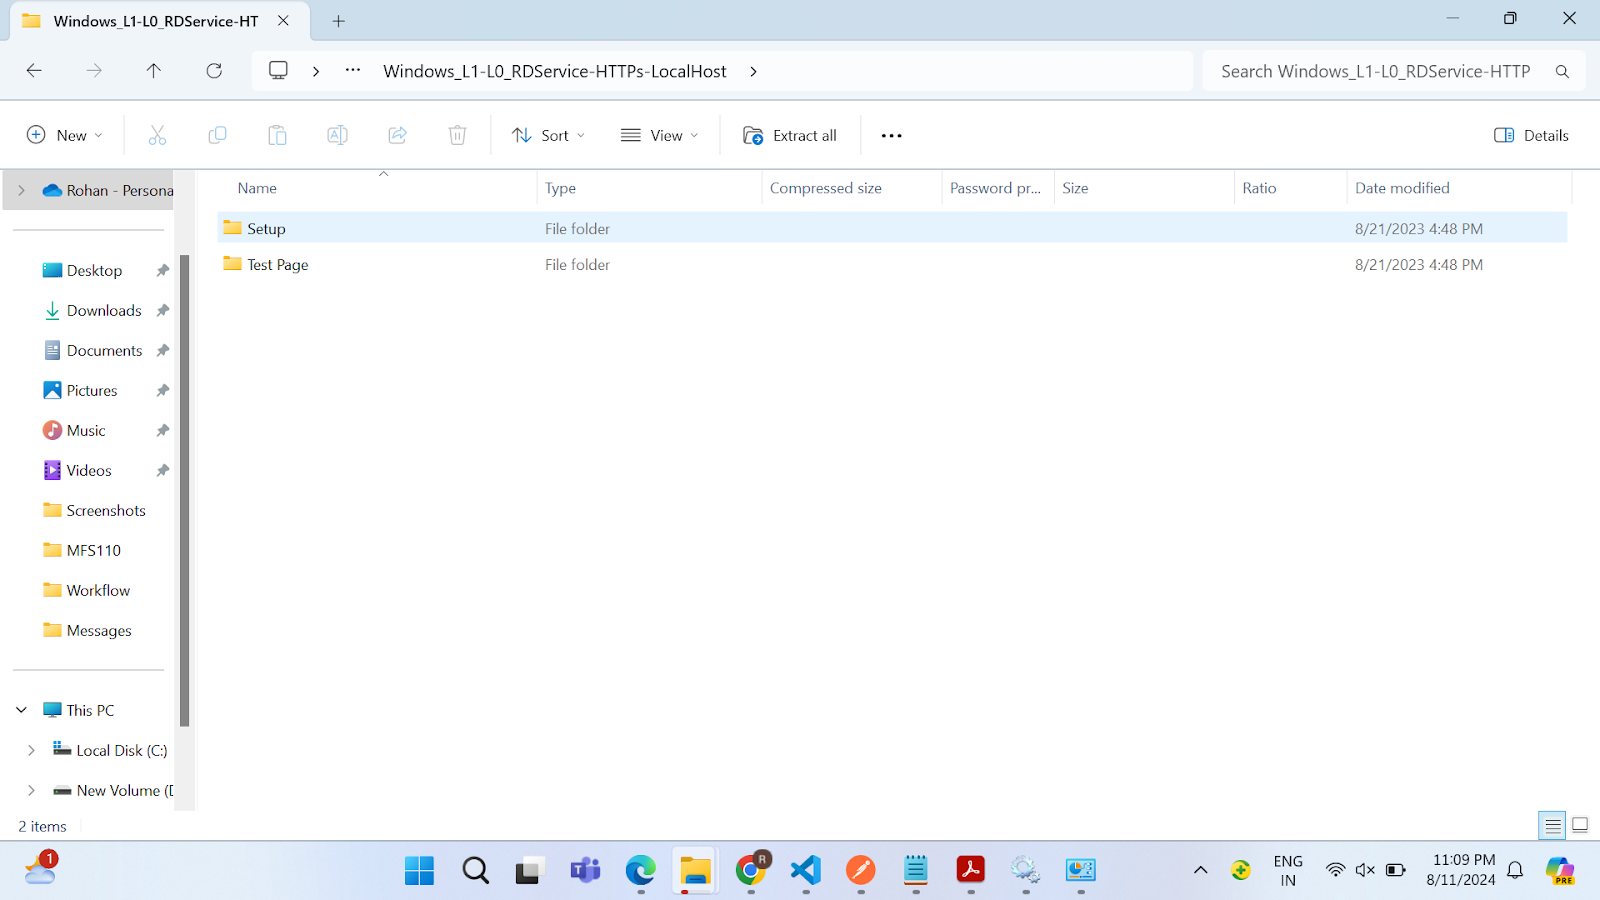
**Step 4:&#x20;**&#x41; folder will open. Double-click on the “Setup” folder.
![](https://lh7-rt.googleusercontent.com/docsz/AD_4nXcFV6GG0ShM-xYe5q_dVmAAW1QasT-8Ati0IPCCrR8GBXDZ7quwWJzawW11odaM1euupaFDP_mmSpHWfPmWaT0lBxlPlLh7Ldil_X3DUp6s92iqrGVautCqXEKMmQuOg4rK_P5PHHWWSK-Y8kgmL_vXHizJ?key=_0Cba4i6TK5v38ucsScutA)

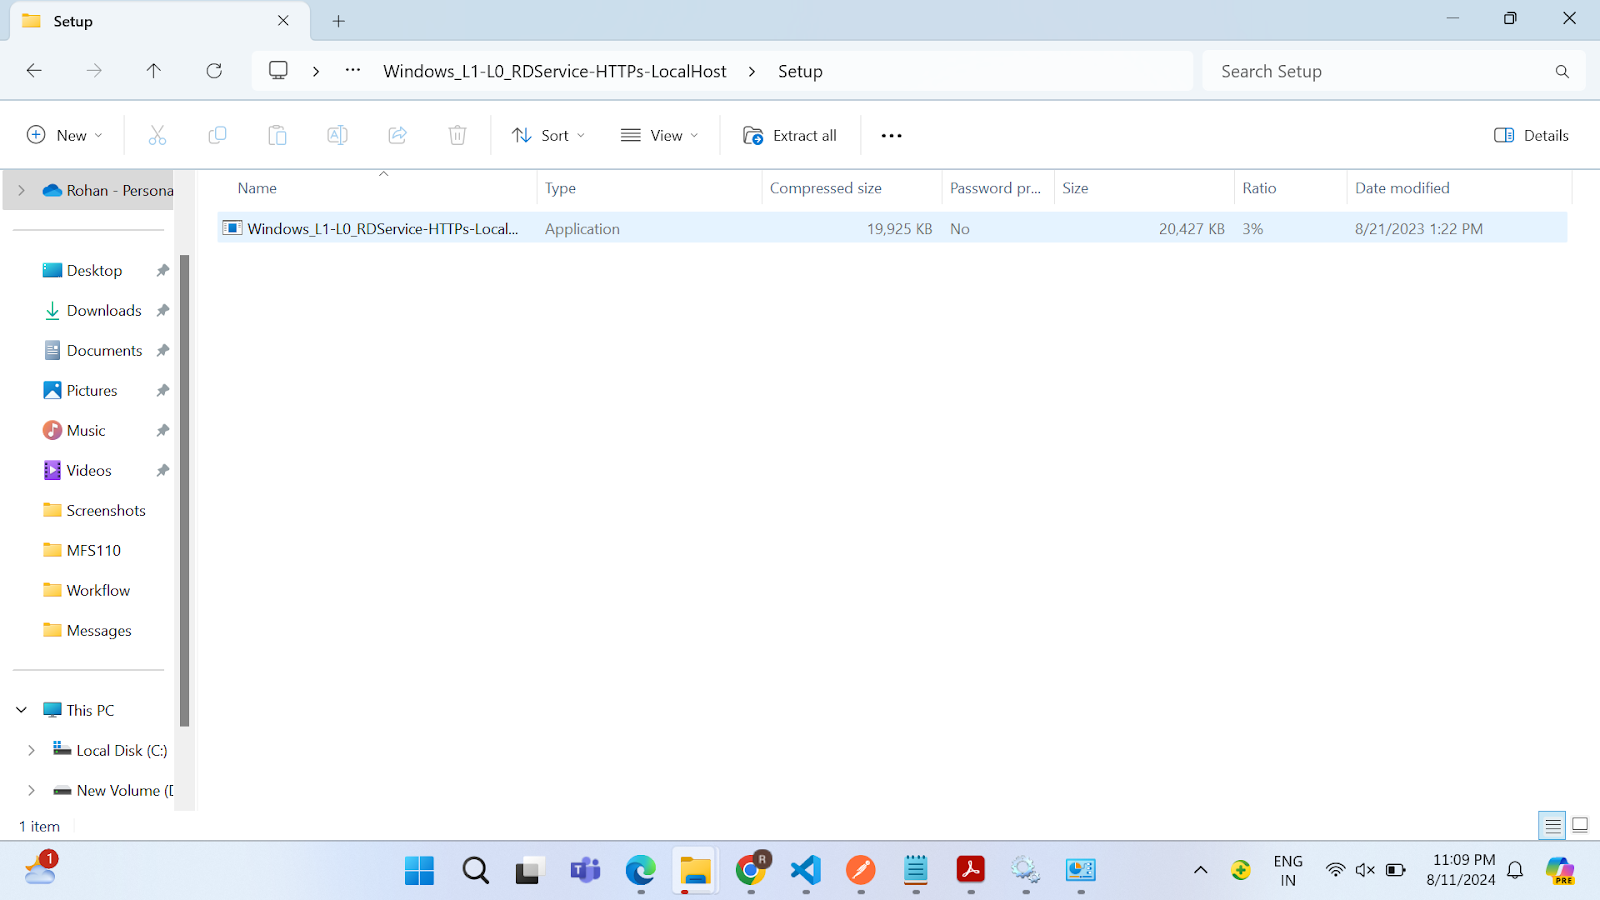
**Step 5:&#x20;**&#x44;ouble-click on the Windows\_L1-L0\_RDService-HTTPs-LocalHost application.
![](https://lh7-rt.googleusercontent.com/docsz/AD_4nXe2InXyHTdAk74qQnoH1bl8Anqbaa0yDoxSU7CHcpLxtSa5HsQz4CsUF0SYh84jkKn8Hhhm5VzwvV1MwRrRj1kWG7maoBkZMayKjJZjU6z5uT1VJBSfAlySFIWD-KIi623bWosGe7MGXPAChVa_zM-lxpc?key=_0Cba4i6TK5v38ucsScutA)

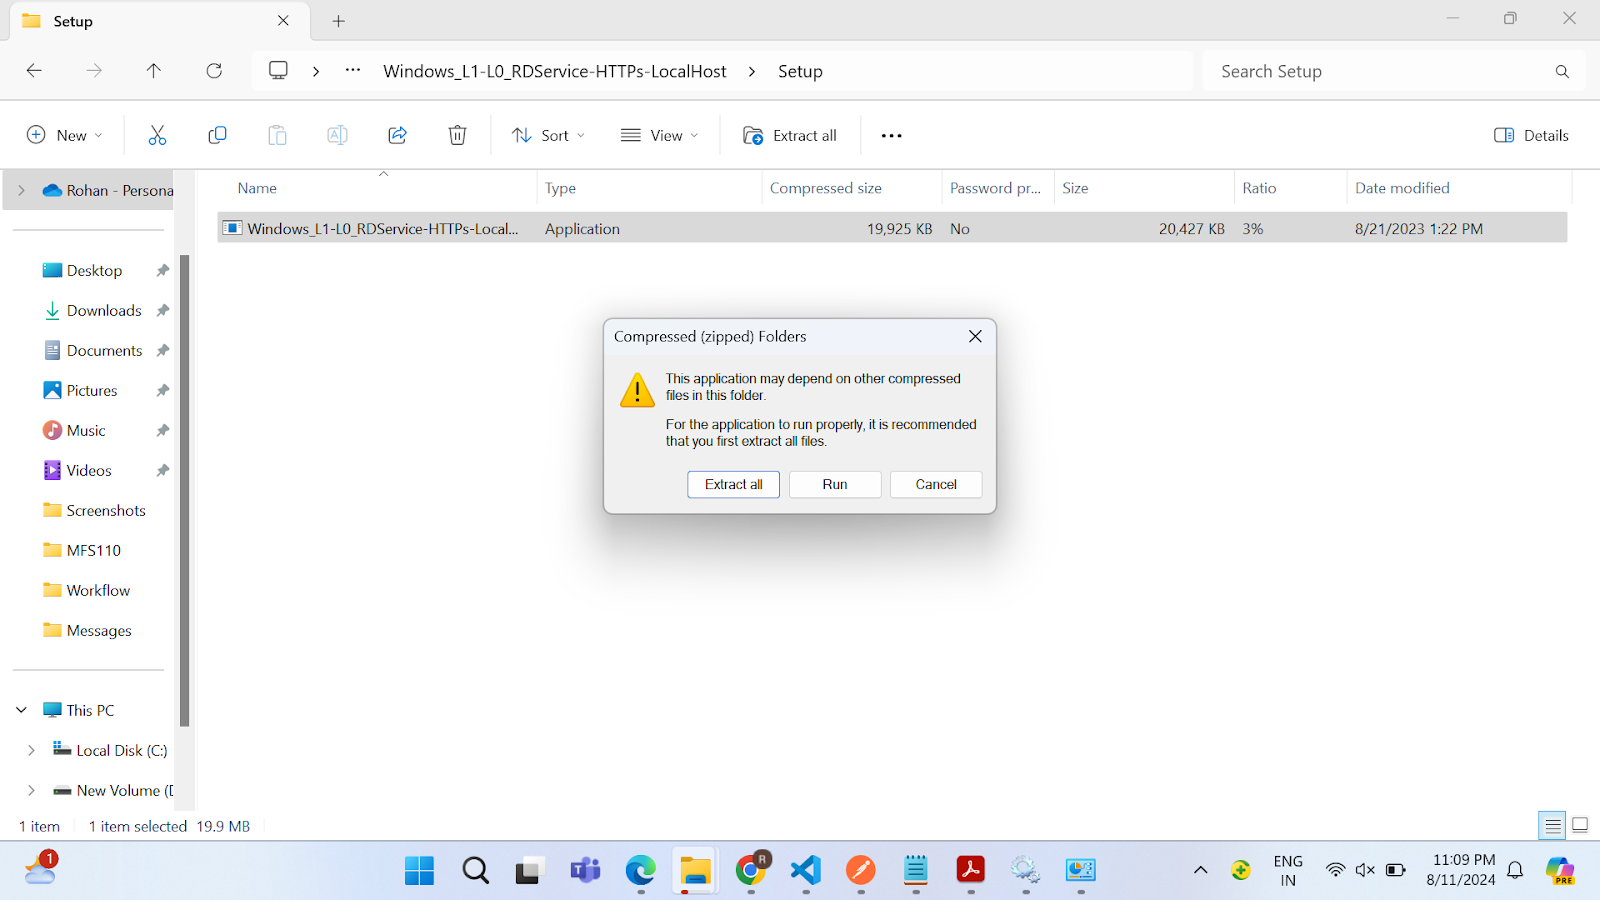
**Step 6:&#x20;**&#x41; window will appear asking to extract the file. Click the “Extract all” button.
![](https://lh7-rt.googleusercontent.com/docsz/AD_4nXdXQW9rpcrjEyop6i7emn9ldgGIu4ptsuXetoCA-n4eux2I29skR_dcnBjF6pLaGuZBldVdCRjV9VBB7EOpz5xZ_H26Jb__5zc0izU62RuYPUr5xgfpxGvl_eVwcytQYq92u4LSyVY1Fv5A0ZhL1O0rmPvs?key=_0Cba4i6TK5v38ucsScutA)

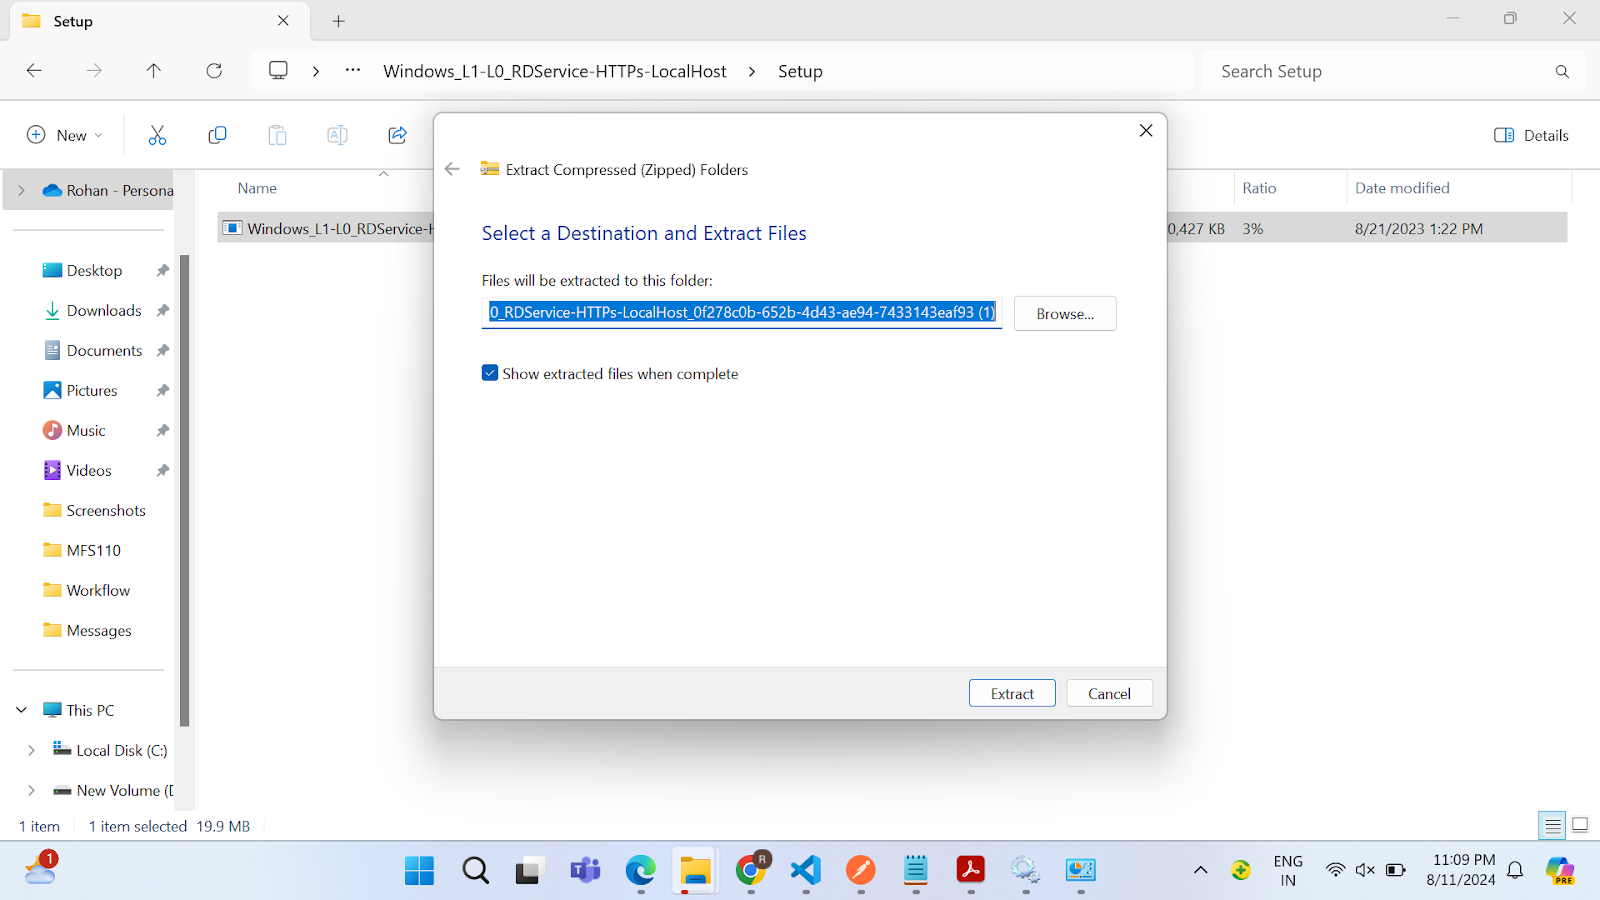
**Step 7:&#x20;**&#x4C;eave the destination folder as default. Click the “Extract” button.
![](https://lh7-rt.googleusercontent.com/docsz/AD_4nXejCVu6j-ewuNq0wCFnWqMtncZIHZBJs8qOGsn28VbszDnGxGbwxH5eS252Nz76gu2oHD1_cIKx2o4CQjhlP36SVYdNuexorihQzbSpypxHerNt3FAkon4tujlB7mkWM7w2t4e2-NqquFnV_NtWrc3mB_4?key=_0Cba4i6TK5v38ucsScutA)

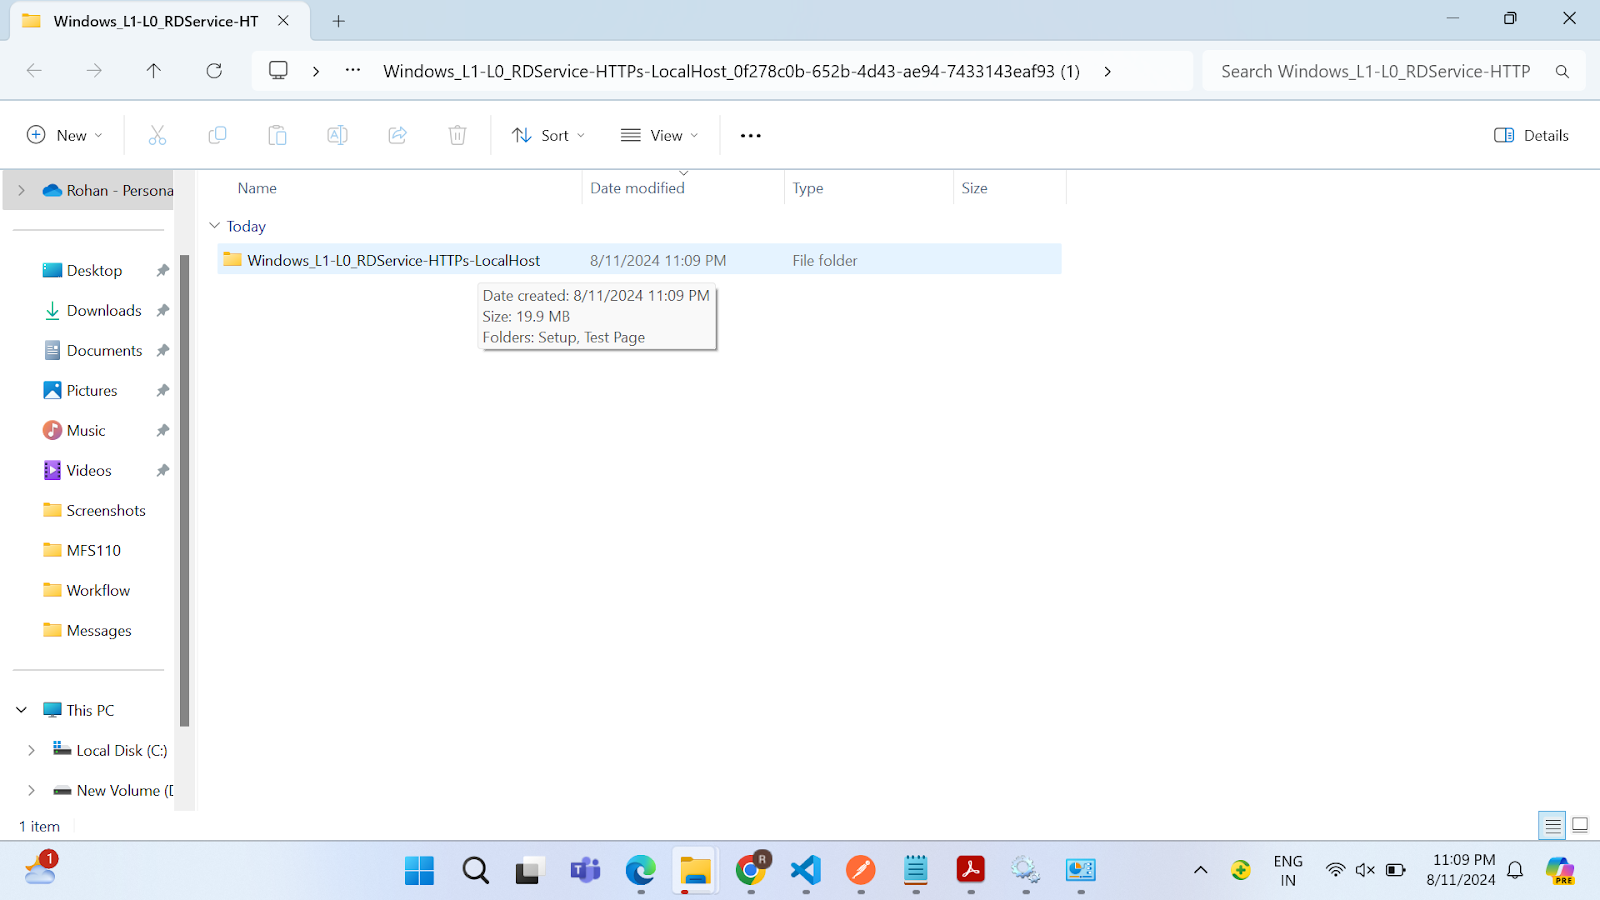
**Step 8:&#x20;**&#x4F;nce the file is extracted. A folder will appear. Double-click on the “Windows\_L1-L0\_RDService-HTTPs-LocalHost” folder
![](https://lh7-rt.googleusercontent.com/docsz/AD_4nXeiXO6gafyCVvbaI25oiebdMZ48JGMwl5K7Wm8SX4SWQrfdOoVwDv_3FyM4xyURk8XGm084MXHjcY5_JI634M6czSXGRFwHsmTEhDgVtD7b16wO3n915hJsJSybZ3PCL1ceODU7TOKGVwluVMWbnUhhI04?key=_0Cba4i6TK5v38ucsScutA)

**Step 9:&#x20;**&#x44;ouble-click on the “Stepup” folder.

![](https://lh7-rt.googleusercontent.com/docsz/AD_4nXfmJ9tkAy7aYarL1RIltOqz2HhTqVw6PRPh-EpDSxo2yMOYXD-FfTSf1iV48o-yimH8U3spFwaGDOuUMvoioor3LcO4NEZq97xLAcocNMw_uC-_HhIsHDjnB5mmEpvwz5-VgVeYjlHJ6oeV97MSfg0oQvVf?key=_0Cba4i6TK5v38ucsScutA)

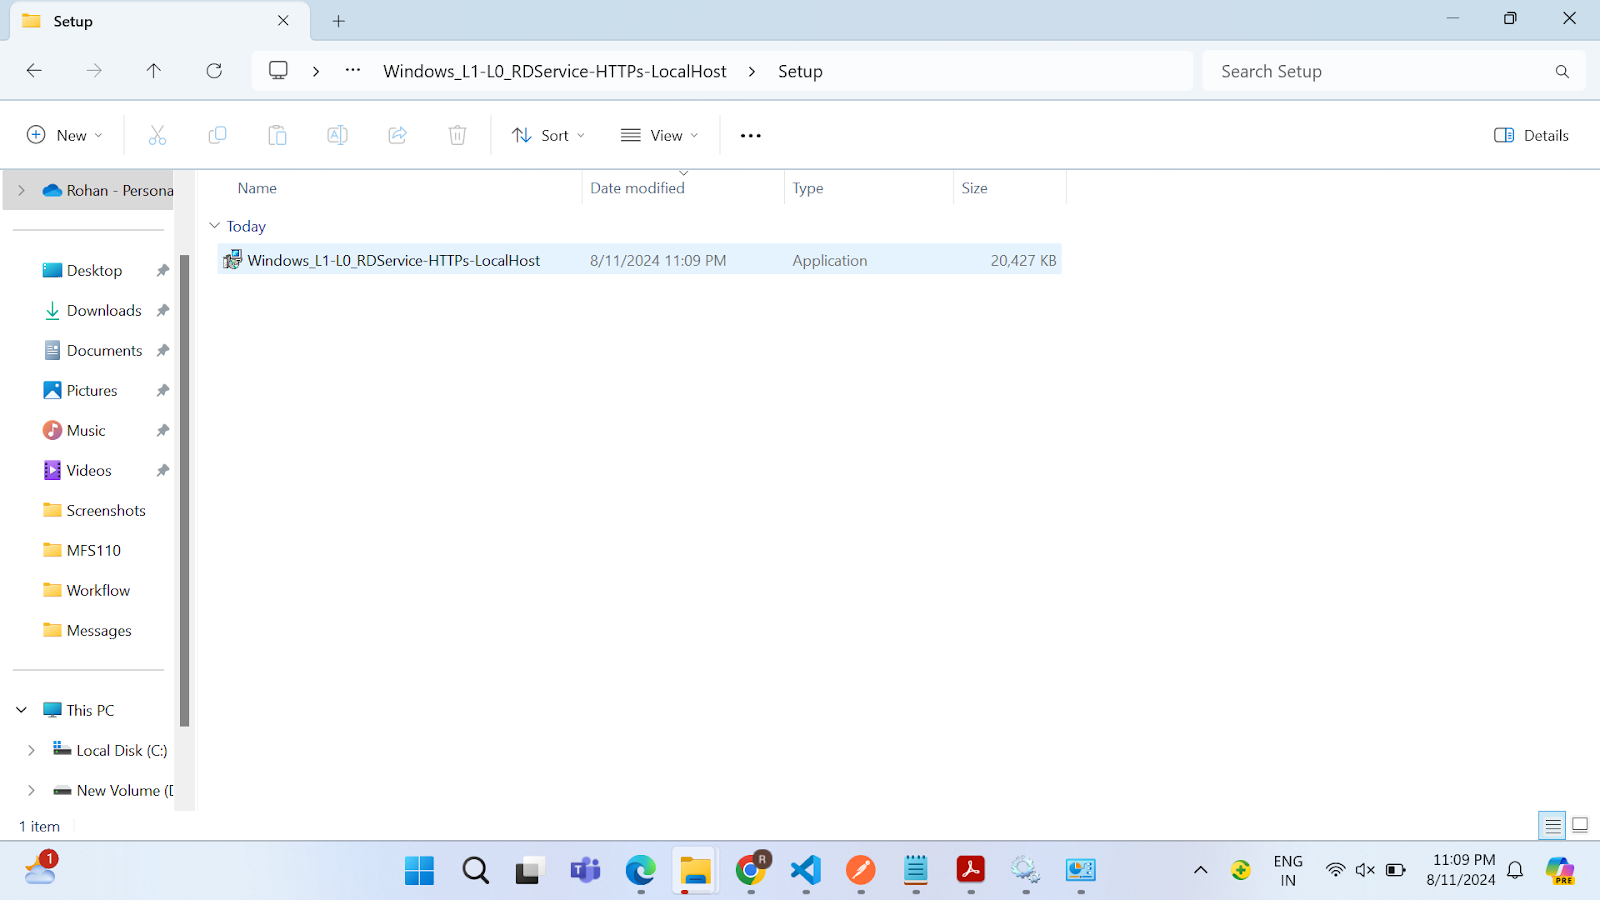
**Step 10:&#x20;**&#x44;ouble-click on the “Windows\_L1-L0\_RDService-HTTPs-LocalHost”. An administrator window will appear. Click the “Yes” button.
![](https://lh7-rt.googleusercontent.com/docsz/AD_4nXfofKxH22nYe-JG6UNAINyxoGbuojLjMp2jLi5RbKdjdfFBBhyN4bNYsj0Etm6U9lDJ0hx8vI8o7rbbtCcBMdrTolwS97bv2oweureQLvhj7P3P2ZzJ3K2HkgfkQ6HPQ2Z57hr8iciYIv9pNqBlTp9DCvPh?key=_0Cba4i6TK5v38ucsScutA)

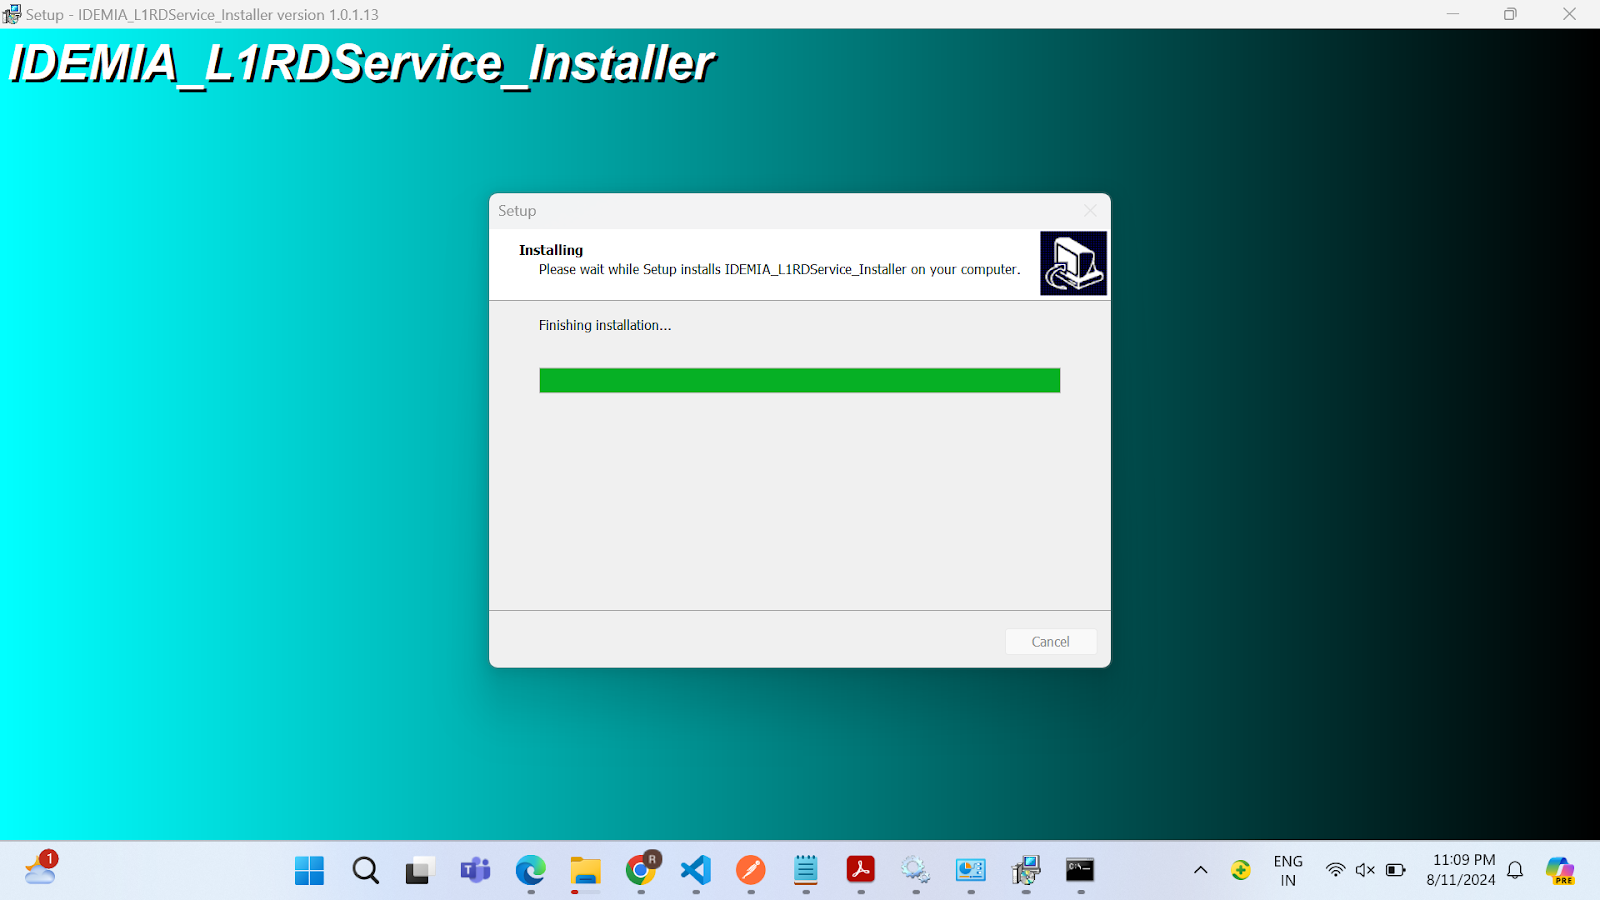
**Step 11:&#x20;**&#x54;he installation IDEMIA\_L1RDService installation process will start. Please wait for a few seconds.
![](https://lh7-rt.googleusercontent.com/docsz/AD_4nXdObUooy5uxSRlDHfViEM_diBWGrGfYk0VZG_3uu_hpmuLmPyM17hS3rpN5xyLNhqRiK3Hx-UWsQSpUyr6DzwwzSEntbAbmCpHjFjq4AT1L2Pa4Jp-NCGFOLFkxYjdgwme0NVfjuh46jop7VLQw79hm0_ep?key=_0Cba4i6TK5v38ucsScutA)

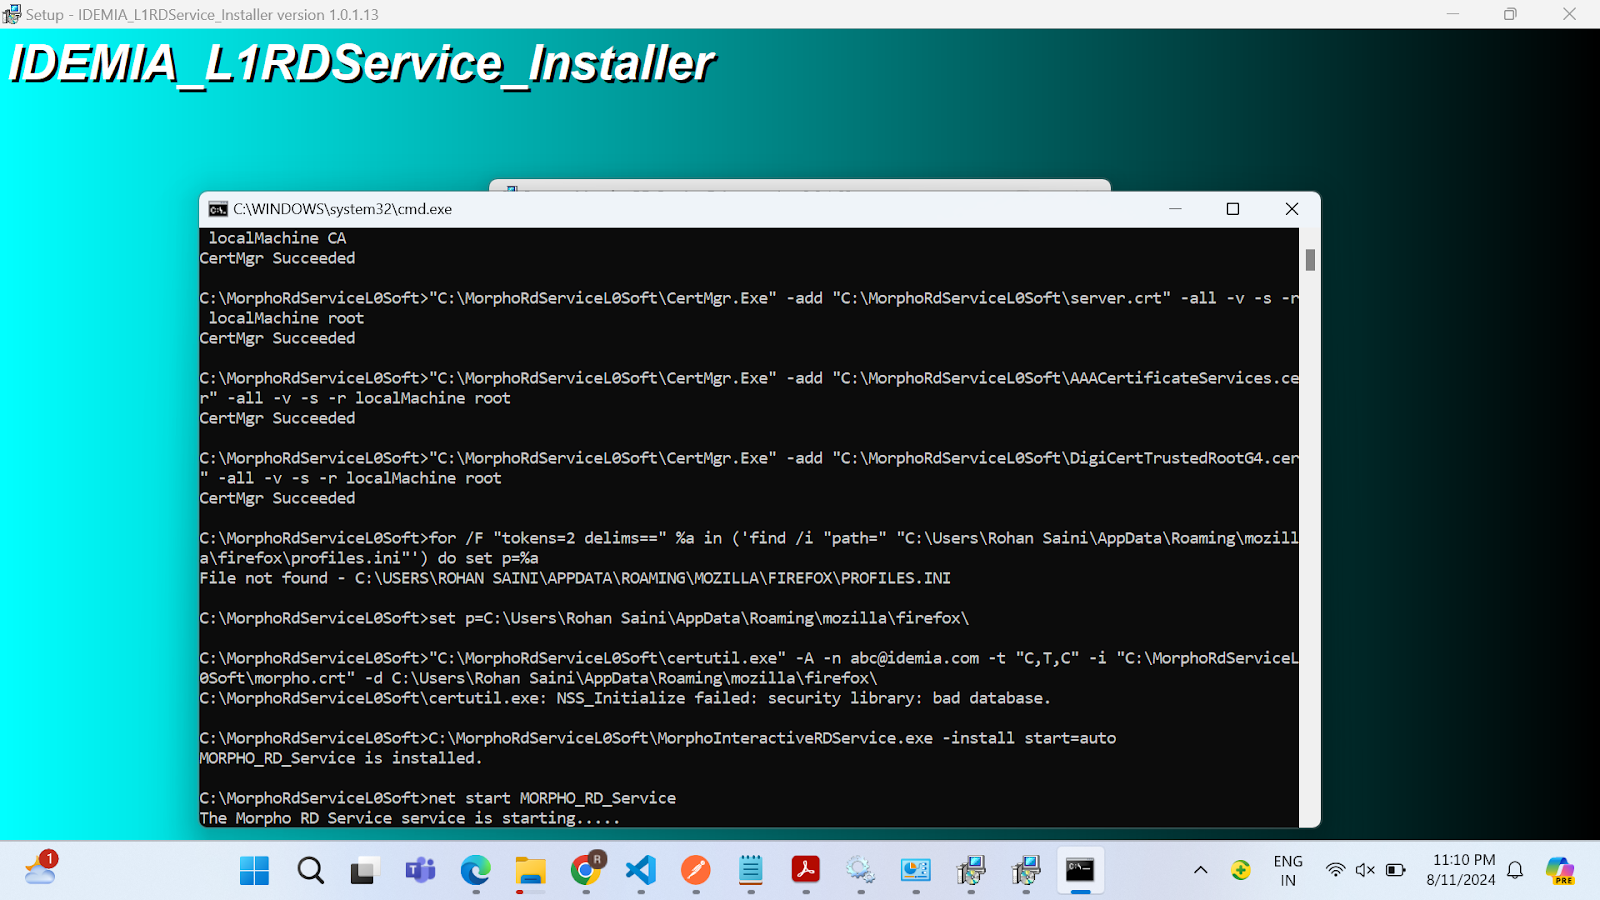
**Step 12:&#x20;**&#x54;he IDEMIA\_L1\_RDService will automatically start. Please wait for a few seconds.
![](https://lh7-rt.googleusercontent.com/docsz/AD_4nXfz6wXLunrfmMJfeYxlJyb3vSfFdAV_xHzbm09CRaHsqzoOP1n_l_xeI75fVJwfXllyzYXELsKFYkLXZnW75HWyqaTfNNtun_SWtHa6iPKB9_8urW8oMrxytEoHNcMcZ5t45kUdZeUCcmK_RnEx6DmZkI8?key=_0Cba4i6TK5v38ucsScutA)

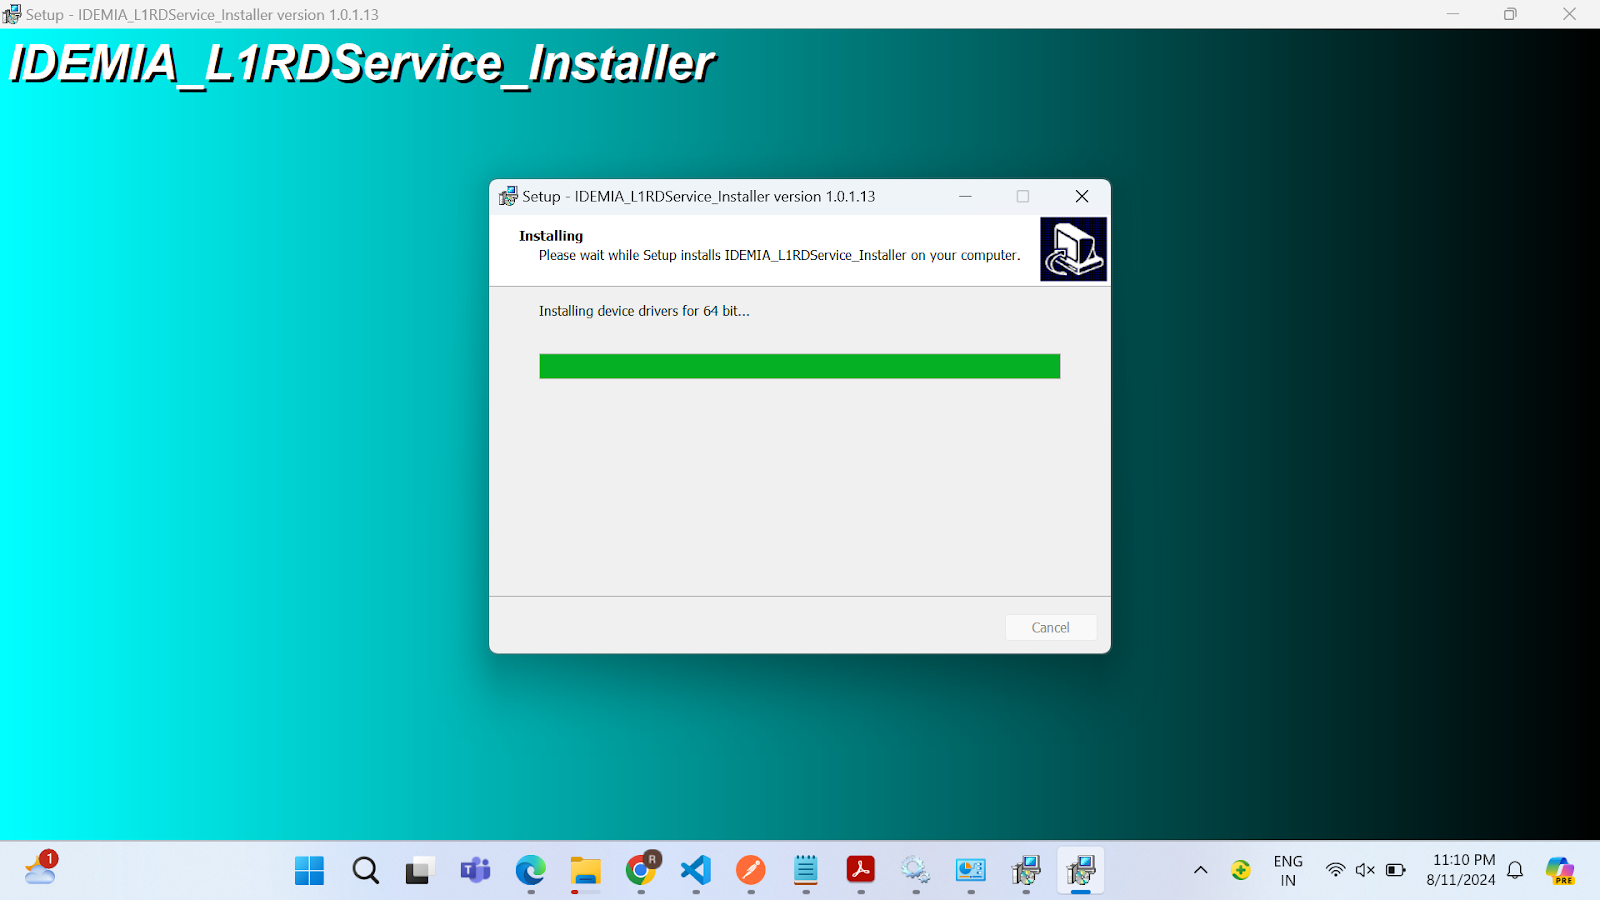
**Step 13:&#x20;**&#x54;he IDEMIA\_L1RDService\_Installation will be completed.
![](https://lh7-rt.googleusercontent.com/docsz/AD_4nXe2gqgG856_uXtE27SIH4ezrvocDzHMhuZgA1nAnFLAjxJ-MKdCJ3wslEIK-fsEzTibHWQ9uqPd4WQSpniR52MUmDQfcKA5KxC8q1Bpe_lbuDzYa-CXCiIp2AQ2wpStF0mqqCOJl8LpWxqsXNBDgkQAuBZa?key=_0Cba4i6TK5v38ucsScutA)

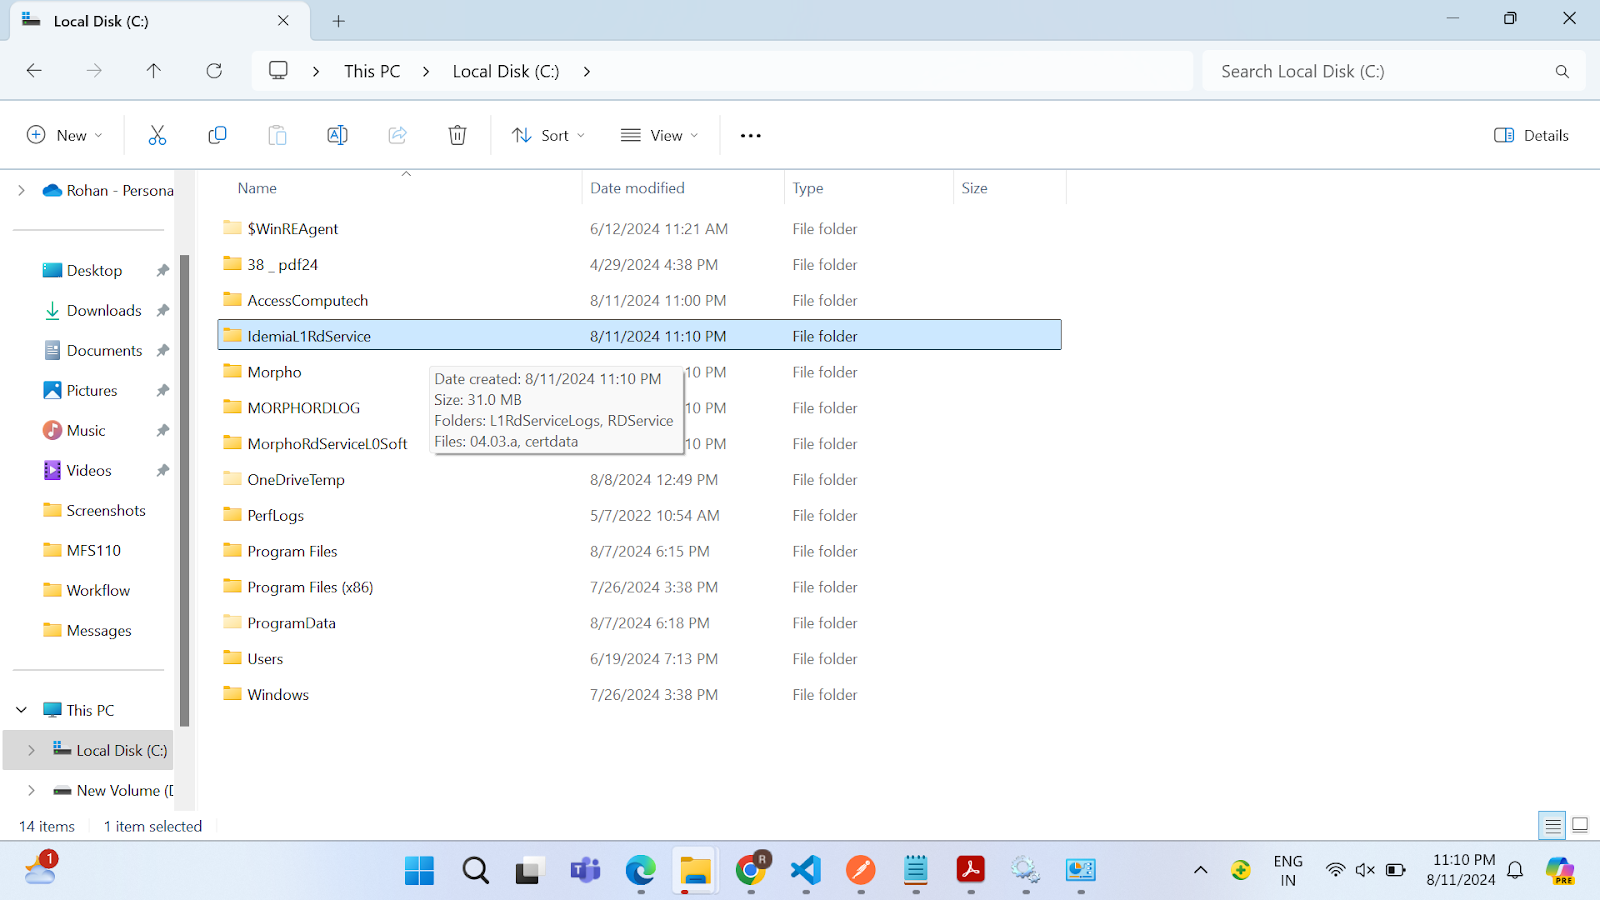
**Step 14:&#x20;**&#x4F;pen the “Local Disk (C):”. Search for the “IdemiaL1RdService”. Click on the “IdemiaL1RdService”
![](https://lh7-rt.googleusercontent.com/docsz/AD_4nXeko_W0UJipakbL7NJNYZ6ODxCOU78hILviecEy0HSApK7vmr0wN7XVP6b-aarCOCX4lBOMzhCWKWAmuzid1n2HTLUhdfMTnOJFSfVfQGOWXP-czMVXrYhqUs5AvyNMgF5N57vM6xixO412x4W_mcOEB95v?key=_0Cba4i6TK5v38ucsScutA)

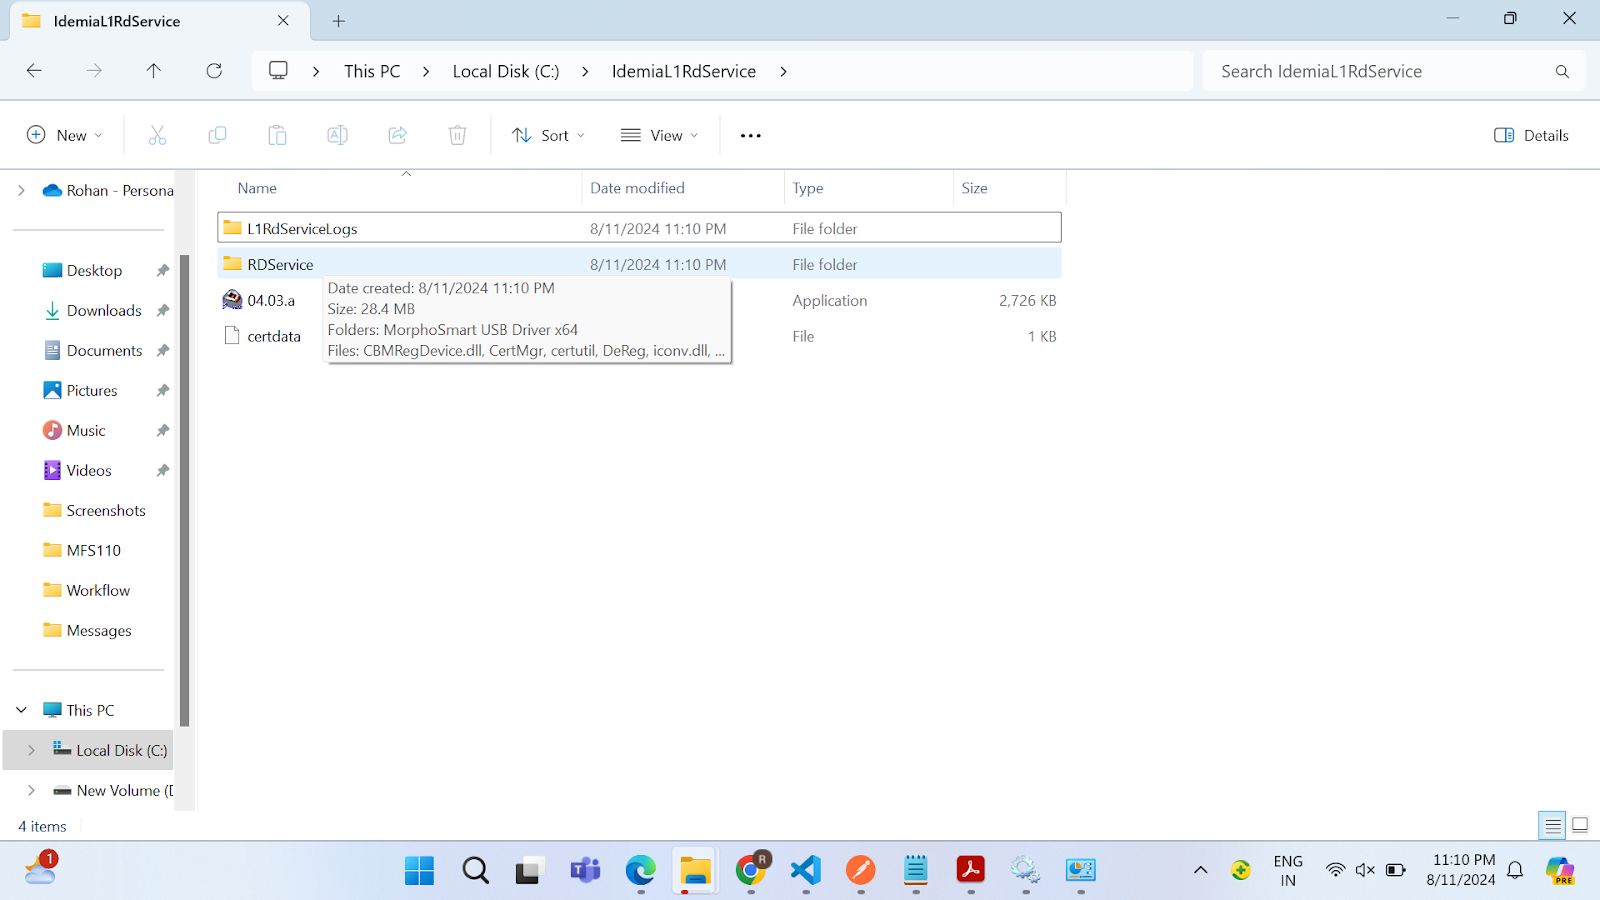
**Step 15:&#x20;**&#x4C;ook for the “RDService” folder. Click on the “RDService” folder.
![](https://lh7-rt.googleusercontent.com/docsz/AD_4nXfPjkvmMbQBA8z8HtUbHXAM1UgECR11msPpuCFlzOw3AIPOoAaG520ebp82o1Gff_glNAhjosZ2A9aUeuBnAjtJnWXxkRqDBhLgMXcoWiII0ygLeFHnxMGP3eE2btLy7qLlY1t0bbRYMNNWsZPtCQsMk-ep?key=_0Cba4i6TK5v38ucsScutA)

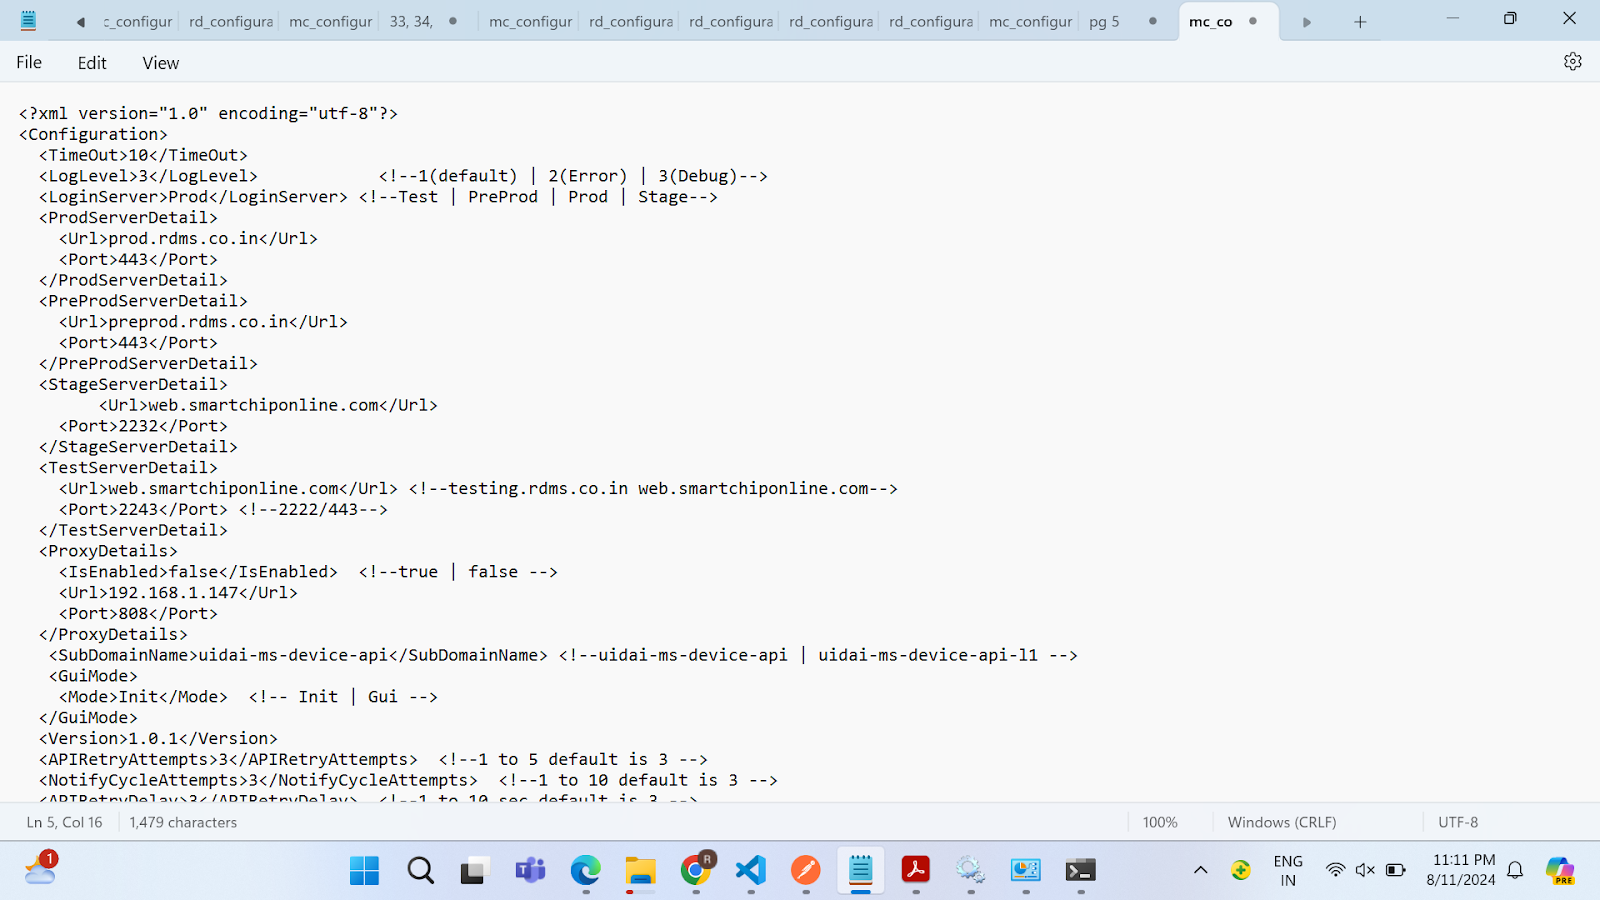
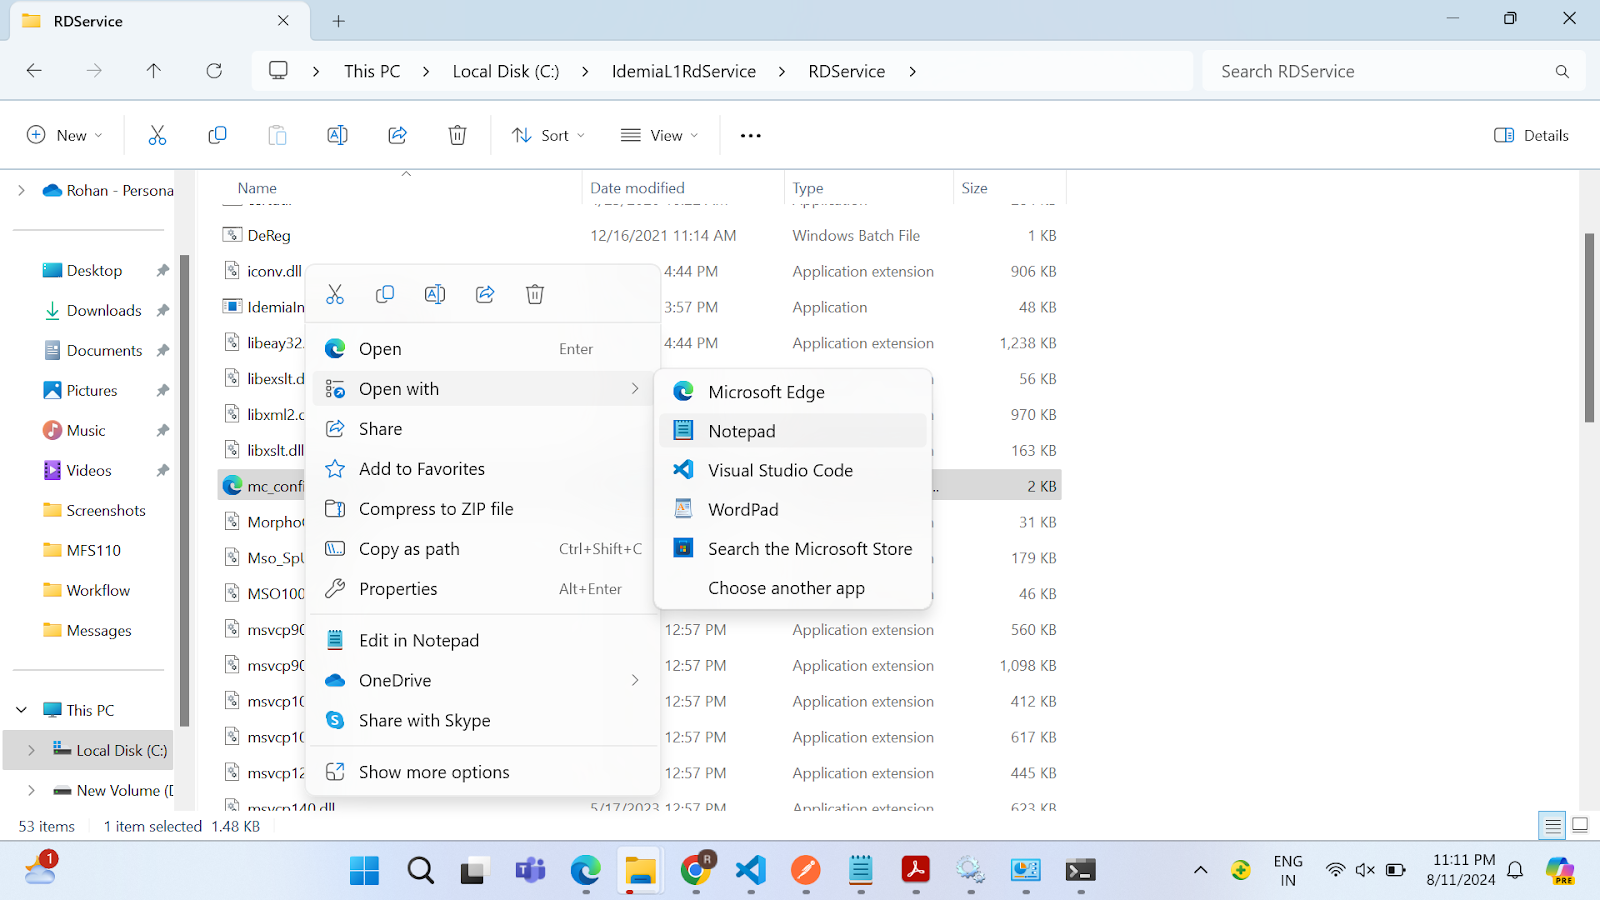
**Step 16:&#x20;**&#x4C;ook for the “mc\_configuration” file. Select the “mc\_configuration” file and open it with Notepad.
![](https://lh7-rt.googleusercontent.com/docsz/AD_4nXdJbWXLGoMMKVAkmNNorC5rHP1pqIvXy0b3qTcjS5TDMeJ2vUs3JtiAIMhNpIhnvjMXcDG08Q43IWUrmY0bjLPAgdbbEvC7ctNkNnJ4mLLxBb9a3wGzR7UBQYiOe31HNvm-UJq7zaIEsiLQ047sCqRRNQw?key=_0Cba4i6TK5v38ucsScutA)

**Step 17:&#x20;**&#x4C;ook for \<LoginServer>Prod\</LoginServer> in the opened file.

![](https://lh7-rt.googleusercontent.com/docsz/AD_4nXc4FyZsz3OBCDLTLM98UGy2_oiQ_IVmd-SeRbiMqATlIhMEQlWaLAeeyvZk7xahm21z4ouH6xvrAug3x2BtcoEdyelGE84QawNng5-l7tZIkx_iMgLsvGcaUlo8ynhOBcgFEW6M8mcUmvXErVQuV9wgfR_b?key=_0Cba4i6TK5v38ucsScutA)

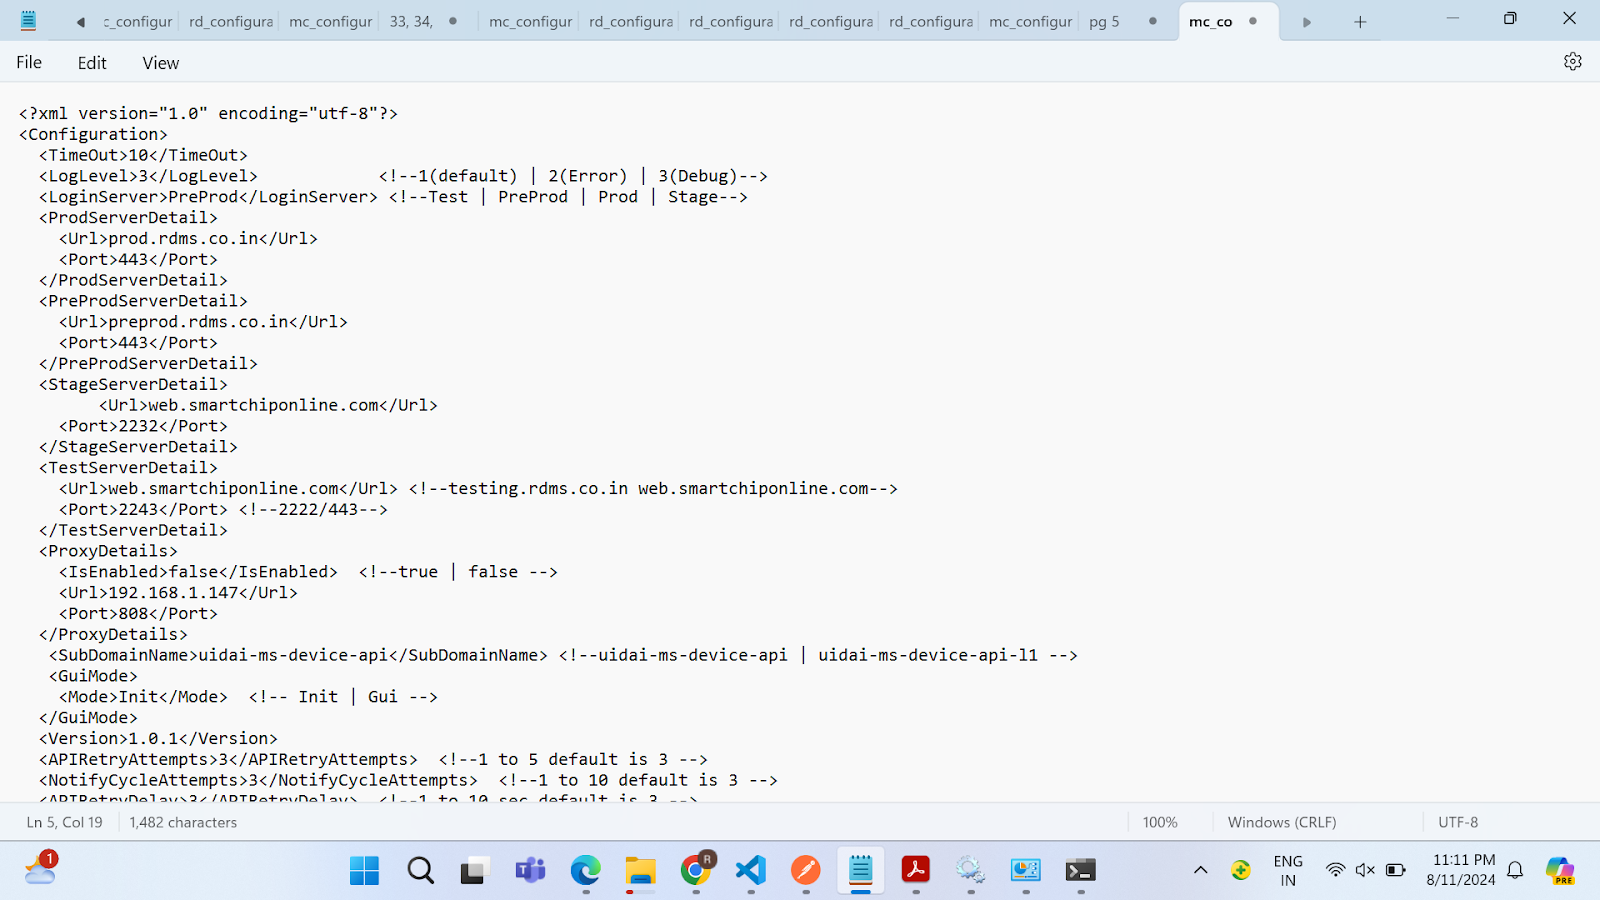
**Step 18:&#x20;**&#x43;hange the \<LoginServer>Prod\</LoginServer> to \<LoginServer>PreProd\</LoginServer>. Click Ctrl+S to save the file.

![](https://lh7-rt.googleusercontent.com/docsz/AD_4nXe_89vIMcchocUIWDdNyQeZPQ5XbsaZLWNyGLT2v_rGANWV4_QPZ_JPC4MQkhBs_OK7fVv16LZrzNrV8sAjzF4jOOYReureNBAWNgjSuvTXSO67S5ZfZjOA5sa_J0QoE8A3iEqoLDu3mSfMC0gJvwtz1UA?key=_0Cba4i6TK5v38ucsScutA)

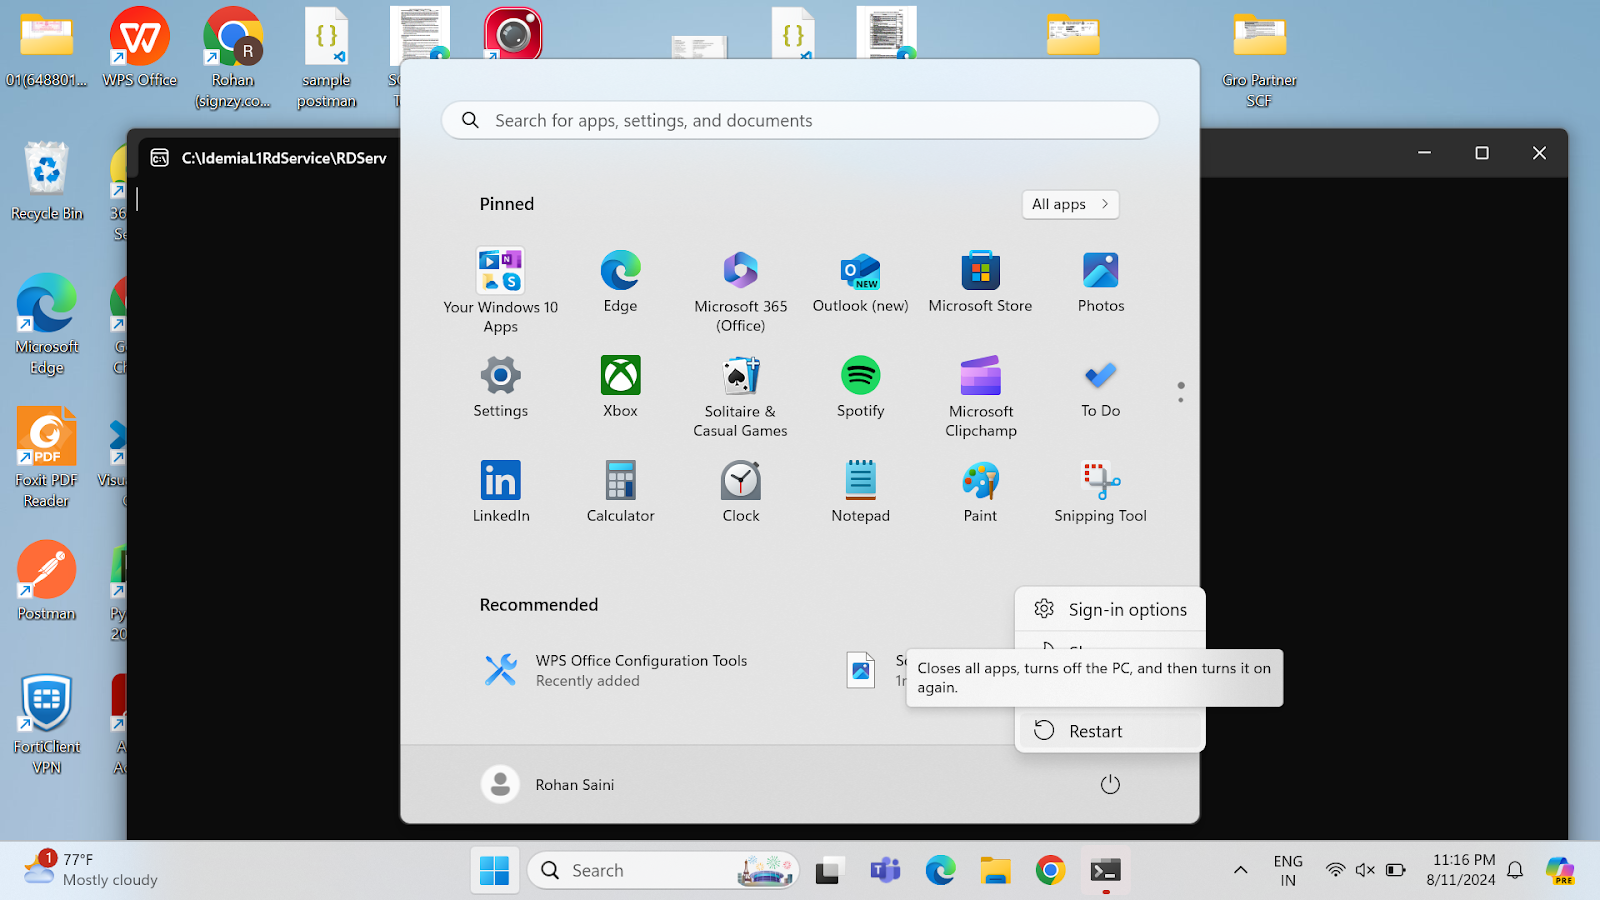
**Step 19:&#x20;**&#x43;lick on the Windows icon from the taskbar and “Restart” the system.
![](https://lh7-rt.googleusercontent.com/docsz/AD_4nXcGCvfwvEcnEU6lk7JyjOPciMzqB8E_zoif3RyxaS2qMKVrmJUy3ArNrM7lYpK7JHTiP5RkZ5nlB9-pqnz18Y2e1El4pdr6hUIWWpj0WmTeOETSslnDXvpg6lRx5iFft5iars3NhK5HEOZtlGu5yPvoWVML?key=_0Cba4i6TK5v38ucsScutA)

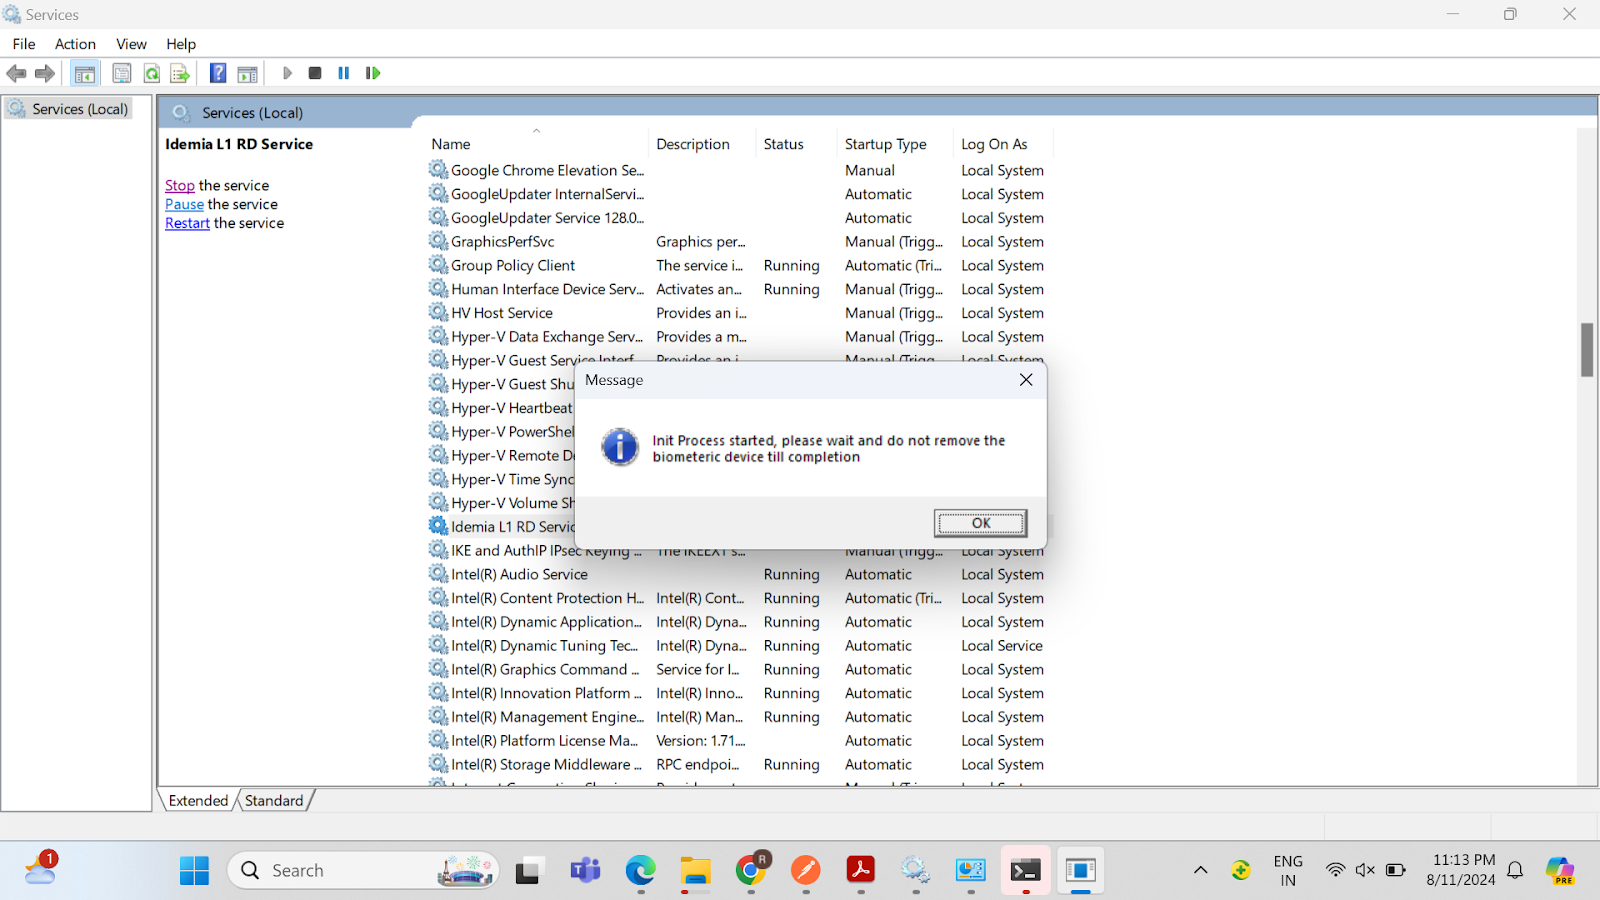
**Step 20:&#x20;**&#x4F;nce the system restarted. Insert the IDEMIA Morpho L1 device into the system. Please wait for a few seconds. A message will appear on the screen stating “ Init Process started”.  
![](https://lh7-rt.googleusercontent.com/docsz/AD_4nXdfihTSOd8FoAQyJhJd-CQXPwBXa5XfDVZIG5r1yXEs8LOailegmZHYK5PwEXUq26ZklC-a9iAT-KfhTwkS00hqBSRDpgD6kdvP-Em1ANX1wyk73X3l1rP_XNR0Q_SaeI2RzDy6b3x47kW4HefbILsmEXaK?key=_0Cba4i6TK5v38ucsScutA)

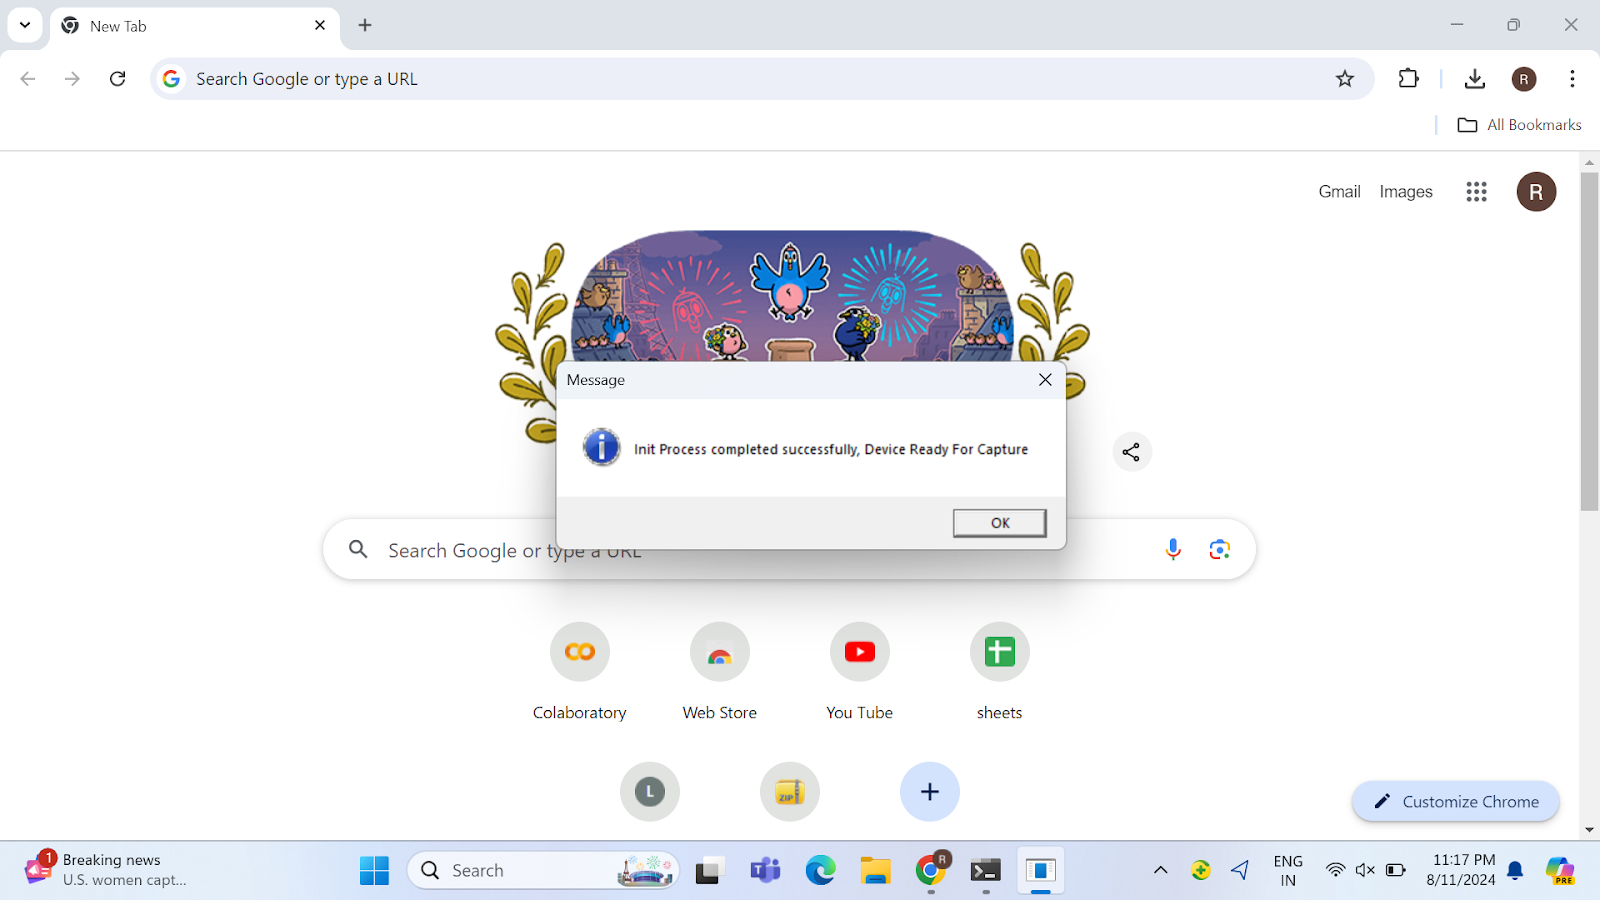
**Step 21:&#x20;**&#x4F;nce the Int Process is completed. A confirmation message will appear stating “Device Ready to use”. Click on the “OK” button.
![](https://lh7-rt.googleusercontent.com/docsz/AD_4nXcFCCchR7oAxo2cEFdkb7mQzTxZPNoP-ftAelz3D9Bn7G7jmrZGLCW4rVVhc6_36iWuqEu5pZMSgM5XWCB4UCS7sZssMW--mjPOGS5yBbggTRbLjXLxQPsgMlHbeqGeKUfj4hU9is4OKIyMy8c6nOu17B4c?key=_0Cba4i6TK5v38ucsScutA)

**Step 22:&#x20;**&#x4E;avigate to the signing link sent to the signer’s email (provided while initiating the contract).

![Signing URL Email](https://lh7-rt.googleusercontent.com/docsz/AD_4nXd62WBQ7eQBHk0fm5exiNqk1kc2TafBwtKq0cT2ovPR6ayuuY4zP5mW0VMEAdIzLtmrmUornVkxkjHmTeFmZPr0u02QmPaK8HHo3y9vFqofXvOnJIhmg7XiBKMJUtvGDN-M8HtaIcZJAdyHG_5_179MKmE?key=RMS7mIdPO_86hILBTujSbA)

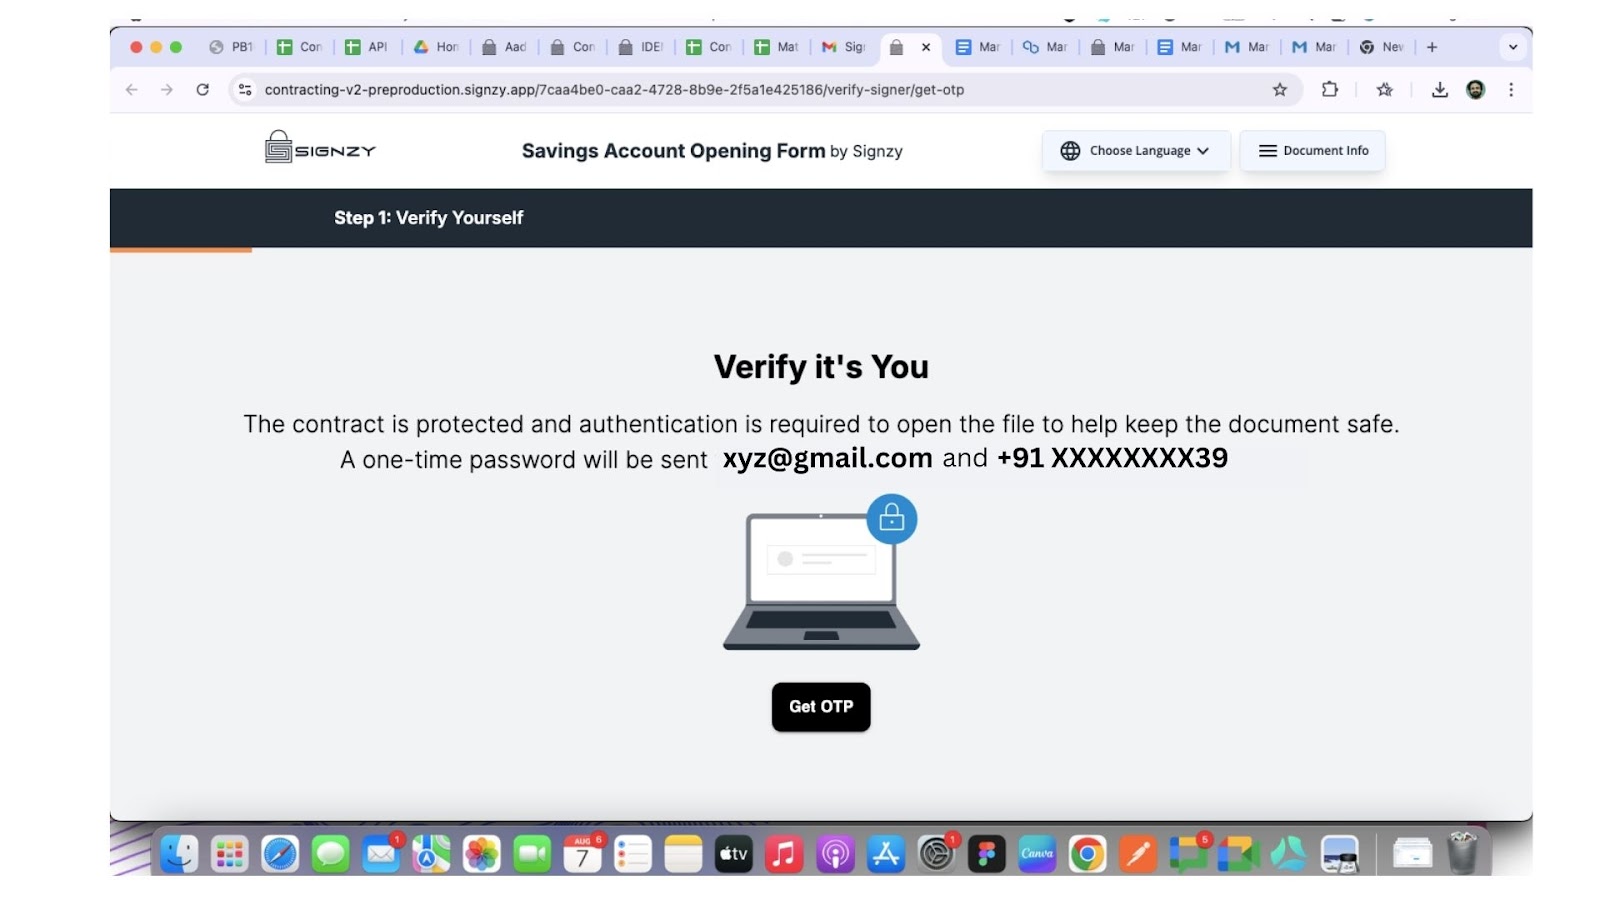
**Step 23:&#x20;**&#x54;he pre-verification page will open, where the user needs to perform verification using a one-time OTP. Click on the “**Get OTP**” button.
![](https://lh7-rt.googleusercontent.com/docsz/AD_4nXeHMBPZSbnYcxuNiVx4CAPaShvsyHqSqqYEGxwigsNcI4Y0NjLFfhw6DirfqKEtDLM4w0A9pX2nW-QgJM7Z6csYls4XqVIYwwvAu0vqBDfaAH45bhDo6Ny1_uocCv0dfBTlb3tposXVxF_xKQJpy6LT9Ftu?key=_0Cba4i6TK5v38ucsScutA)

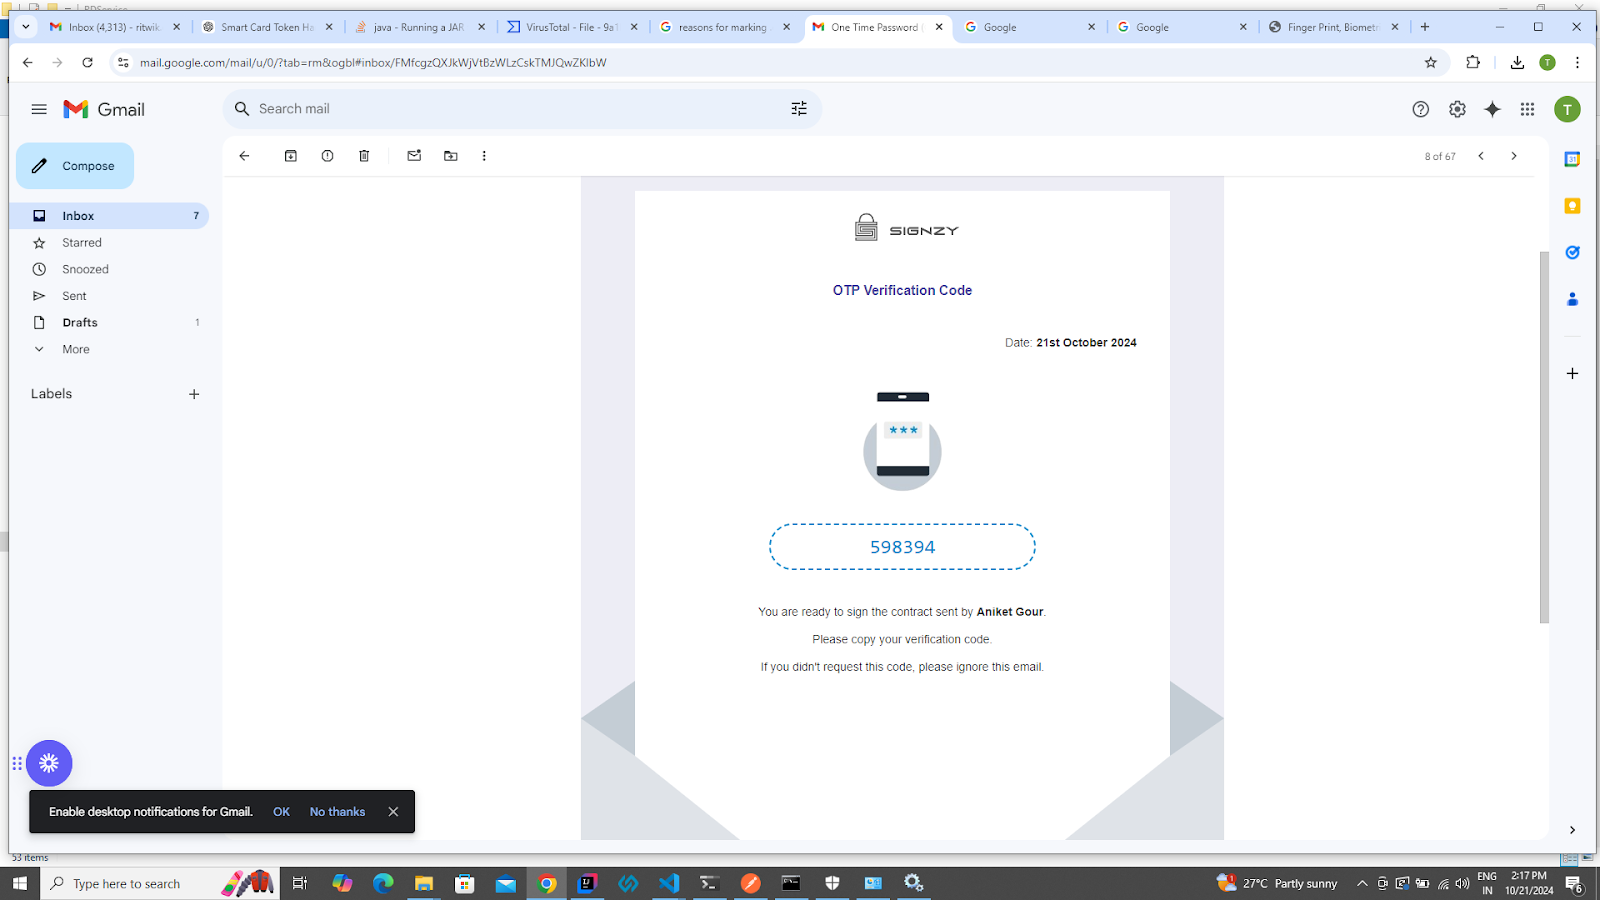
**Step 24:&#x20;**&#x54;he user will receive the OTP on the email provided during contract initiation.
![OTP Email](https://lh7-rt.googleusercontent.com/docsz/AD_4nXdPot_aClS47y9220Y71dc2rNMEx4J3XL7QOwmqFfKcnd9tCeAJTCYHQKhwJsXpD0_kWjjFRzKUk3ZqztHSMYCUeJd-3GtfE6t0EnMlwiKsrTmolpXwcburdNEzPCPyO79wQT4tz4mgM10Nfewdsm3_nt98?key=RMS7mIdPO_86hILBTujSbA)

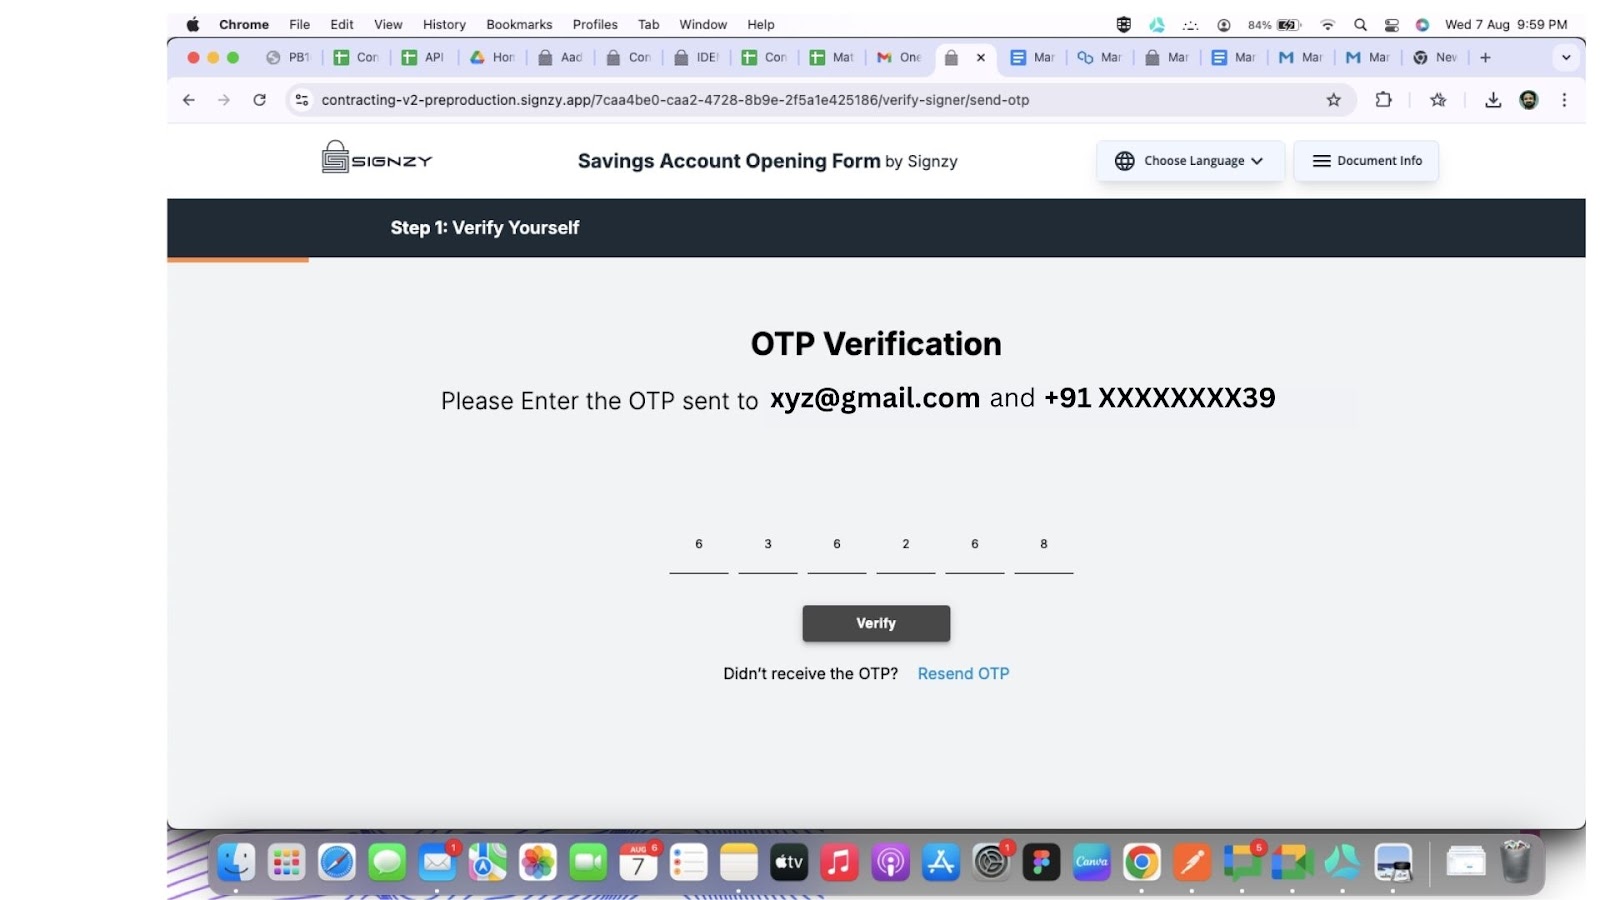
**Step 25:&#x20;**&#x45;nter the OTP received via email and click on the “Verify” button.
![](https://lh7-rt.googleusercontent.com/docsz/AD_4nXc99BNIH_q2535jGBX-XWmRxlCN7Eh5pZ6BXAZ-tsFJyzYoKpGL_CxEEvzVuhBafPs35lpvbKiTEiPz_ZGrOzaEqQLTN2U8S9Q2CgTURS58O3D2ITsGR5uIqaeGPu-aWBmic3V2F8uPQdRuzzmOT7TYO5Lt?key=_0Cba4i6TK5v38ucsScutA)

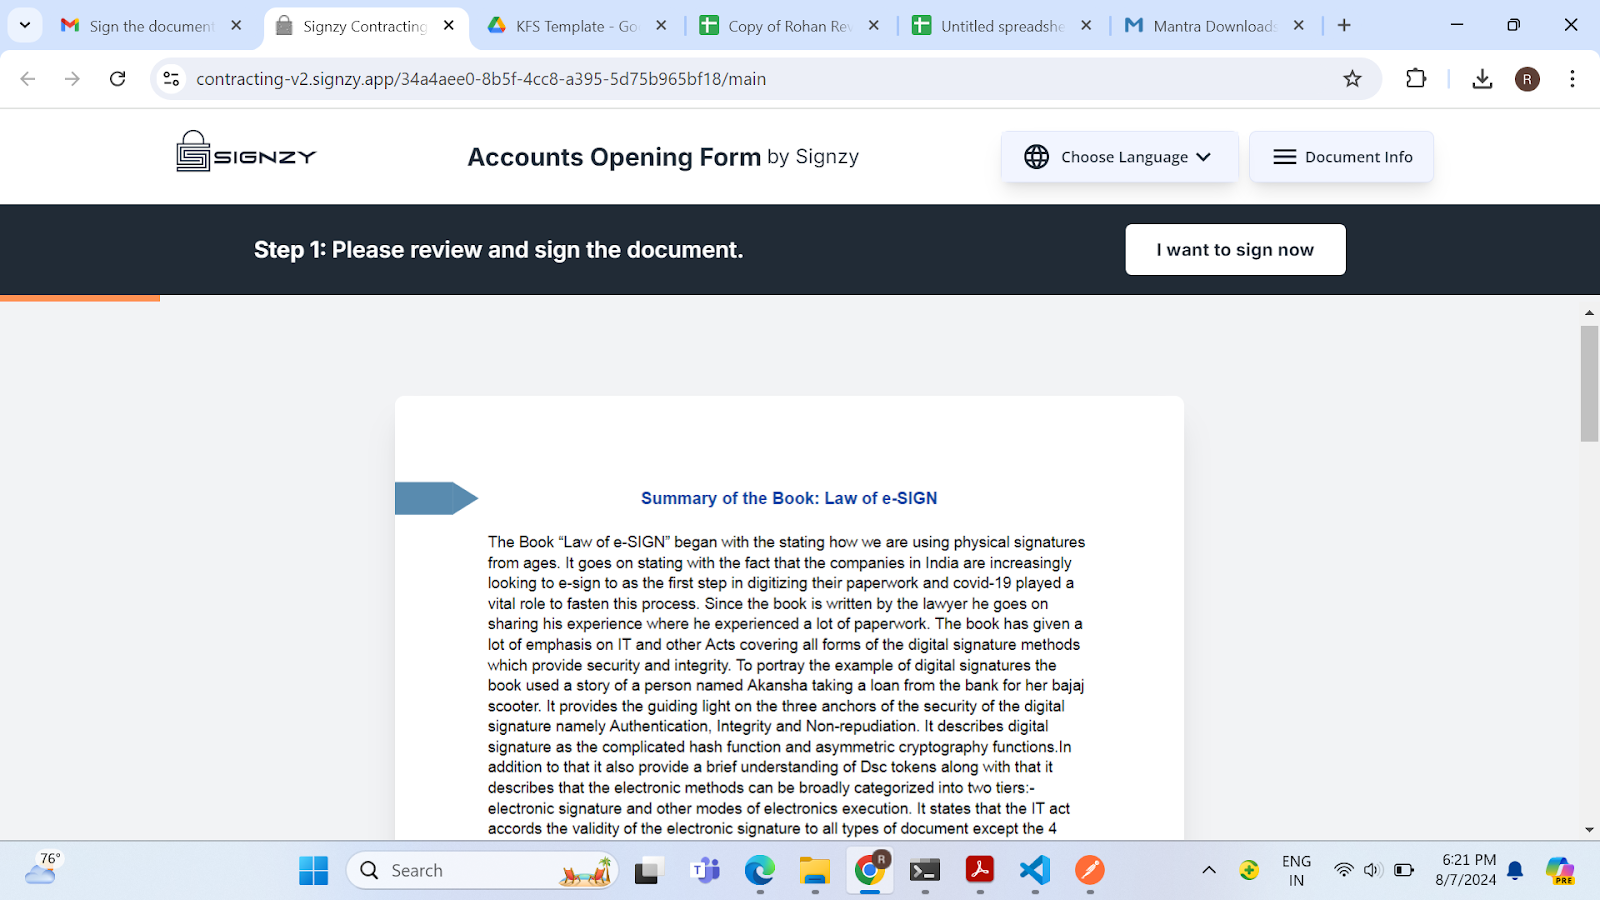
**Step 26:&#x20;**&#x55;pon successful verification, the user will land on the contract page. Click on the “I want to sign” button to proceed.
![](https://lh7-rt.googleusercontent.com/docsz/AD_4nXeI-ated5lYMgO2dNmfjVu4VovHBKSwZdqKNd3K4pl0qWymZ1civmM-kO1UjhUhS8prmD9wQmf9DjpRsPAiq0dIc3WFD56u-0dquaEG1rTWJWMcszpa_azggjOwJO2mXd9KxGM3kmI1_R6f66rgwFwPPA6u?key=_0Cba4i6TK5v38ucsScutA)

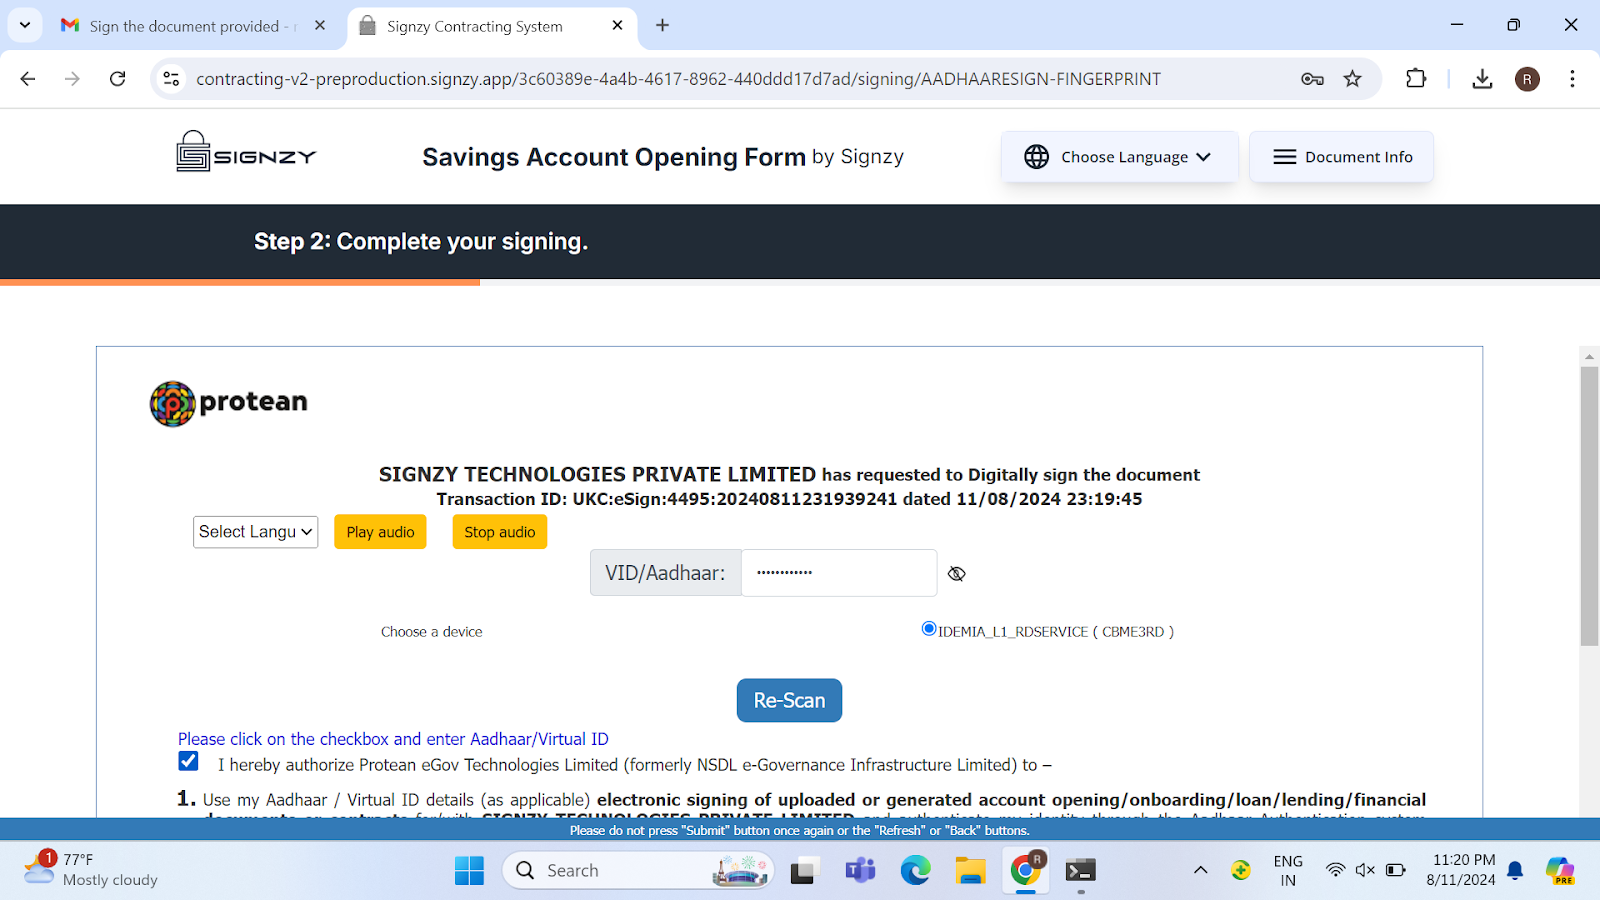
**Step 27:&#x20;**&#x54;he NSDL interface will open. Fill in the Aadhaar Number. The device is automatically detected. Select the device “IDEMIA\_L1\_RDSERVICE(CBME3RD)”.
![](https://lh7-rt.googleusercontent.com/docsz/AD_4nXeH10TOe-yy1amJKEfWAQKR2gzKMHNznbPQR5MO3jatrwuYa-wzn-0iAdvH-ty7Rn0Nt4Llgcwl7ze1DxKjs0gs9w-fvnSL_a3lMR6IpiBPPulevlPVvDiwGGC-Vbo51WFxjqs8OzrNSyf8FxPjFuuCKmHy?key=_0Cba4i6TK5v38ucsScutA)

**Step 28: Tick** the consent box. Click on the “**capture”** button to perform the signing.

![NSDL Interface](https://api.archbee.com/api/optimize/qSNGjc2nDdmTfGm_rfzKG-3a5s7FDoKZrVCbJ_ItuNs-20240811-200351.png)

**Step 29:&#x20;**&#x41;n embedded message will be displayed. Click the “**OK**” button.

![NSDL Interface](https://api.archbee.com/api/optimize/qSNGjc2nDdmTfGm_rfzKG-60sOS5dKuzwiJeh5ZjJUM-20240811-200448.png)

**Step 30: Place your finger** firmly on the device. The finger will be automatically captured and a notification will appear stating “FINGER\_OK”. Click the “**OK**” button.

![NSDL Interface](https://api.archbee.com/api/optimize/qSNGjc2nDdmTfGm_rfzKG-eXadK3yNJ-2uZr1xKfyPm-20240812-044818.png)

**Step 31:&#x20;**&#x41;n embedded confirmation page will appear with a confirmation message stating “Finger Captured Successfully”. Click the "**OK**" button.

![NSDL Interface](https://api.archbee.com/api/optimize/qSNGjc2nDdmTfGm_rfzKG-1H_3JhHLQpnR-Ntyw0tFU-20240812-044923.png)

**Step 32:&#x20;**&#x54;he user will be automatically redirected to the signed contract where they can see their signature affixed to it. Click on “**Done**” to complete the signing process.

![Contract Page](https://api.archbee.com/api/optimize/qSNGjc2nDdmTfGm_rfzKG-gPbiPAn51VYXpdijEpluZ-20240811-135819.png)

**Step 33:&#x20;**&#x54;he user will see the Success page and can click on the “**Great**” button or be redirected to the success URL set by the contract initiator after 5 seconds.

![Success Page](https://api.archbee.com/api/optimize/qSNGjc2nDdmTfGm_rfzKG-0RHDGCnTFe1A4iFtyC9St-20240807-173201.png)

**Step 34: &#x20;**&#x54;he user will receive a confirmation email with the header “**Confirmation of signing the document**,” containing the signed contract.

![Contract Signing Confirmation Email](https://lh7-rt.googleusercontent.com/docsz/AD_4nXetZdxbJGY-p8jGGuvzcGxYTPXKRCptTFPRqNAjht-nupDwinTkaYkjC2m-4NpCrx-a1OjnVqLiiUQnWiMdFAiT7q1MYVPoR1MPWrAQ4a59vUaoC4gpFs8nj5ksPh752NN8-hReJdMP8XNsNYRtyccRWHsL?key=RMS7mIdPO_86hILBTujSbA)

**Step 35:&#x20;**&#x4F;nce all signers have signed the contract, the user will receive another email with the header “Your document signing has been finalized successfully,” containing th&#x65;**&#x20;final signed contract&#x20;**&#x61;nd th&#x65;**&#x20;Audit Trail Certificate**.

![Audit trail Email](https://lh7-rt.googleusercontent.com/docsz/AD_4nXdvL9AmFfDa_BRSMGlTOYsZwtFPfSmkH-5cgCd5JlQTzDnPFTvqBE1RkxtSwOSdrtz_VkFOIkGiA_6riwfhvebsSV6CayyQVlswk6QxXScKYh_sUhAdMzRQMHgnQugNvDQo67ttiTR2en14OG2jyh5w3UnT?key=RMS7mIdPO_86hILBTujSbA)